
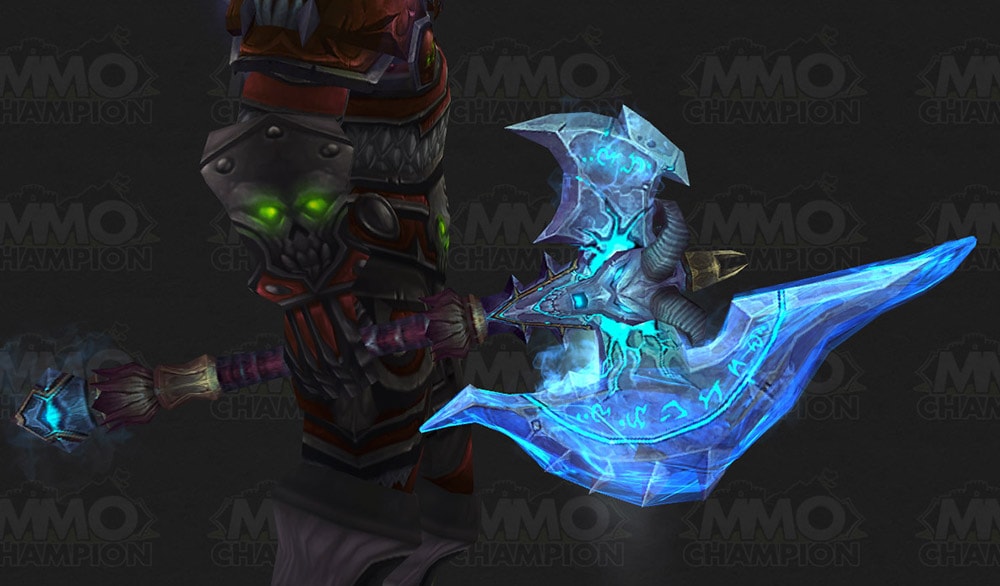
While making costumes is super fun, I especially enjoy building cool looking things in general. One of these “things” was actually the legendary axe “Shadowmourne” from World of Warcraft which always made me wonder how it would look in real life. Also it was just faster to build it in my workshop in just a few weeks instead of farming it in-game for months, ha ha!
Note: Before following the making of Shadowmourne it’s a good idea to watch my video on Youtube. It was quite hard to film AND photograph every single step, so it’s easier to understand everything by checking out both! Thanks!

By loading the video, you agree to YouTube’s privacy policy.
Learn more
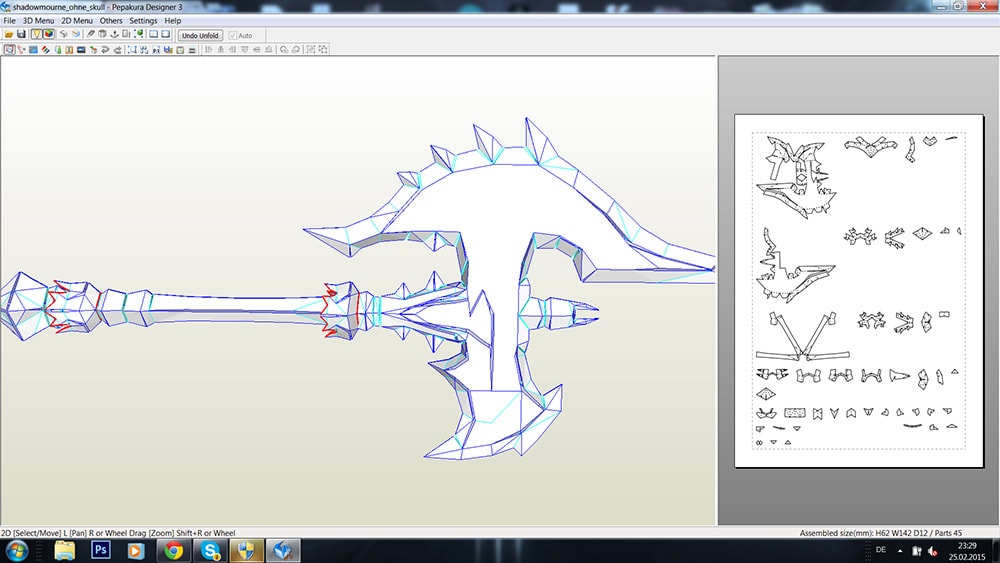
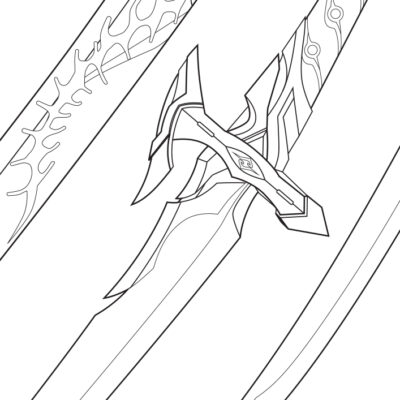
For the base I exported the original WoW 3D file with the WoW Modelviewer to a program called Pepakura Designer. This little tool allows you to edit and lay out a 3D model and print the surfaces out on paper. To make everything a bit more simple I asked a friend to get rid of the skull on the back and front of the axe.
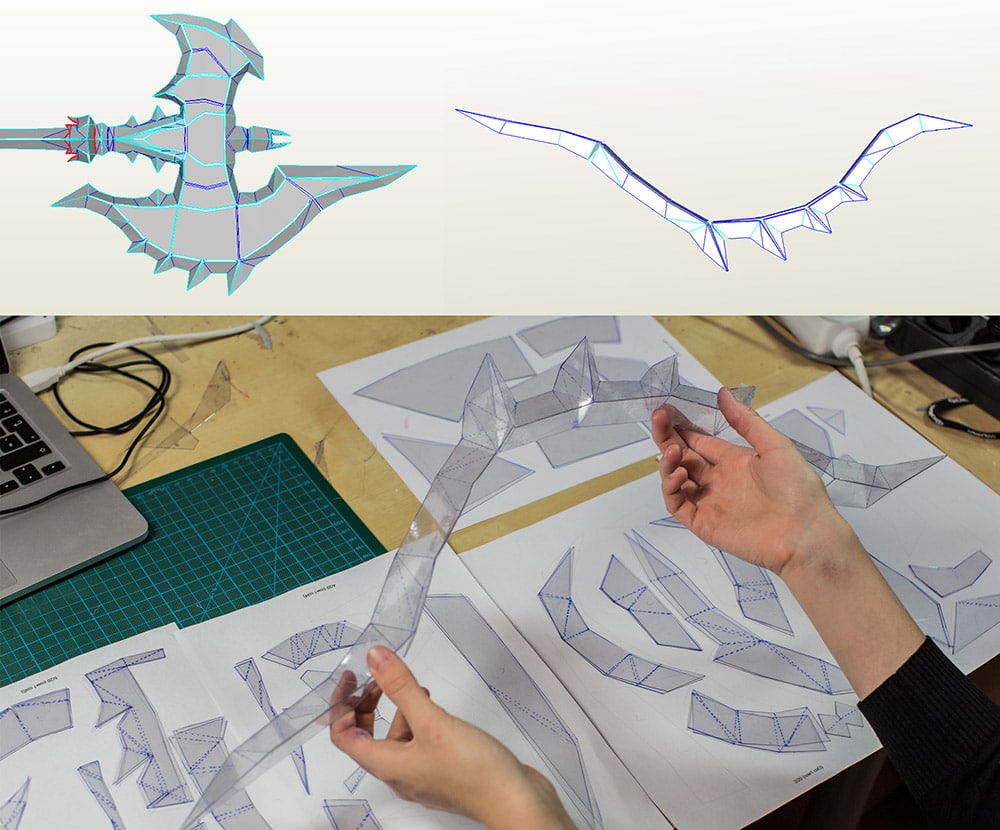
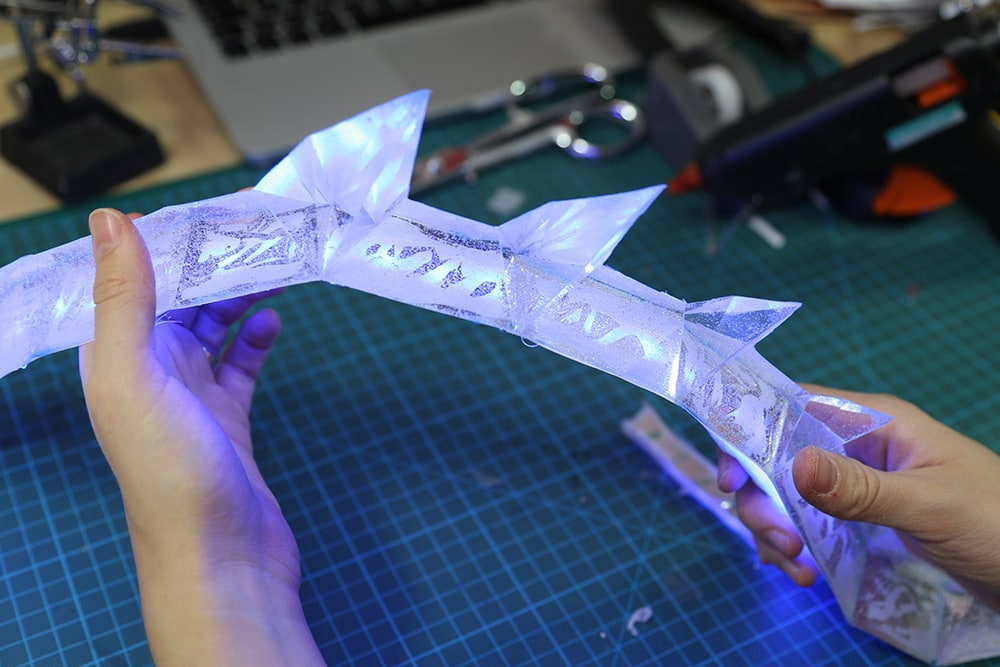
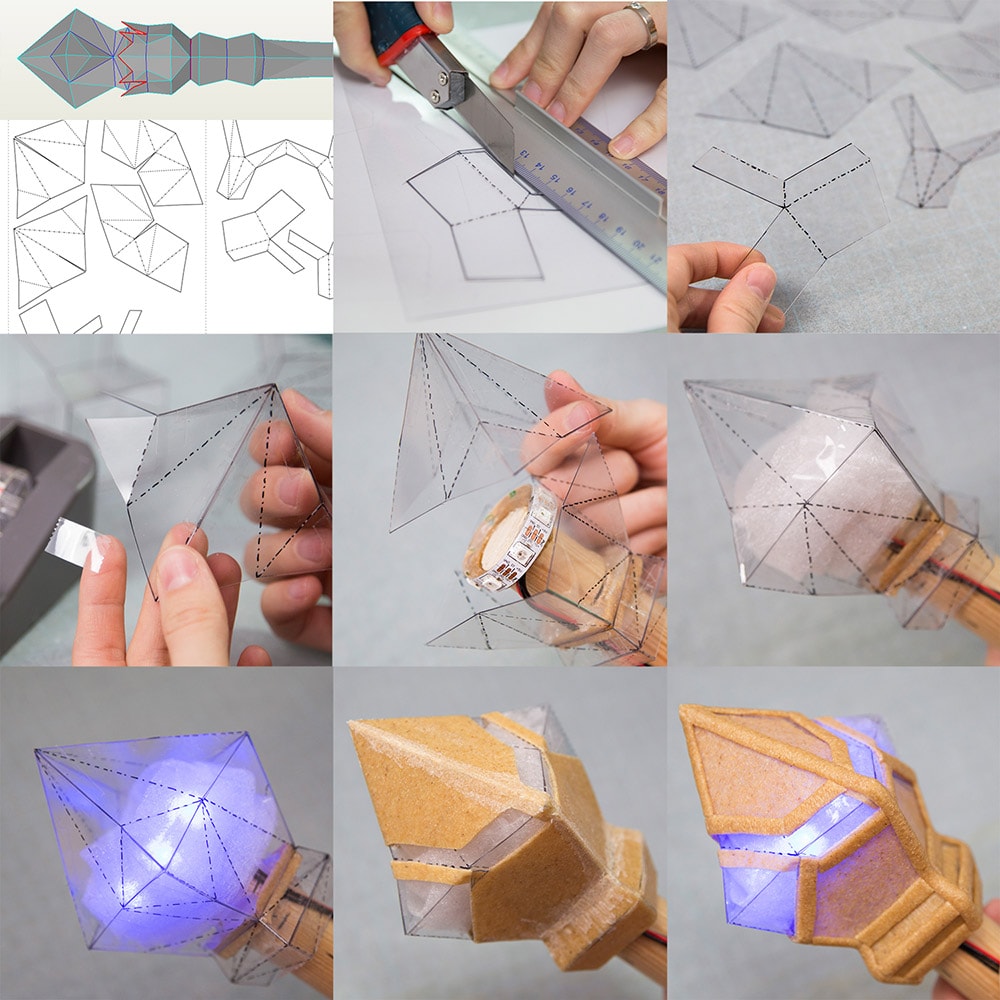
I usually prefer to start with the most difficult part of a prop – in this case the front blade, which I wanted to completely illuminate. So I printed out the model (isolated it from the rest of the axe first in a 3D program) and transferred the pattern to a 2mm thin translucent PVC foil. To glue all parts together, I used simply some translucent tape.
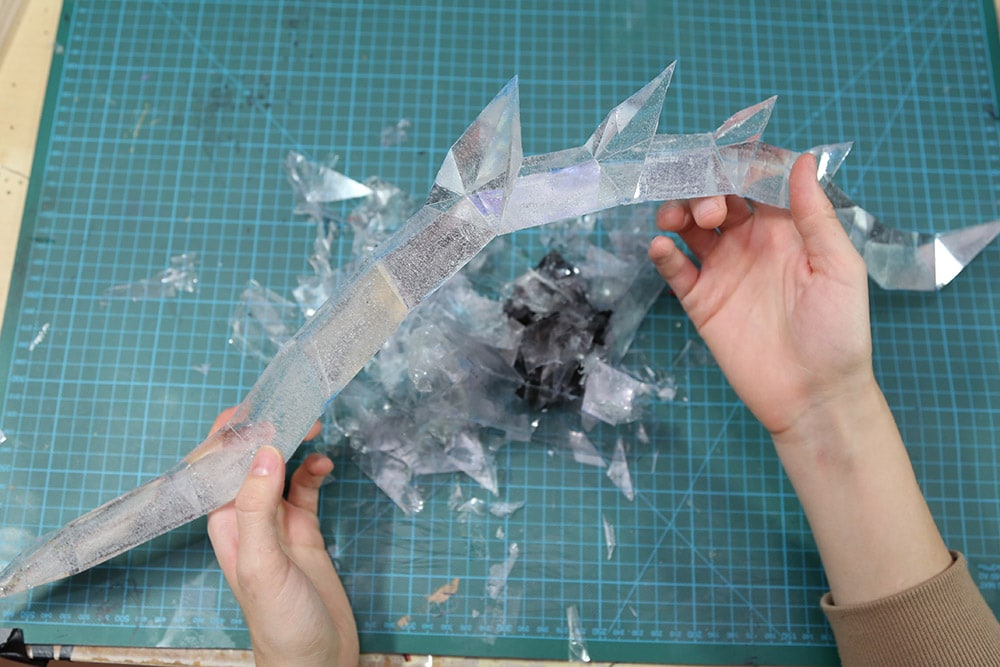
The build was super wobbly and sensitive but strong enough to be filled with some clear resin. Since I don’t own a pressure chamber the resin cured out with countless tiny air bubbles in it, but I guess this look fits pretty nice for the frosty design of Shadowmourne.
Afterwards I simply glued some paper to the back to spread the upcoming LED light better. Then I wrapped over half a meter of LED strip in packing material and just hot glued it on the back of the blade. The result of this really simple work looked pretty nice already!
Btw: If you also want to add some lights in your projects, check out my LED book for some helpful tutorials!
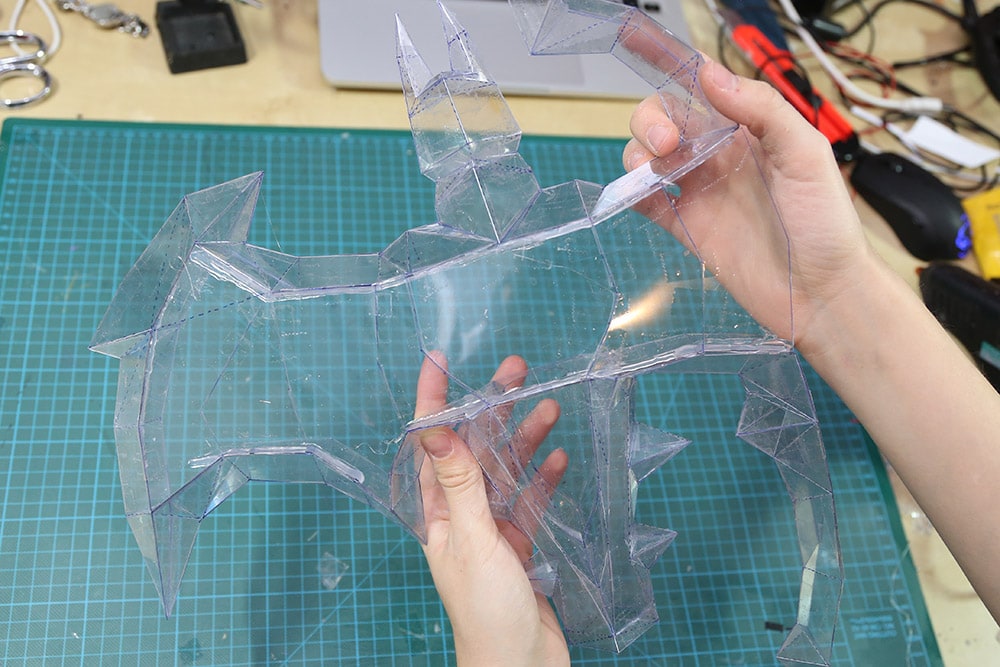
Now it was time to build the rest of Shadowmourne. While the blade was pretty easy to set together however, the head of the axe cost me quite some time. The result was again very fragile and I had to be very careful when holding it in my hands. Since the axe had to be hollow and translucent, this was the best solution I found for that job.
Well, and this was actually the core: I attached around 1 m of LED strip on both sides to a piece of lightweight balsa wood which fit perfectly into the hollow axe. The blue thing you see is actually a LiPo battery which was supposed to be the power source of the whole circuit.

To get rid of the light dots of my LEDs I put a couple of layers of packing material over them. I sadly have no idea how this stuff is called, but I hope this picture helps you to find it out. It’s really nice to spread light in general and I used it for many of my LED projects already.
And this was actually the first light test! Way too flashy but still cool.
The circuit was still pretty huge and ran on a standard Arduino Uno , a bread board and far too many long wires. It was just a simple test of how the lights would actually turn out, but the animation looked awesome already and I was very excited to finish this project! At this point a big shout out my friend Jon McPhalen who was in charge of all the coding! I tried to edit the code myself several times, but I just don’t have enough experience to write my own code yet. Hopefully soon! :)
(If you check out the website of Adafruit.com you’ll notice they have not only amazing products for projects like these, but also offer a complete code you can directly upload and work with it. So no need to program anything at all! In addition they have amazing and easy tutorials and teach you everything you need to know about LED strips![]() !)
!)

So here is the final build: The giant Arduino Uno was replaced by an Adafruit Pro Trinket 5V![]() , the power source of a 6600 mAh LiPo battery got a PowerBoost 500c
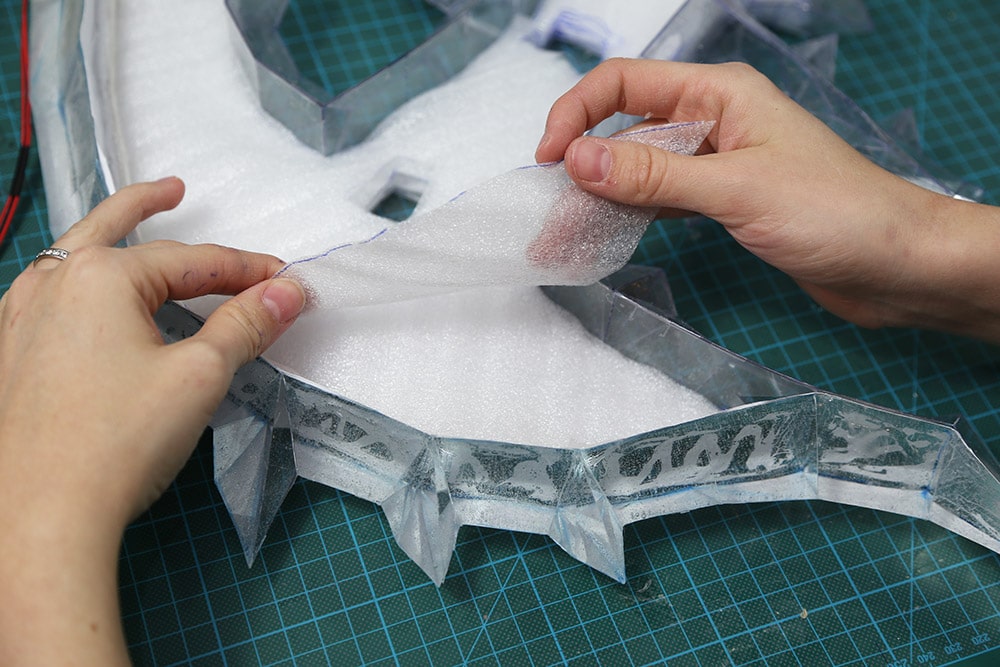
, the power source of a 6600 mAh LiPo battery got a PowerBoost 500c![]() for charging and a tiny switch turned the lights on and off. To stabilize the super thin foil shell I added pillars out of balsa wood in between. On those I’ve placed the LED strip
for charging and a tiny switch turned the lights on and off. To stabilize the super thin foil shell I added pillars out of balsa wood in between. On those I’ve placed the LED strip![]() core and covered it from both sides with several layers of packing material to spread the light very evenly. In total I installed around 4 meters of LED strip
core and covered it from both sides with several layers of packing material to spread the light very evenly. In total I installed around 4 meters of LED strip![]() with around 240 single LEDs on it. Everything was super professionally covered in tape and hot glue!
with around 240 single LEDs on it. Everything was super professionally covered in tape and hot glue!
Again, just watch the video above to understand everything a little bit better! :)

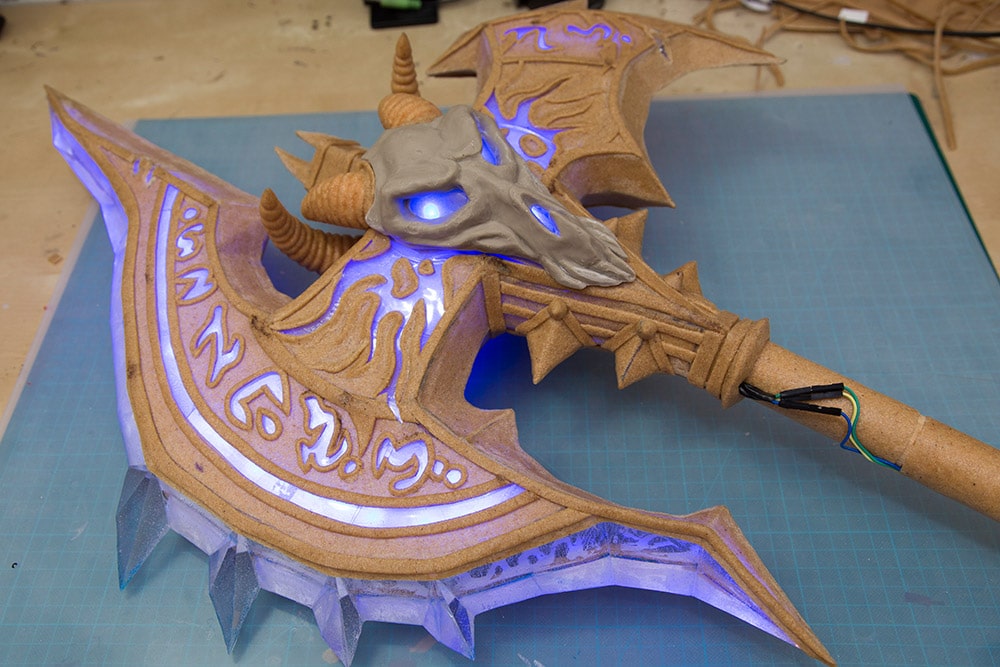
The circuit worked and the build was finally ready for the next step: Worbla ! By adding the material at the right places and cutting the runes out, I finally was able to create the light effect I had in my mind for the whole time. The axe should light up evenly from it’s core instead of having just a few blinky LEDs here and there. So I grabbed again my Pepakura patterns, transferred them now to Worbla and carefully covered almost the whole prop with it.
Since I was still busy with the axe itself, Benni decided to play around with some Super Sculpy for the skulls. Afterwards I covered the sculpt with Mold Max 30![]() from Smooth-On and brushed some Shell Shock into the mold. I dremeled
from Smooth-On and brushed some Shell Shock into the mold. I dremeled![]() out the eyes and the base of the horns and filled the hollow sculpt with additional LEDs and wires.
out the eyes and the base of the horns and filled the hollow sculpt with additional LEDs and wires.
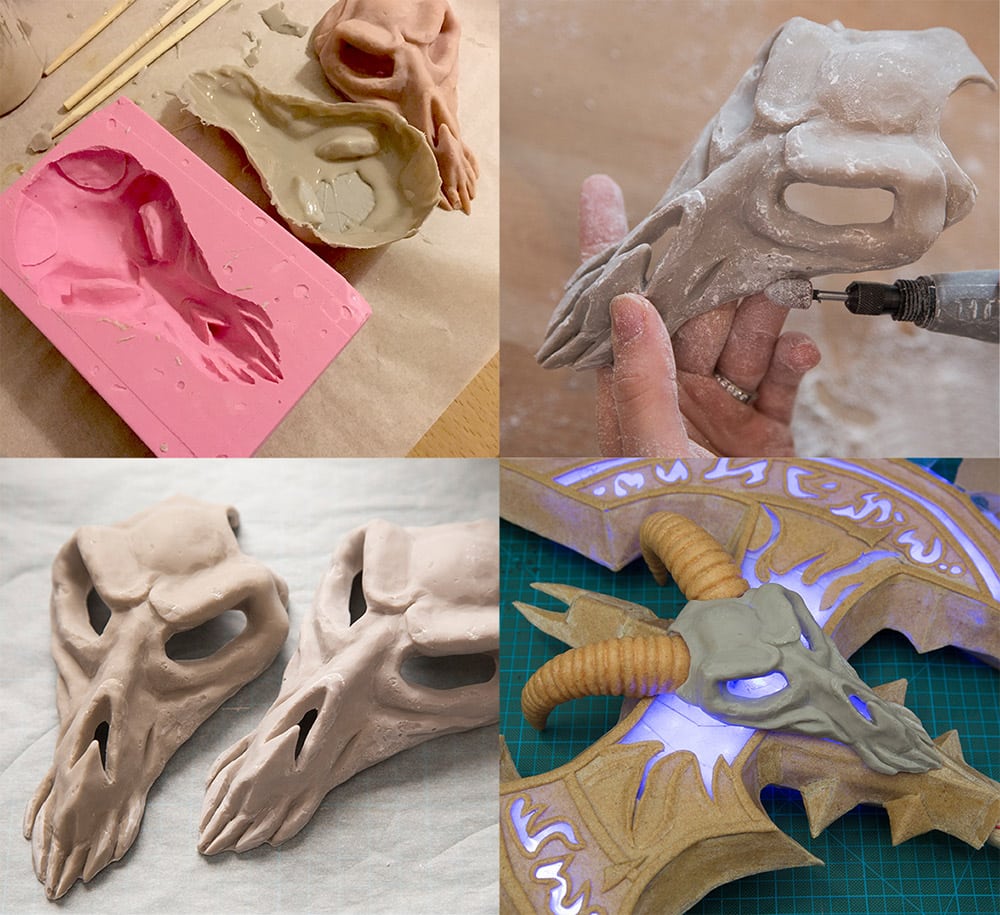
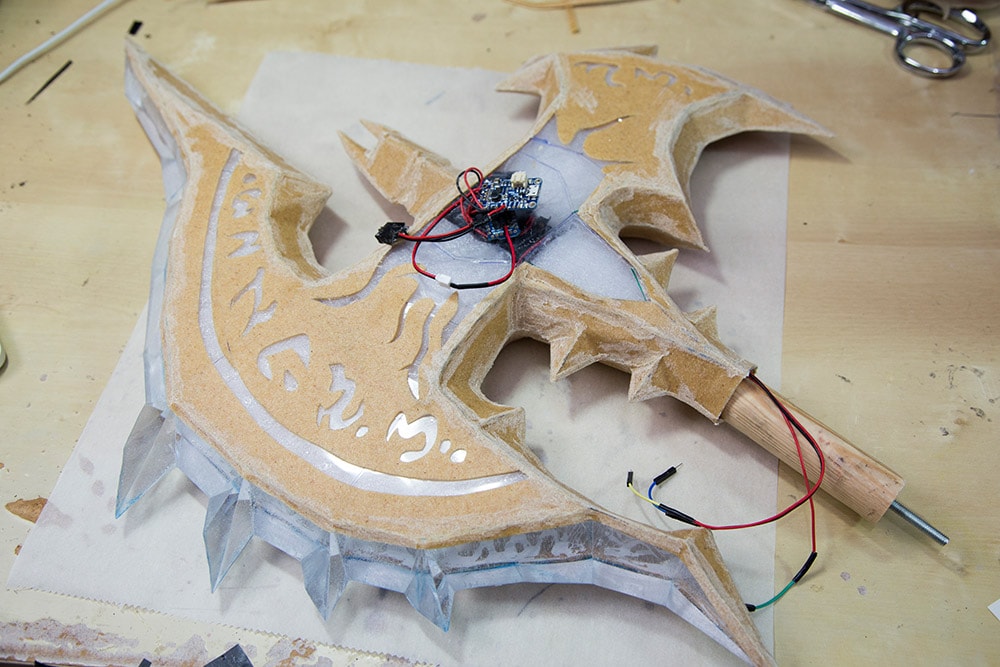
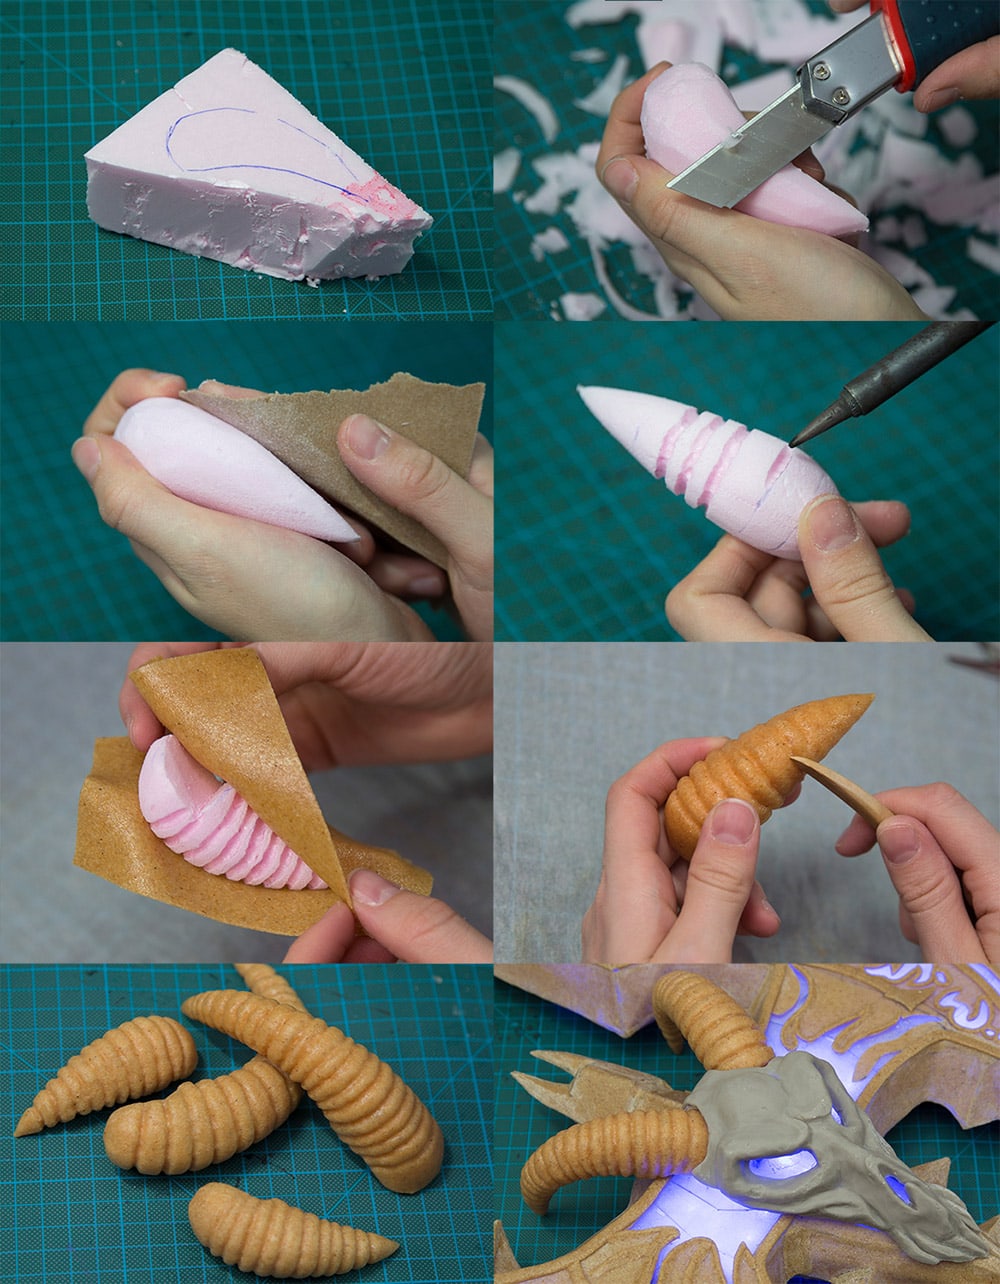
To create the horns I grabbed a piece of pink insulation foam, carved, sanded and burned it into shape and covered the fragile material then with Worbla for more durability. It required just a little bit of heat to attach both horn pairs to the axe. While I attached the skull on one side permanently with a bunch of hot glue, I used magnets for the other side. This removable piece “hid” the main circuit inside and here I was also able to turn the lights on and off and charge the battery via USB.
After adding all details as well as both skulls the axe was finally ready for the paint job! As you notice there were still some wires visible. For a comfortable transportation I separated the head from the bottom and so I had to add connection plugs for the circuit to the end of the axe.
To better understand the building process of Shadowmourne, I also made a simple making-off for the bottom part. Hopefully this gives you a better perspective of the foil was well as the packing material I used. Building this stuff was actually really easy and fun and I would totally love it to try my skills on another cool prop! I love lit up weapons!
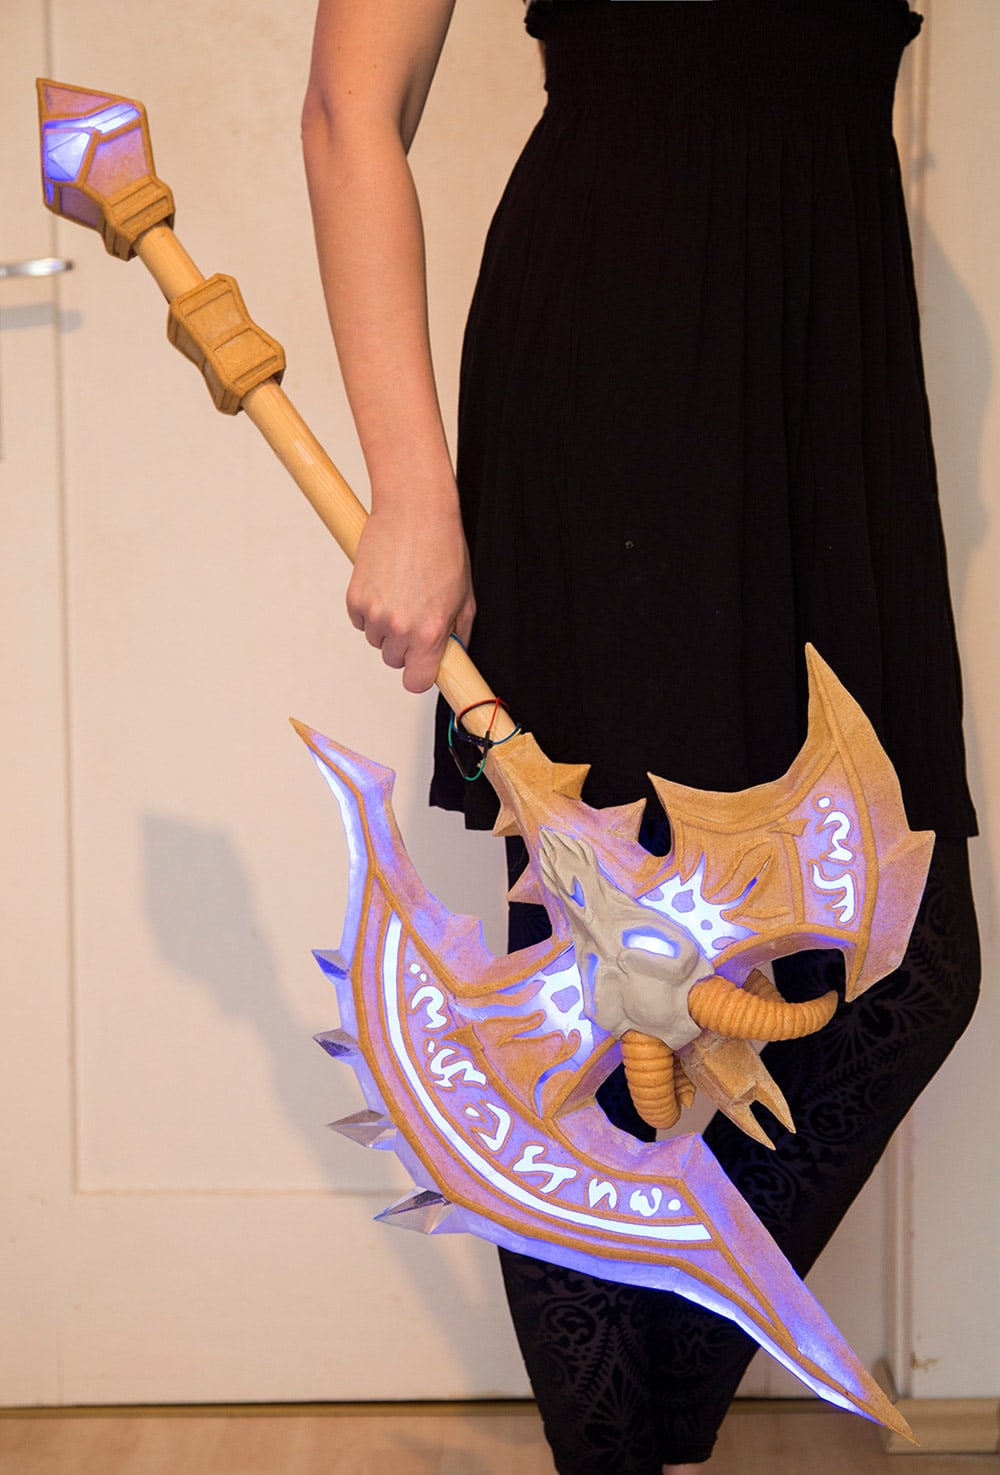
And here is a size comparison! Like I said, I wanted to be able to bring Shadowmourne to conventions and actually show it to people. It’s nice to build something cool, but it’s a shame if nobody can see it in person, right? So I limited the measurements to my suitcase and built the axe with only 70% of it’s original size. It turned from 2-hand to 1-hand, but I still was very excited about the look!
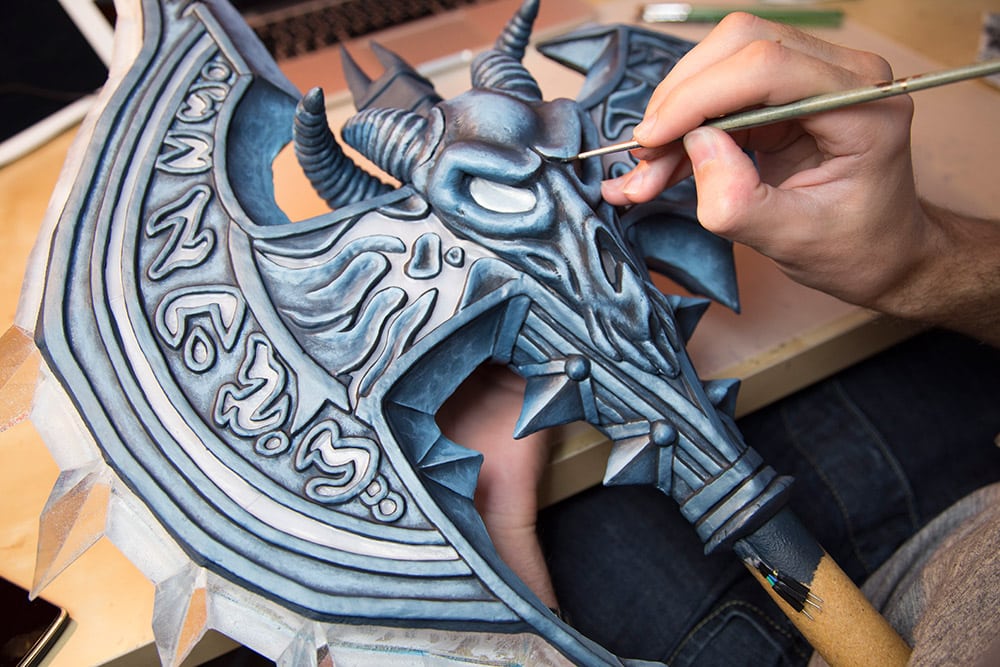
For the paint job I asked my lovely husband again. After priming with around 7 layers of wood glue (Elmers’s glue![]() works as well), he used simple Acrylics . Then he added different shades of grey (not 50!) and blue by hand. Since the reference is very colorful and cartoonish – just what I love about the design of WoW most – he added strong contrasts for lights and shadows. For the icy look of the transparent parts he covered the plastic then with translucent blue nail polish. Shiny!
works as well), he used simple Acrylics . Then he added different shades of grey (not 50!) and blue by hand. Since the reference is very colorful and cartoonish – just what I love about the design of WoW most – he added strong contrasts for lights and shadows. For the icy look of the transparent parts he covered the plastic then with translucent blue nail polish. Shiny!
My Painting Book may also help you!
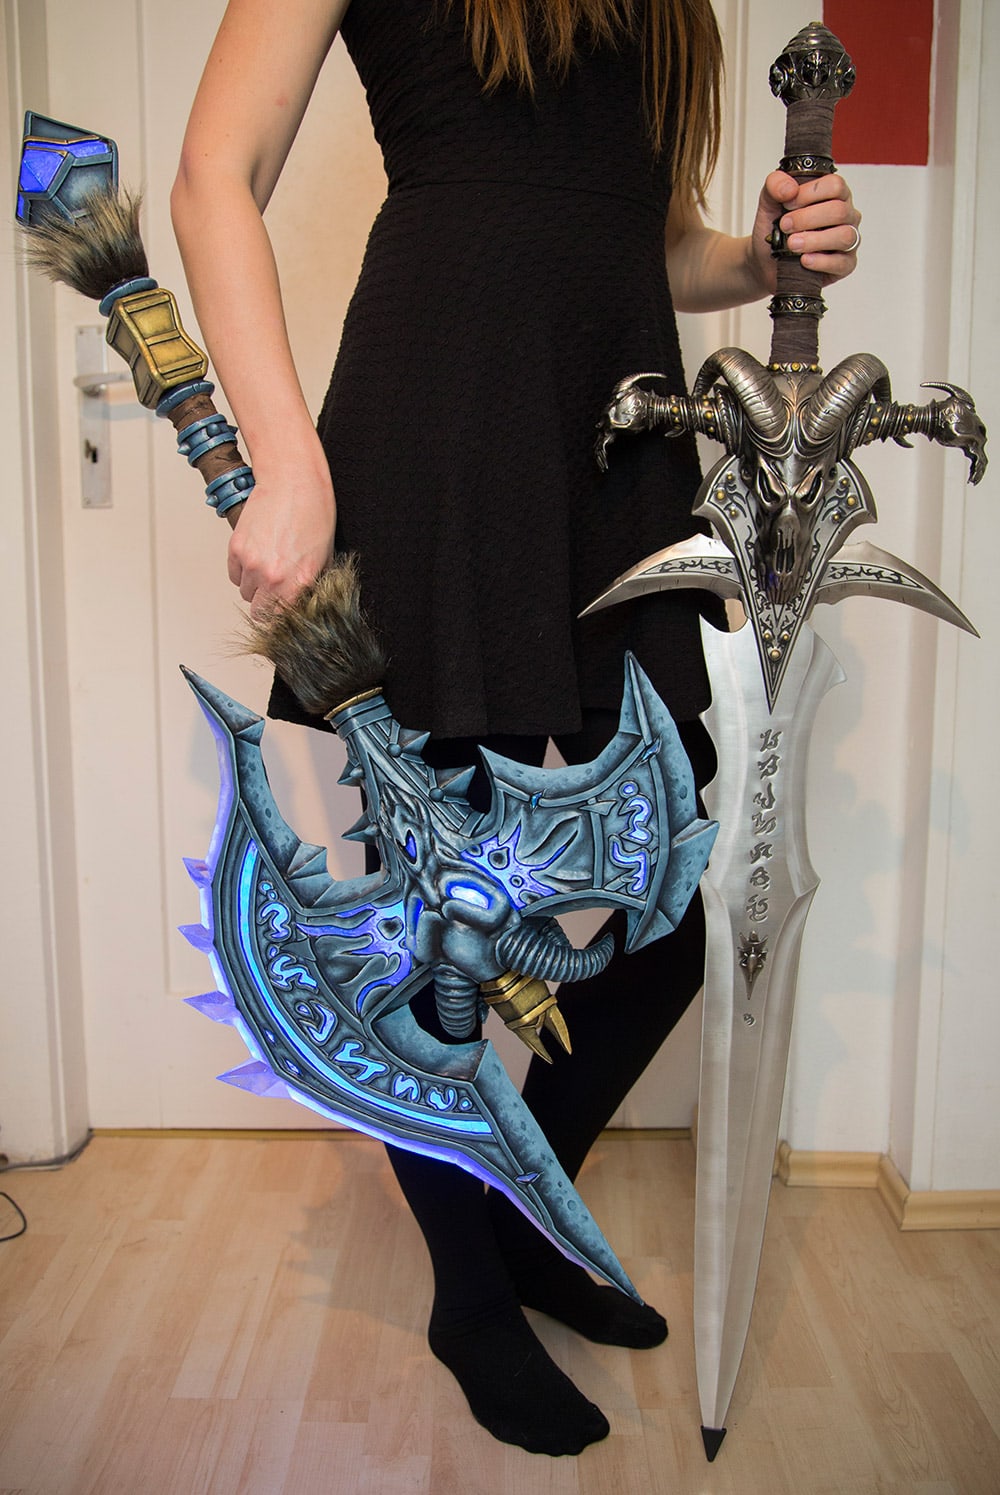
Well, and here is the final result! I don’t have a costume for Shadowmourne (yet!) so I’m just standing around in my floor and try to look cool, ha ha! Since I also own a replica from Frostmourne, I thought dual wielding wouldn’t be a bad idea. In total I worked around three weeks on Shadowmourne and it was one of the most exciting projects I ever finished. It was awesome to learn new things and experiment with different materials and techniques. In general I also really enjoy to play around with electronics and so I’m already to swing my soldering iron soon again!
We use Amazon Affiliate links. If you buy something we might get a small commission. Thanks for your support! Learn more.


So, did you create a completely closed off mould with the pvc foil that you then filled? I’m trying to work out how you cast the resin without it spilling over and out of the mould.
Yes but it still did spill everywhere…
Kamui,
Is there anyway to sell or make the mold that you used for the skull? or the finished pieces (unrefined if you like. I at least can dremel lol). I think with practice I could get the hang of the rest of this, but I cannot sculpt out that skull.
Could you contact me at gik__@hotmail.com. I’m unsure if you would be interested in making one yourself to sell. If so I would love to talk with you about it. If not i completely understand but would still love to chat with you when you have the time, this is absolutely the best shadowmourne replica I have ever seen, amazing work. Do you have any other replicas you have made? I’d love to see them.
what am i needed to make it please step by step
How I would have loved to see a glowing Frost..
Still an incredible effort on both pieces!
Wish I funds, skill & patience to make quality props like these (wouldn’t even know where to begin)
Sell one to me? ;u;
I love your work.
Needless to say more.
compliments!
Kiss
Ray
Hi you said you used 2mm translucent pvc foil, I’m having a hard time finding it, is there a site I can order that online? If so that be great!
could you link the 2-D cut out page please? I am having trouble using pepakura to get the model.
wow. Just amazing. I hope my prop turns out 1/10 as good as yours! Also, in the last photo, what’s the weapon in your left hand? Will you make a post about that one too? It looks incredible!
That’s frostmourne they’re both from WOW
I just had a question about using wood glue to smooth out your worbla work. I recently made a weapon and some armor using worbla and did about 6 or so coats of wood glue on it. When they were dry it seemed fairly smooth, but once I painted it (used spraypaint as a base), it looked absolutely awful and all the marks (like pin holes from popping air bubbles) revealed themselves and the smoothness was long gone. Does this happen with yours as well and Benni’s painting techniques just mask it really well? Is it the spray paint? I was really disappointed when all my hard work and time got ruined. I’m going to hope and try to chip off all of the glue and then start from scratch again, but wasn’t sure if it was something with the wood glue, spray paint or should I just go back to using gesso + sanding.
Would really appreciate any insight you may have! TY Kamui!
Hey Kim! Thanks for your message! It can indeed happen that you can still see the pin holes even after applying 6 coats of wood glue. But the surface itself should be smooth. Usually Benni uses thick acrylic paint and a brush to make the base color. This way it’s probably is a lot thicker than using spray paint so it only adds to the smoothness of the surface. If you are not satisfied with how it looks you can always just add more layers of wood glue on top of the paint and then paint over it again. No need to chip off all your work. Hope this helps a bit!
Svetlana
Holy crud. I’m trying to keep my language for decent company. . Anyway the whole point is that your WoW weapon looks amazing! So any other words I want to use but this one is the most polite. I saw it and wanted to run and wake my husband up to see it as well. But I’m going to just mail him a link so he can see when he gets up himself. You did awesome work and it is truly beautiful. The glow on it makes it look like you plucked it straight out of the game!
Where do you get the transparent foil?
Hey there! I actually bought it in a local crafting shop. You should be able to find it in every good crafting store!