
Monster Hunter World is one of my favorite games ever and I think Nergigante is super cute and it was just natural for me to bring the Nergigante Armor as a cosplay to life! The costume was one of my biggest projects ever, even though I chose the relatively small Nergigante Dual Blades (Decimation Claws) as my weapons. I made it completely out of affordable EVA foam from scratch and it took me around three months to finish the project. So here, I wanted to talk a little bit more in detail about this whole insane costume!
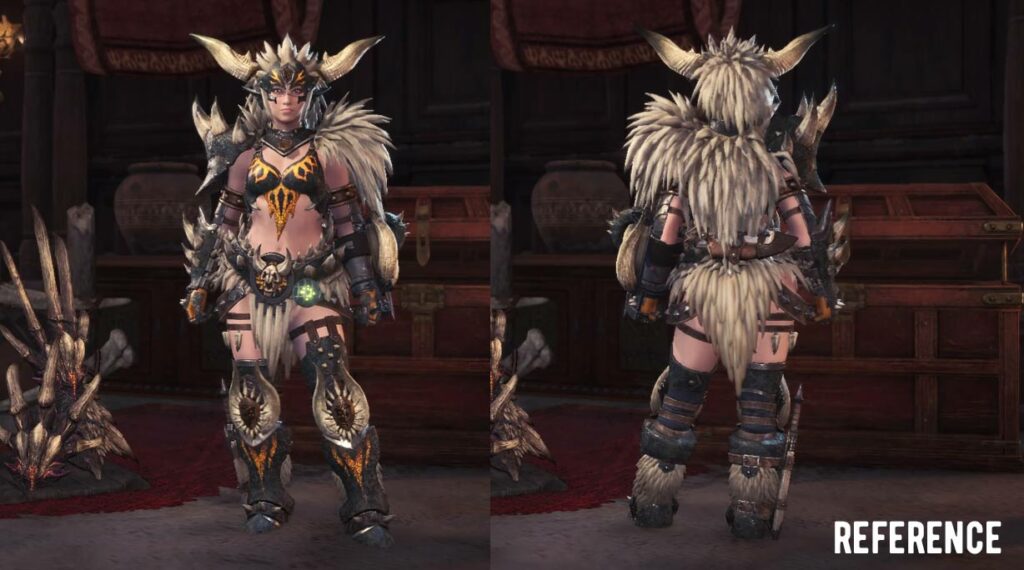
The costume reference for the Nergigante Armor
My main source for the reference was obviously the Monster Hunter World game. I took plenty of screenshots when visiting the in-game smithy and tried to get a detailed look of the armor. I especially wanted to figure out the scaly texture of the armor and all the awesome spiky details. The origin of the set, the monster Nergigante, is incredibly cute and I really wanted to catch every single element of it.
I surely also need to mention, that I played a LOT of Monster Hunter World. Over 400 hours at the time of writing this article. It’s a great game and will be probably inspiring for plenty of upcoming projects. Well, and if you are searching for a new game to try out, I can highly recommend it! It’s super fun, can be played solo or with friends, has a lot of variety and is full of amazing creatures that want eat you for lunch! I’m obviously also incredible excited for the upcoming Monster Hunter Rise!
- The debut of the new “wirebug” mechanic allows for wire-based grappling actions that can be used to scale...
- The game will introduce magnamalo, a menacing new flagship monster, as well as other new monsters like the...
Additionally, I also used the Monster Hunter World artbook for further reference of the armor as well as the weapons. Artbooks are in general great to get a good view of a specific costume design and project. That’s why I also collect artbooks for pretty much all games I want to cosplay from.
My favorite tools and materials for Armor Making
Now my main material for the costume was black, low density EVA foam. It’s very easy to shape, can be curved and is great if you want to add details with a soldering iron. I mostly prefer it though, since it’s very lightweight and also quite affordable. In fact, the costume turned out really huge, but it cost me maybe $100 for all the necessary foam. I would say, EVA foam is in general a great material for large projects, since it keeps the costs low and doesn’t require plenty of tools to work with. You might want to check out my Foam Armor Making Book if you need some tips and tricks to create your own costumes.
My main materials for the whole costume were the following:
And these were the tools I was using:
These are actually the basic tools and materials I use for most of my projects. To create your own, you obviously don’t need all of them though. However, I think it’s a good and solid base to start crafting instantly without any waiting times. It’s just super annoying if you are full of motivation and want to start crafting, but still need to wait for a product delivery. But now you are prepared and know what you’ll might need!
Also, check out my Amazon Storefront if you want to get more ideas for handy tools and materials!
Working with foam is fun and easy!
To inspire people, I actually uploaded all progress steps, my ideas and also my struggles on Instagram, so here are a few photos from it. I think it’s important to remember how much work and effort goes into creating such a project. People might look at it, assuming it was bought or made by a special effects team. However, we cosplayers do all of that in our free time with the most simple materials and tools. And I think giving this kind of insight is pretty eye opening for many people who have no idea about this amazing community.
Speaking of community, you might want to check out our Cosplay Crafting Community on Facebook. It’s a great, creative and very supportive place for passionate artists, crafters and fans all over the world! You might also want to check my foam beginners guide!
Sieh dir diesen Beitrag auf Instagram an
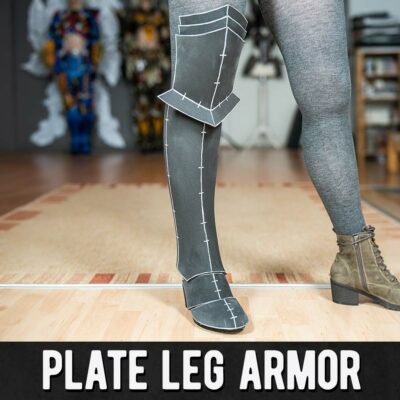
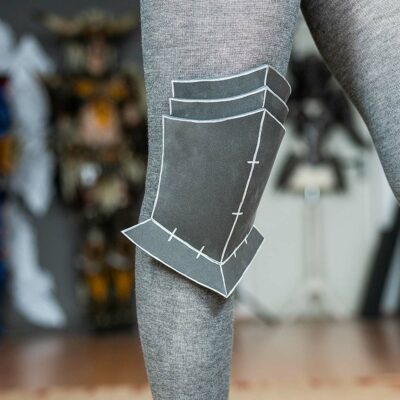
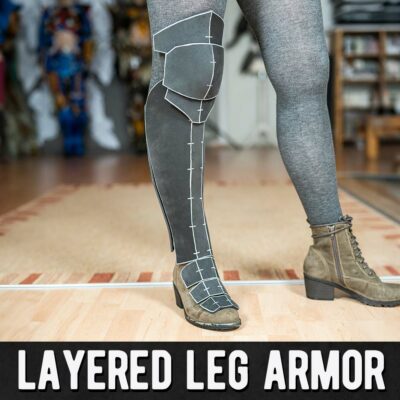
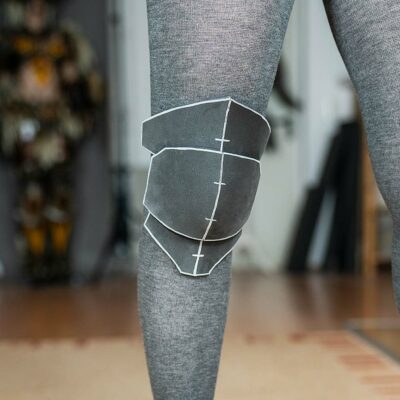
As you can see, I worked with quite complicated shapes and textures. Still, my very first steps were very basic and I think everyone can achieve the same. I did all patterns free hand and just experimented until I got the right one. The texture was burned in with a simple soldering iron. Just remember to wear a professional respirator to avoid breathing in toxic fumes. Burning all the dragon skin scale by scale was really fun though. However, I admit that this step took me literally forever. Still, I think the difference is quite amazing!
Sieh dir diesen Beitrag auf Instagram an
I think the final results looks pretty impressive. However, everything started small as you can see. I’m not a professional costume designer nor do I often use fancy tools like 3D printers, laser cutters or sculpting/casting. Everything just starts with a cheap duct tape pattern and then I just keep on going.
Sieh dir diesen Beitrag auf Instagram an
Sieh dir diesen Beitrag auf Instagram an
Sieh dir diesen Beitrag auf Instagram an
I probably also need to mention that all the scales and the texture on the armor was burned in with my soldering iron. I have two of those laying around in my workshop. One soldering iron is reserved just for my electronics work and one is there just to burn foam, leather, fabrics, etc.. This technique just mess up the tip and it just wouldn’t work well with actual solder. As you surely can see though, this tool is great potential for so much more than just installing LEDs.
Sieh dir diesen Beitrag auf Instagram an
Time for some painting fun!
And this is how the armor turned out after the paint job! Once I was done building everything, I primed the foam with three layers of Plastidip. This is a spray-on rubber, which can be applied super fast. The best thing about this product is though, that it maintains the original texture and shape. This way every single detail, every spike, every gap, every scratch and every mark was still visible. In addition though, the EVA foam as well as the foam clay sculpting became more durable and wouldn’t break any more. The built was ready for the paint job!
I used here mainly my airbrush to apply the basic paint job with Vallejo colors. Afterwards I used the oil washing technique to highlight the burned in texture in the foam. Finally, my husband Benni used super covering Liquitex acrylics to apply the orange and yellow parts. It’s quite difficult to find these colors with enough pigmentation and the ones from Liquitex to a great job.
Sieh dir diesen Beitrag auf Instagram an
Anyway! I think you still think… “Wait… what is going on? How did she made this?”. Luckily I have plenty of photo as well as video footage of this whole project. So, here for example you can see how I created one of the bracers from the basic pattern to the final paint job. I hope it shows, that even if the result looks complicated, the separate steps are no rocket science. The Nergigante armor from Monster Hunter World was actually my very first project I applied textures. I had no idea what I was doing and just tried things out. Looking back at my old Zinogre armor, I would actually do many things different now. However, as an artist, I learn and get better with every project and I’m happy about that!
Sieh dir diesen Beitrag auf Instagram an
A fitting test!
Well, and once the costume was done, I did a very first fitting test. For the attachment I mostly used just velcro tape and hot glue. I’ve experimented a lot with other solutions, but velcro + hot glue just works the best. However, it’s important to cover the edges with plenty of glue as well. This way the attachment becomes really strong and reliable.
As always, it’s a great feeling to wear the costume the very first time. While it was surprisingly comfy, it was also quite hot. My belly wasn’t covered at all and the armor looked more like a bikini than an actual armor. Still, the foam was really well insulation and I wasn’t able to wear this costume for a very long time. However, melting and cooking slowly under all those layers of foam was totally worth it: I looked awesome! But something was still missing…
Sieh dir diesen Beitrag auf Instagram an
These are some really crazy weapons!
Next, to the weapons! The weapon design in Monster Hunter is very special. Everything is super massive, looks absolutely ridiculous and I absolutely LOVE IT! Since the shape was very special though, it took me a little bit of experimentation until I figured out the right way to craft it. My solution was, to build a base to fit my hand in. Then I carved five claws out of additional EVA foam and kept on adding details and textures afterwards. Here is a little step by step image of the whole process.
Sieh dir diesen Beitrag auf Instagram an
To get a better idea of the whole process, here is also a super short video of all my work steps. I hope it gives you an idea of how I build these crazy weapons. They are called Decimation Claws in Monster Hunter World by the way. The reason I chose them was, that these were the smallest and most simple ones. Yes, all other Nergigante weapons were even more insane!
Sieh dir diesen Beitrag auf Instagram an
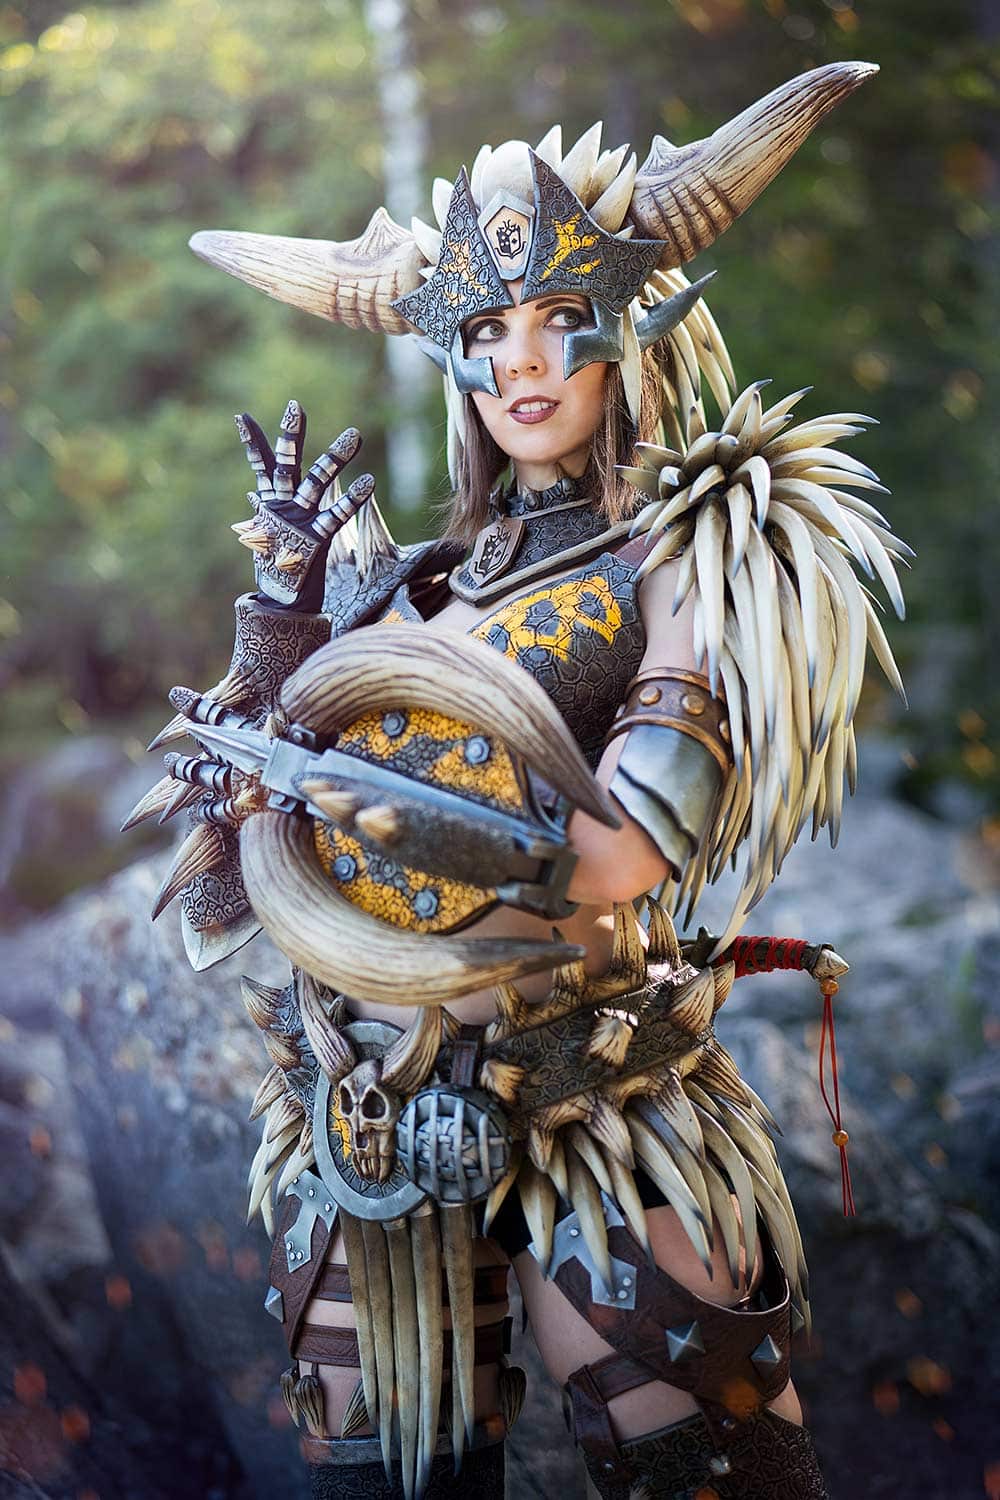
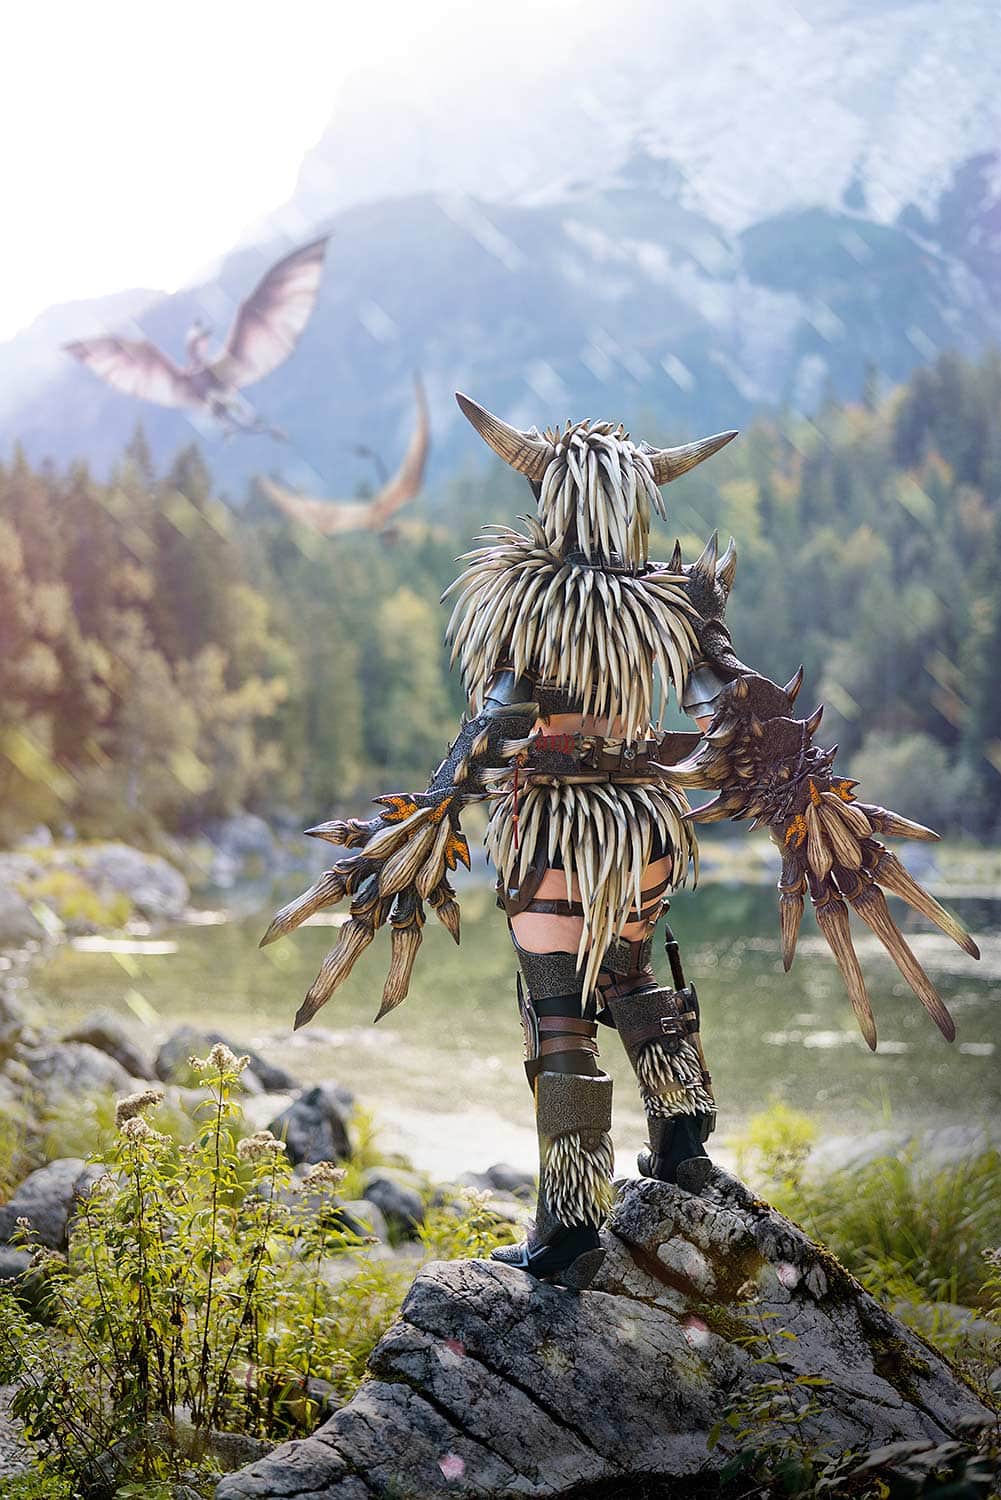
Finally it was time for the epic photoshoot!
Well, and this was then the final result of the whole costume! My husband and I did here a trip to Eibsee, a lake close to the German Alps. Walking in the costume was actually quite challenging, but luckily the photoshoot location was only 100 meters away from the hotel. So, we arrived at the lake and took a long walk around it to explore all potential photo spots. The next morning I applied my make-up, got into the costume and we grabbed our whole camera equipment. Actually, just check out my Amazon Storefront if you are curious which kind of equipment we are using.
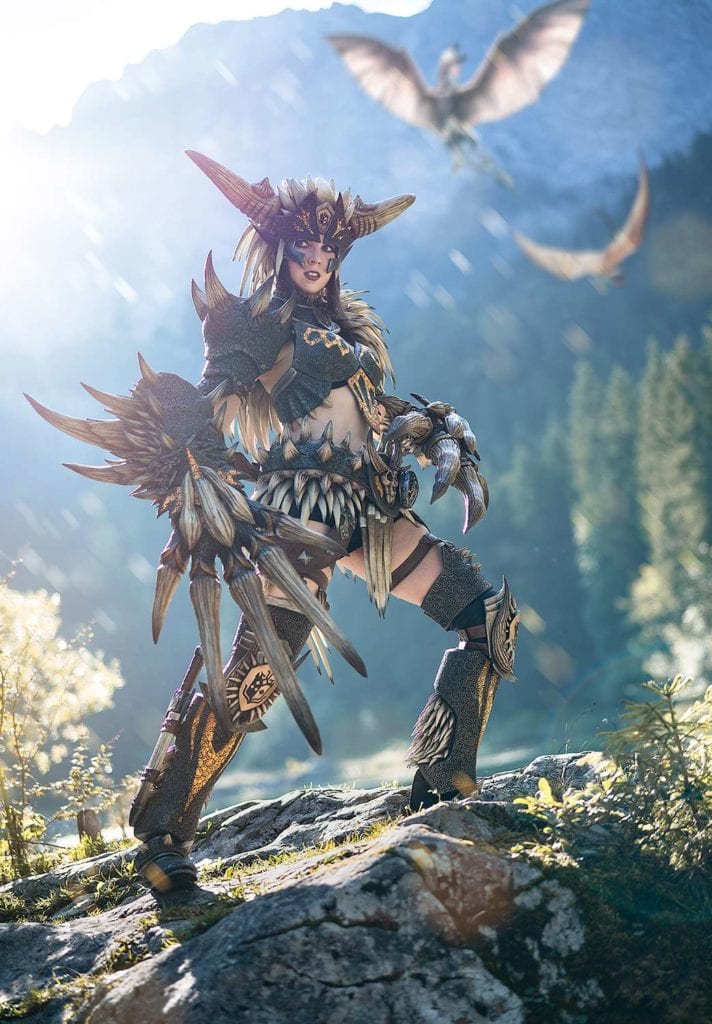
I think Benni did a great job in catching the aesthetics of the costume. Wearing the Nergigante armor, I felt really powerful and ready to slay any monster in Monster Hunter World! My movement was quite limited though and so it was difficult to really do a lot of different poses. So instead, we just tried to change the background and walked a little bit around the photoshoot area. I think, the photos still had a lot of diversity at the end.
I also have plenty of video footage of my Nergigante Armor!
Last but not least, I surely also uploaded full crafting videos onto my Youtube channel. They are as always cut quite fast, but I tried to show every single step. I hope, watching these videos as well, you know then every single details about this insane project! And even though it was a lot of time and effort, I really enjoyed these three months of hard core crafting. The Nergigante Armor from Monster Hunter World is one of my favorite costumes of all times! Wearing it finally after so much work just was amazing and absolutely love how all those photos turned out! I hope you like them just as much as I do!

By loading the video, you agree to YouTube's privacy policy.
Learn more
By loading the video, you agree to YouTube's privacy policy.
Learn more
By loading the video, you agree to YouTube's privacy policy.
Learn more
By loading the video, you agree to YouTube's privacy policy.
Learn more
We use Amazon Affiliate links. If you buy something we might get a small commission. Thanks for your support! Learn more.


oh there are really many things that I have never done or known about. Thank you very much for this useful sharing
Her cosplay is so similar
Wow, the Nergigante Armor cosplay looks amazing! It’s impressive to see the level of detail and effort put into creating such a stunning costume. The use of EVA foam and the various tools and materials showcased the craftsmanship involved. It’s inspiring to see how the cosplay community comes together to share their progress and support each other. Great job!
This is a really impressive outfit, I will definitely buy one. But I wonder if it is as heavy as I thought?
This is freakin amazing!! Are you selling your costumes? I would buy a Monster Hunter one or Zelda one in a heartbeat.