
For the release of Remnant II, Gearbox and GunfireGames asked us to create a super fancy costume from the game! I instantly felt in love with the post-apocalyptic design of the game and its crazy armor and weapon design. Especially the Gunslinger, a DPS heavy cowboy, looked super interesting. This time though I wanted to mix up traditional crafting and repurposing already existing clothes! Let’s see if this would be enough for my Gunslinger Cosplay!
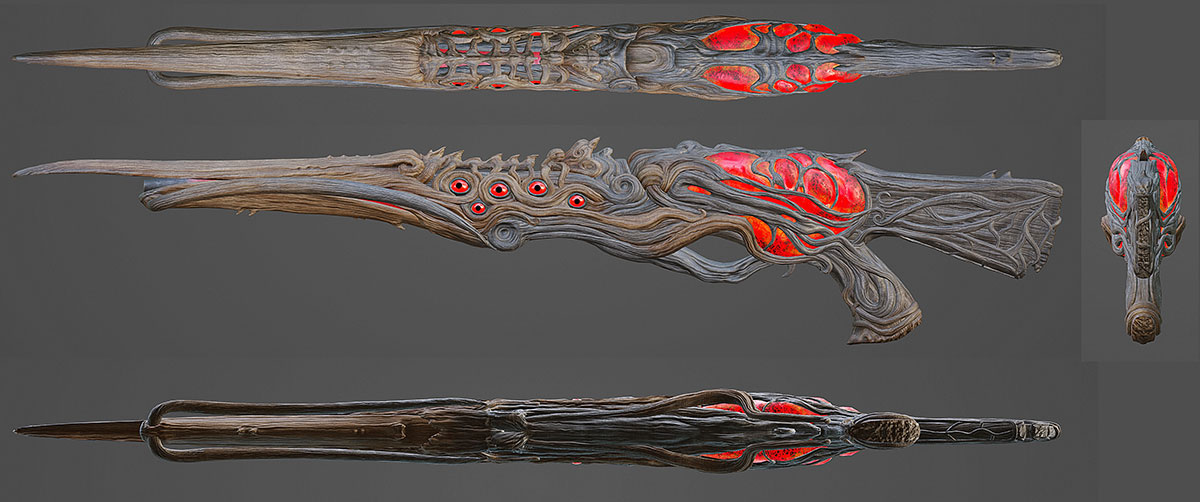
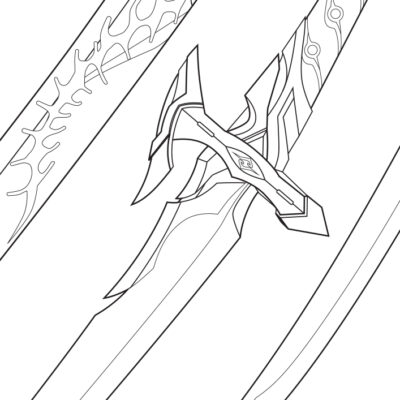
The Merciless Blaster
My weapon of choice was the Merciless Blaster. It has a quite unique designs with plenty of red demon eyes, a pulsing heart-like core and a shape made from twirling vines. I’m a huge fan of foam clay and LED strips as you maybe already saw in previous builds in this project was perfect for having a lot of fun!
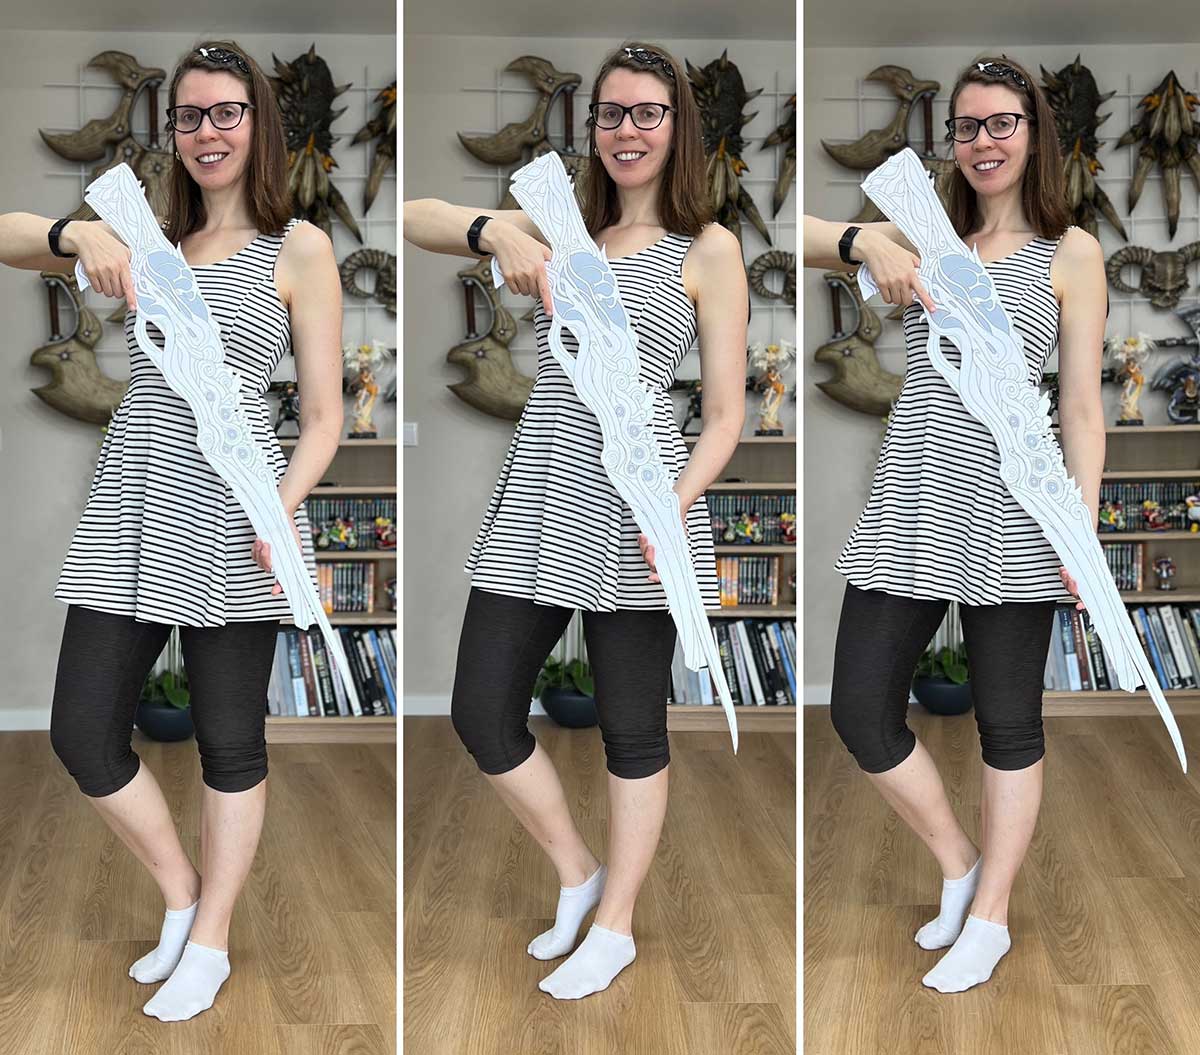
First though, I had to figure out the size. For this job my husband Benni draw a detailed blueprint and got me 3 paper dummies with different scaling. It’s actually quite difficult to figure out the right size just by the look onto the reference. So, this is a pretty easy and fast way to get a good feeling for the right proportion of a weapon. Our printer is an A3 letter printer from Canon btw, but a smaller, standard printer works just as well!
Once I got the right size, I’ve grabbed a non-plasticized PVC pipe, heat shaped it a bit and covered with from all sides with high density EVA foam. I used here Benni’s blueprint to get the general shape and tried my best to guess the thickness right. In addition, I’ve planned to add a real trigger mechanism to activate a sound and light effect once pulled.
After the base was done, I’ve begun covering huge parts of the blaster with addressable RGB LED strips . There are now countless of different LED strip products with 30, 60, 144 or even or 300 LEDs per meter, but 60 is just my personal sweet spot for brightness and power efficiency.
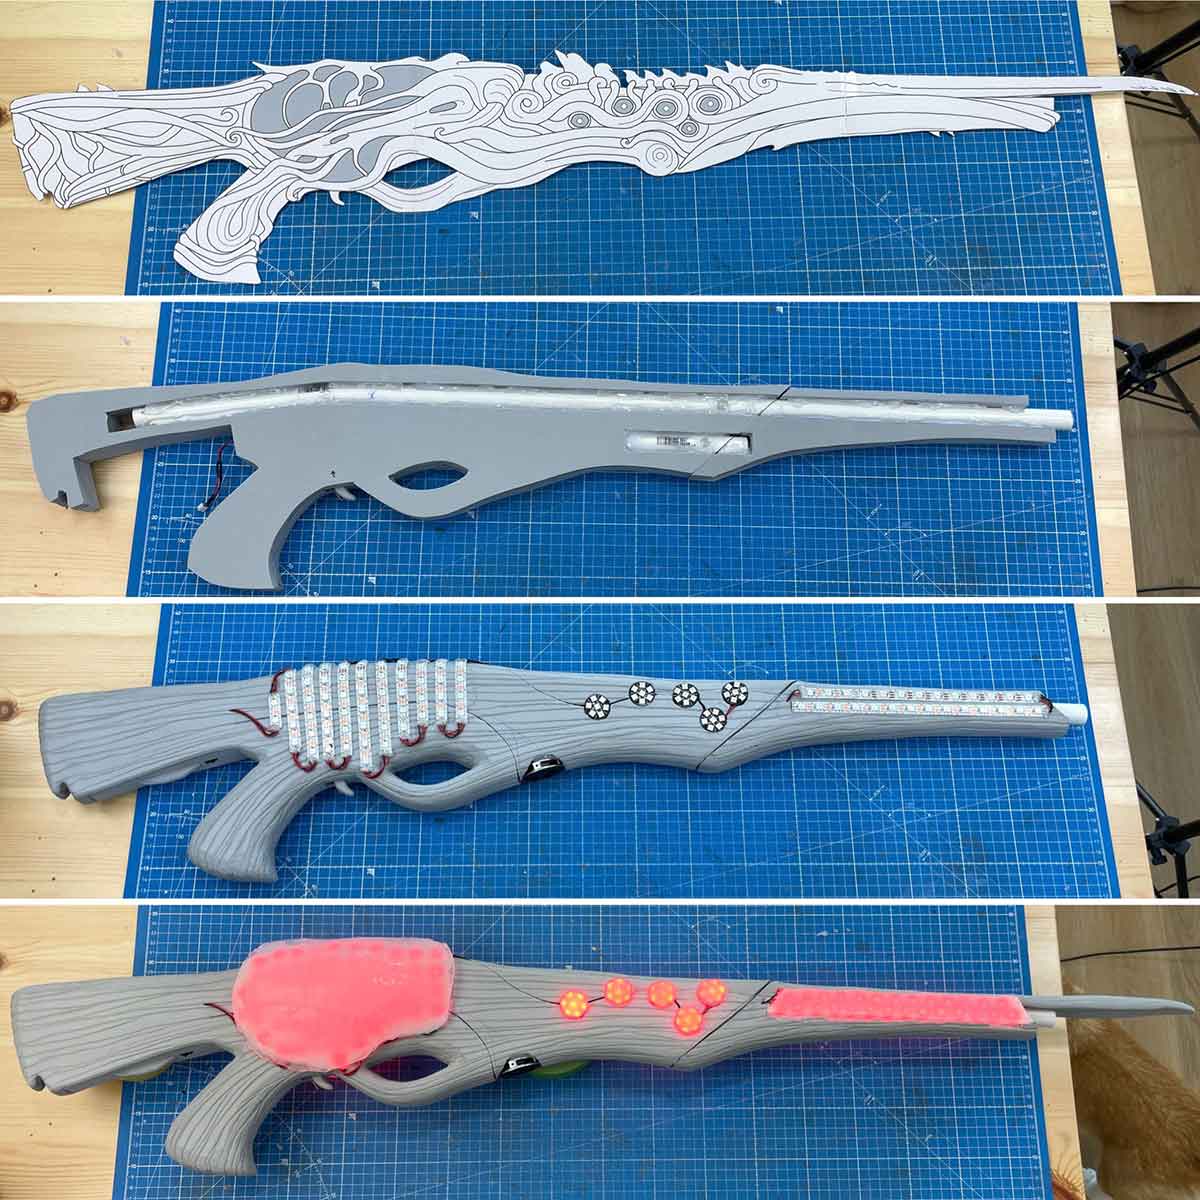 Installing LEDs is really my favourite part of a project and often the main reason why I chose a specific design. I already wrote 3 books about installing LEDs and once you’ve tried it out, I’m sure you’ll fall in love with electronics as well! For the Merciless Blaster I planned to animate the front and the heart like part of the prop, but animate it’s 10 eyes in the middle. To diffuse the material at the end I then used translucent and thermoplastic plastic pallets.
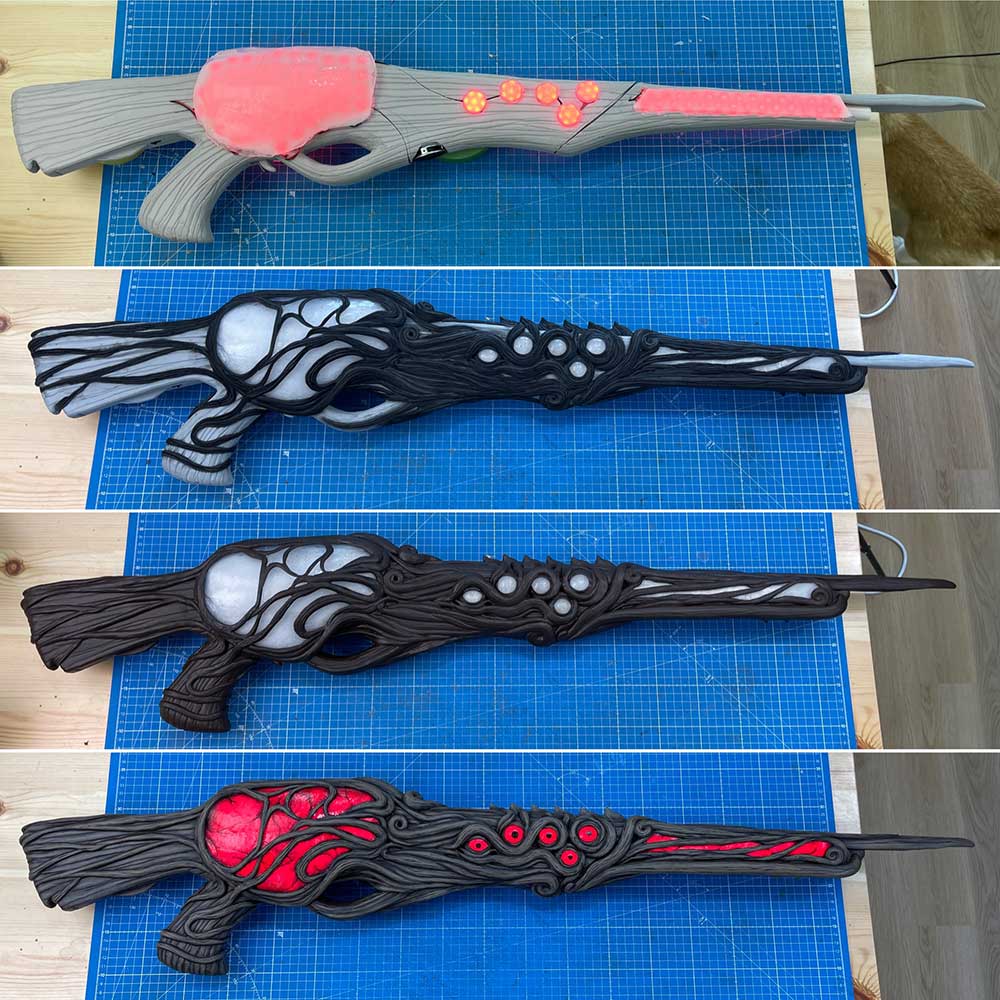
Next on I covered the whole build with Foam clay . I sculpted a ton of foam clay sausages and added them piece by piece onto the blaster. Working with foam clay is super fun and it’s just an awesome material to create organic shapes. Please check out my foam clay tutorial on Youtube if you are curious! Once dried, it was time to prime and paint the blaster for my Gunslinger Cosplay. I applied here three layers of Flexbond and my husband Benni finished the build with a beautiful acrylic paint job next.
Creating the Gunslinger Cosplay
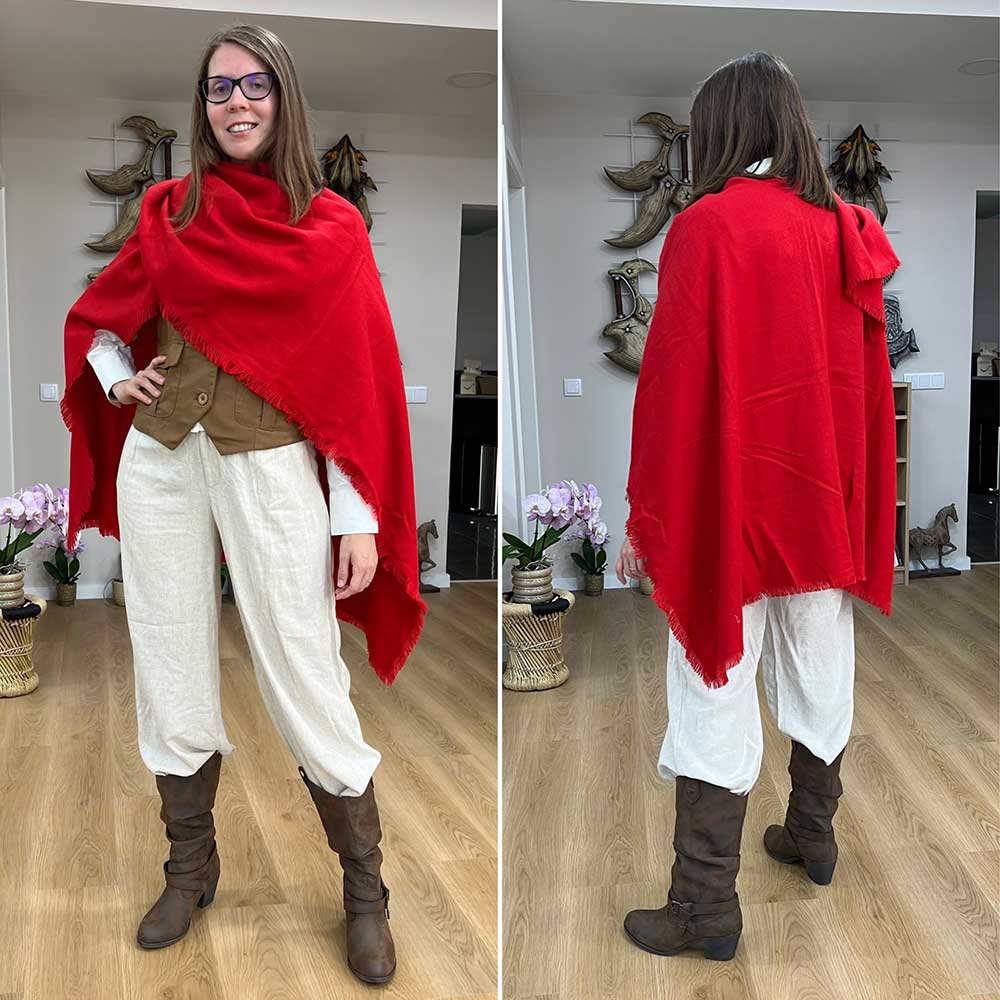
Next onto the costume! As I mentioned, I wanted to repurpose already existing clothes for this project. Most of my costumes are actually sewn, but I always avoid using the sewing machine if I can. And this made also completely sense as the Gunslinger is actually living in a post-apocalyptic world. So, time for some shopping!
I visited a few local stores and found the following: A red poncho, a brown west, a white blouse, wide linen pants and some fancy, cowboy like boots. Loved them!
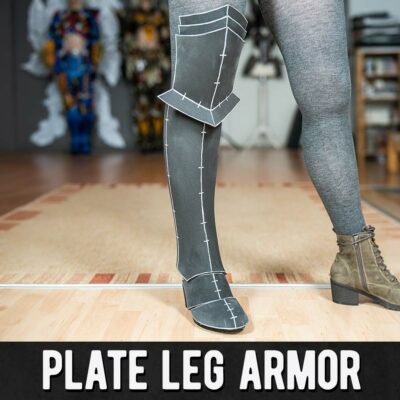
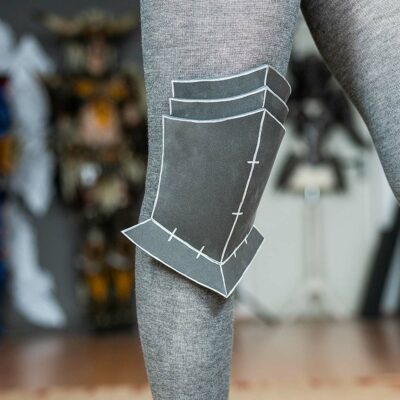
Foam armor making fun
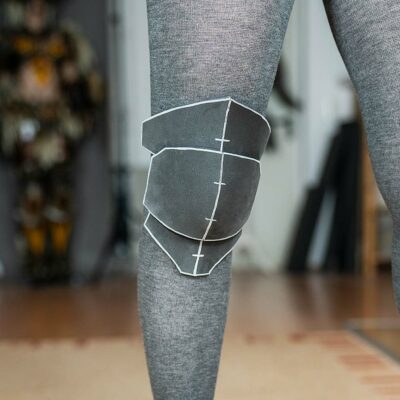
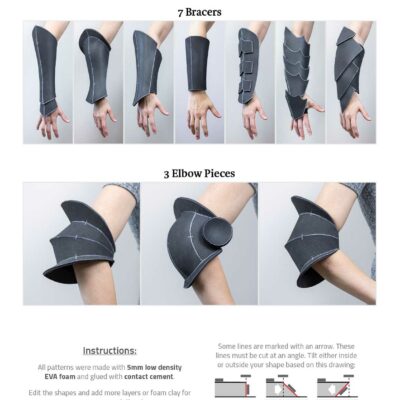
For the armor itself Benni used the magic of Blender. He basically used screenshots of the armor and built all pieces of the armor in the 3D program. Afterwards he used a technique similar to Pepakura to print out some perfectly fitting foam armor patterns. Just check out our Book of 3D Printing and Modeling if you are curious about this technique! Afterwards I only had to trace all parts onto Black EVA foam , cut everything out and glue it together using Contact cement glue ! At the end I added some extra battle damage using my Dremel sanding tool .
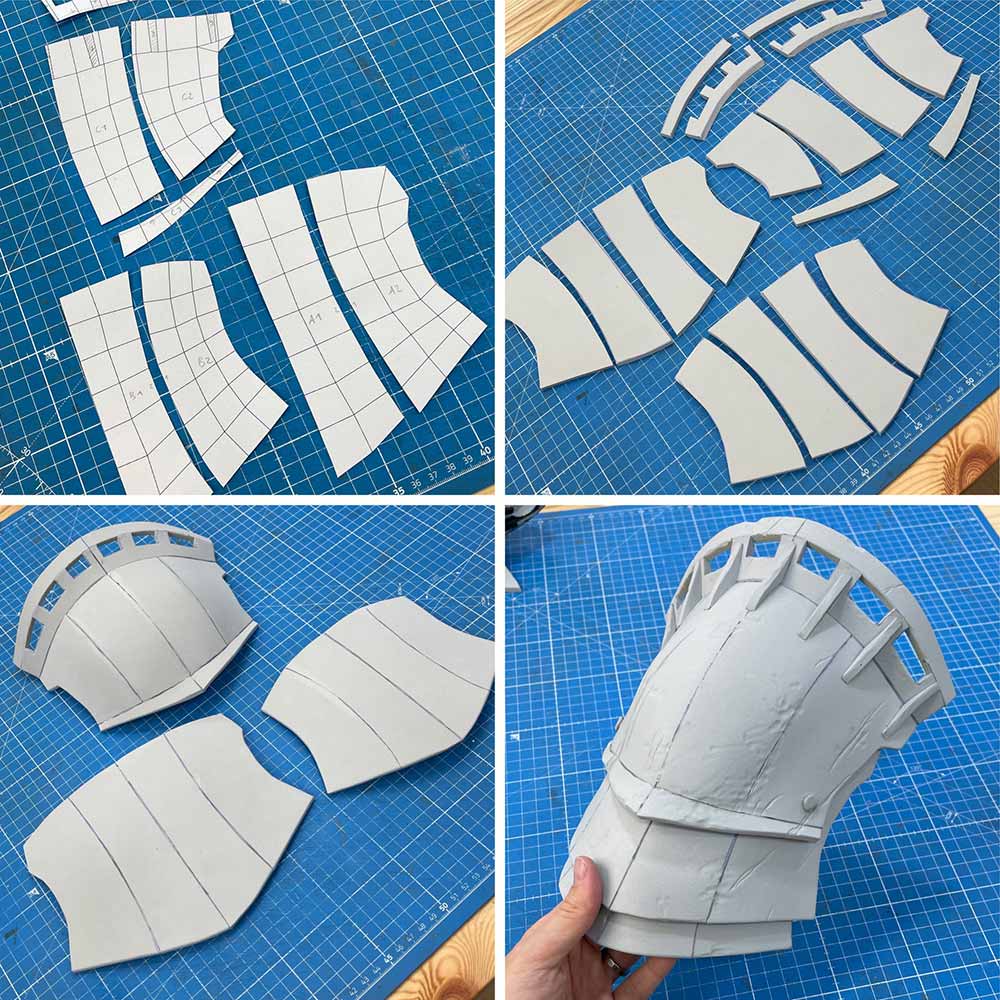
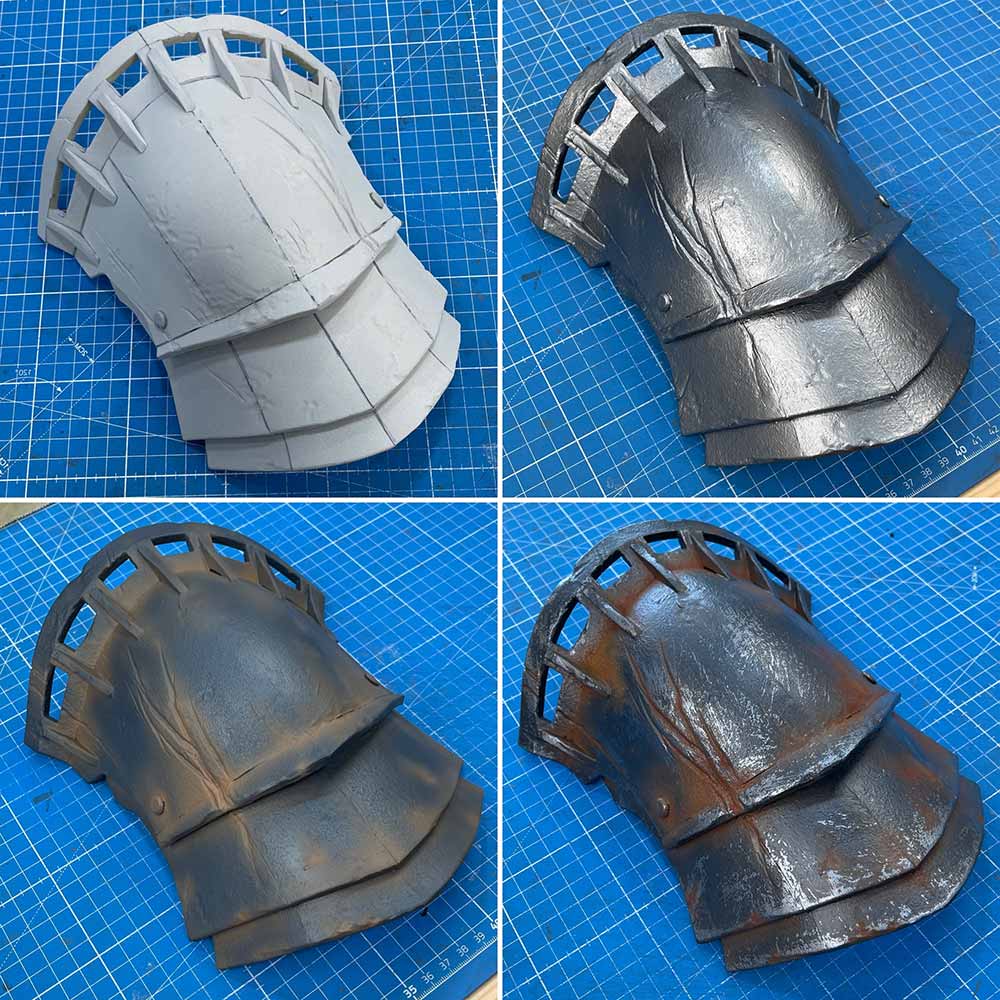
This is actually a quite easy technique I’m using for most of my builds. Blender is an amazing tool and I really don’t miss the times when I was was still making patterns using paper dummies. Once done with all armor pieces, it was time for priming and painting! I applied first 3 thick layers of Flexbond primer and Benni applied then the first layer of silver spray paint. We are mostly working with Vallejo airbrush colors since they have great quality and a huge variety of different shades.
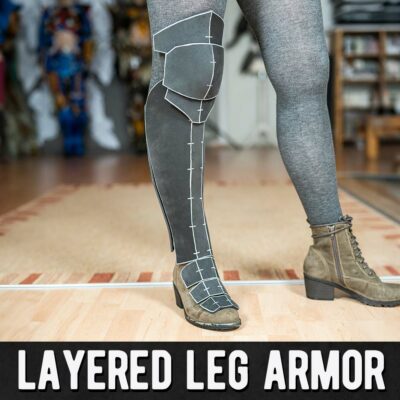
Turning foam into rusty metal
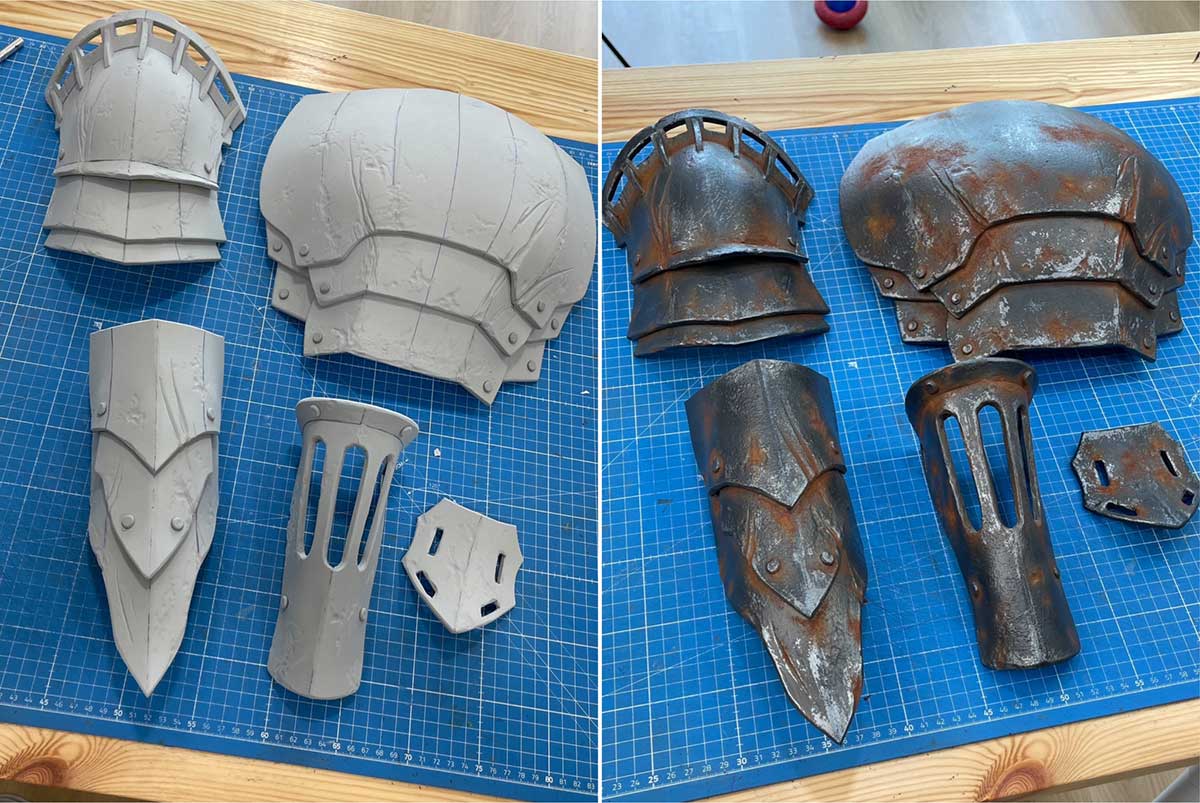
To create the chipped paint and rust effect we did the following: First a layer of silver paint, then hairspray on top! Next on some dark silver and brown for the rusty areas. Afterwards Benni added some warm water and super carefully scratched of the top paint layer using a metal sponge. The result looked already super convincing and needed only some rusty highlights. In the past I’ve actually used a chemical solution and metal powder to create this effect. This time though I had trouble finding all materials. So, instead I’ve mixed brown, orange and yellow acrylics with texture paste. Afterwards I carefully dabbed my fake rust all over all foam armor pieces.
Well, and here is the result! I think it looks pretty convincing. What do you say?
Here is also an before and after of all armor pieces I’ve made. I think here you can also see, why adding texture with my Dremel was actually quite important. Nobody would guess that his is actually all foam – well, except cosplayers I guess! In addition, the paint job was done really fast only within a few hours. I LOVE post-apocalyptic costumes! Check out my Fallout 4 Vault Dweller cosplay if you want to see more!
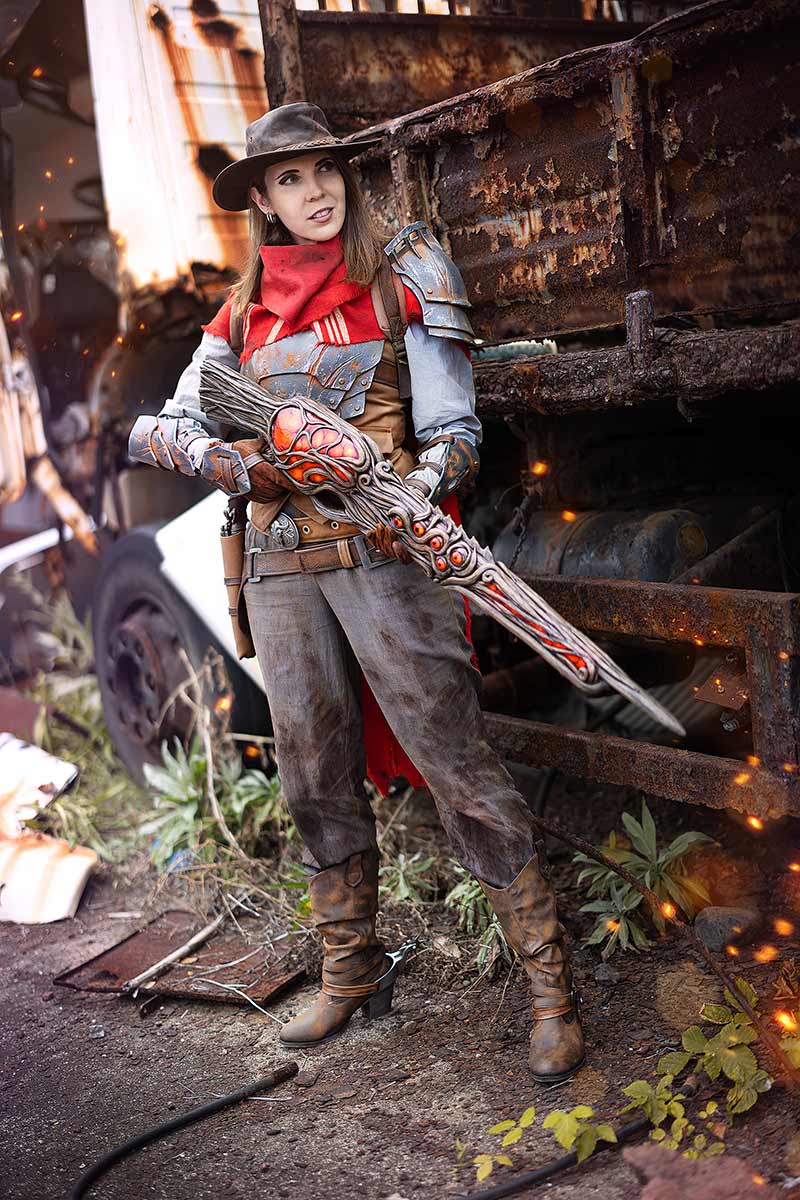
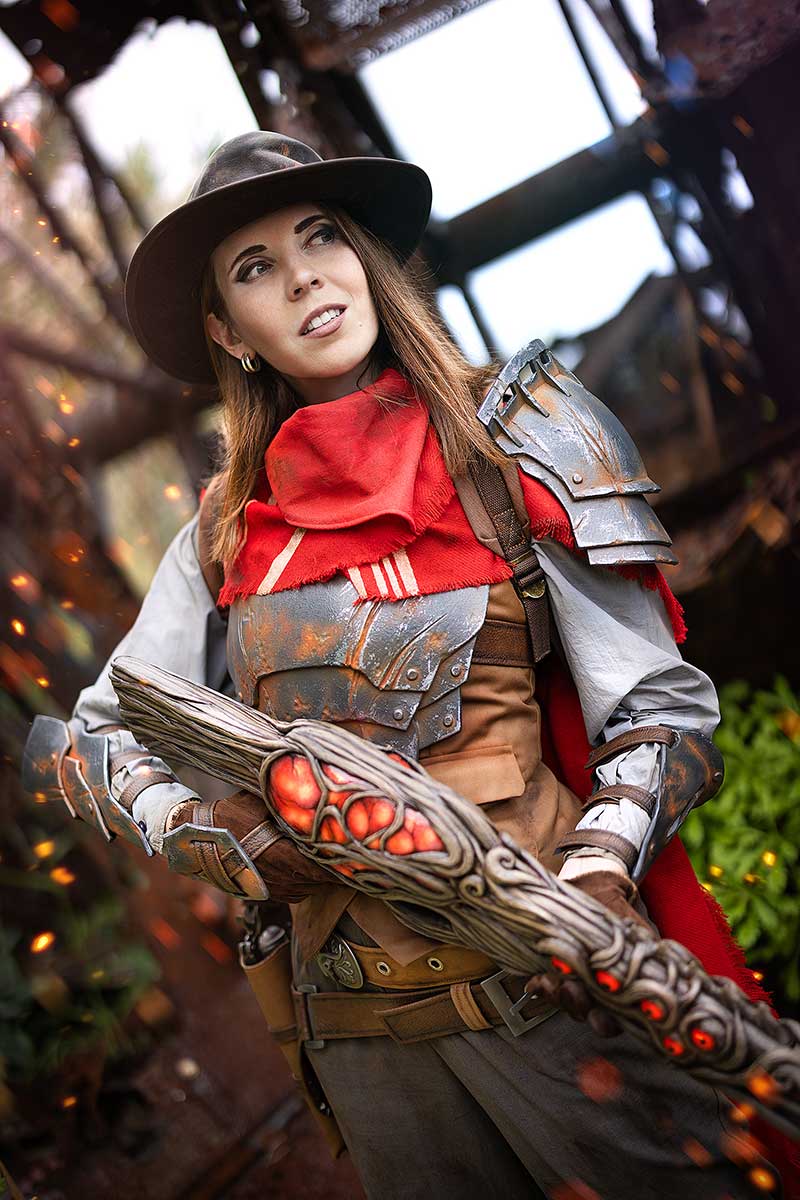
The Gunslinger Cosplay from Remnant II was done!
And this was my whole outfit! As you can see, I put quite some extra work into weathering the fabric. I actually dyed my pants and the blouse and cut and painted the poncho. Everything got also a lot of acrylics smears to look extra dirty. Finally I also made a revolver holster from faux leather and Benni weathered a hat and a backpack for me. Benni and I were incredible happy with the result!
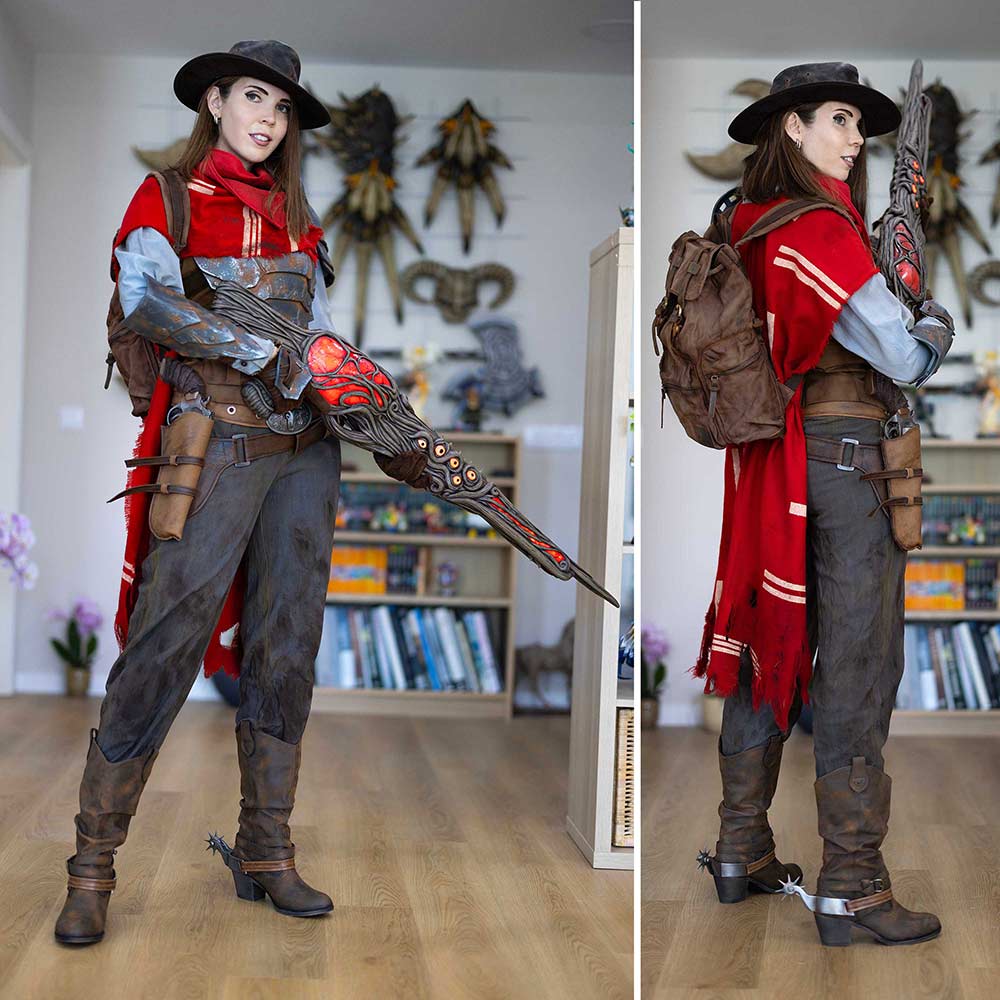
For the photoshoot we tried to find a cool looking lost place with plenty of rusty elements. Finally, we ended up at an old, abandoned fish farm on Madeira. A truck, completely covered with chipped off paint and rust, was just perfect as an background. And yes, you cannot see any lights within the Merciless Blaster during the daylight. So please, also check out our making of Youtube video to get an idea of all the work we’ve put into this costume!
Here is also list of tools and materials in case you want to start crafting yourself as well!
Make also sure to check out my favorite cosplay crafting shop!
My main materials for the whole costume were the following:
And these were the tools I was using:

By loading the video, you agree to YouTube's privacy policy.
Learn more
By loading the video, you agree to YouTube's privacy policy.
Learn more
We use Amazon Affiliate links. If you buy something we might get a small commission. Thanks for your support! Learn more.


Wow! You look cool