
Aloy was love on the first sight!
The moment I saw the trailer of Horizon Zero Dawn during the Sony Conference at E3 2015 I fell in love with Aloy.
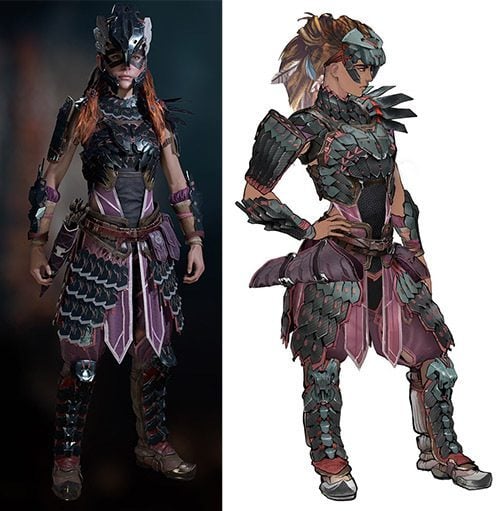
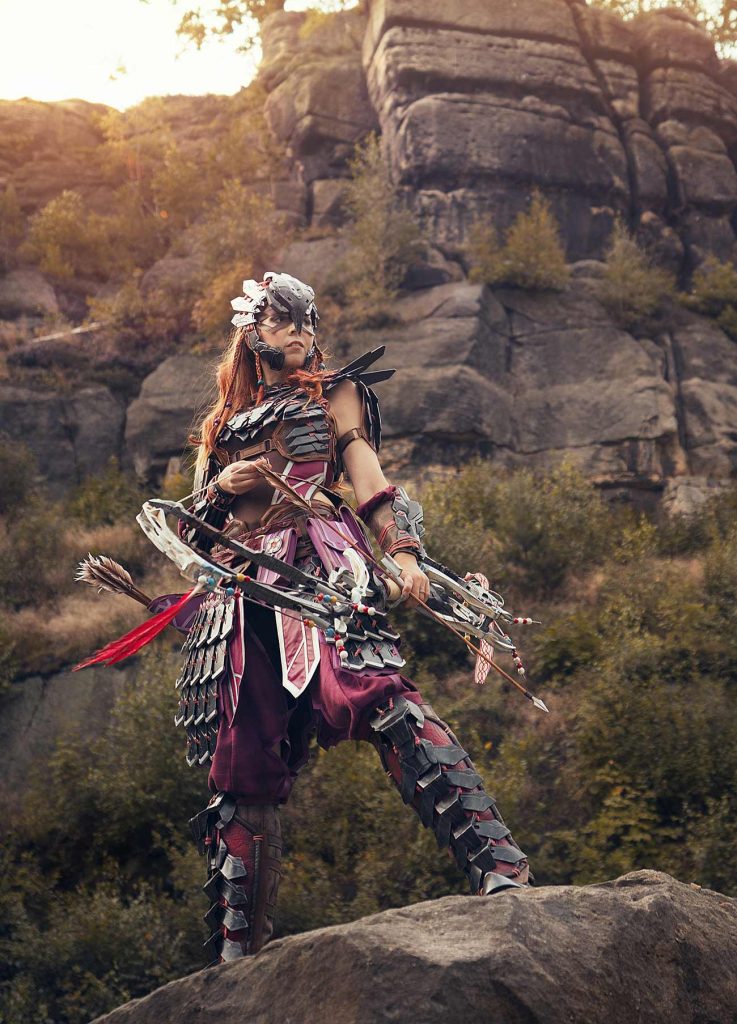
I had no idea who she was, why she was fighting robot dinosaurs but just based on the overall design I really felt the urge to cosplay her. However I someone who prefers to wait for a game, see if it’s good and then create a costume eventually afterwards. Now two years later, the game is here and it’s everything I hoped for! Aloy turned out to be one of the strongest, coolest and most badass characters and every single armor and weapon design is the game is simply amazing. My personal favorite was the Shadow Stalwart Heavy set which you obtain pretty late in the main story. The armor consists out of hundred individual armor plates, which seamed to be sewn on several layers of leather. At this point I had no idea how to build the costume or even which material I would have to choose, but we accepted the challenge!
Finding the right materials
Before starting with Aloy though, I first had to figure out which materials would actually work for her armor. I thought about using Worbla, but it was pretty clear that the final result would turn out far too heavy, too unprecise and it would be difficult to recreate multiple of the same pieces like those armor plates on her belt. I also considered Black EVA foam , but the material wouldn’t be strong enough for some of the pieces, especially when I would have to work with 2mm layers. So Benni finally suggested laser cut PVC plastic and 3D printed elements. He barely knew how to work create 3D models and sculpt such complicated shapes in a 3D program, but he was already eager to learn it. So, we split the project between the two of us: I would do the fabric part and he would be responsible for the armor – quite unusual for both of us!
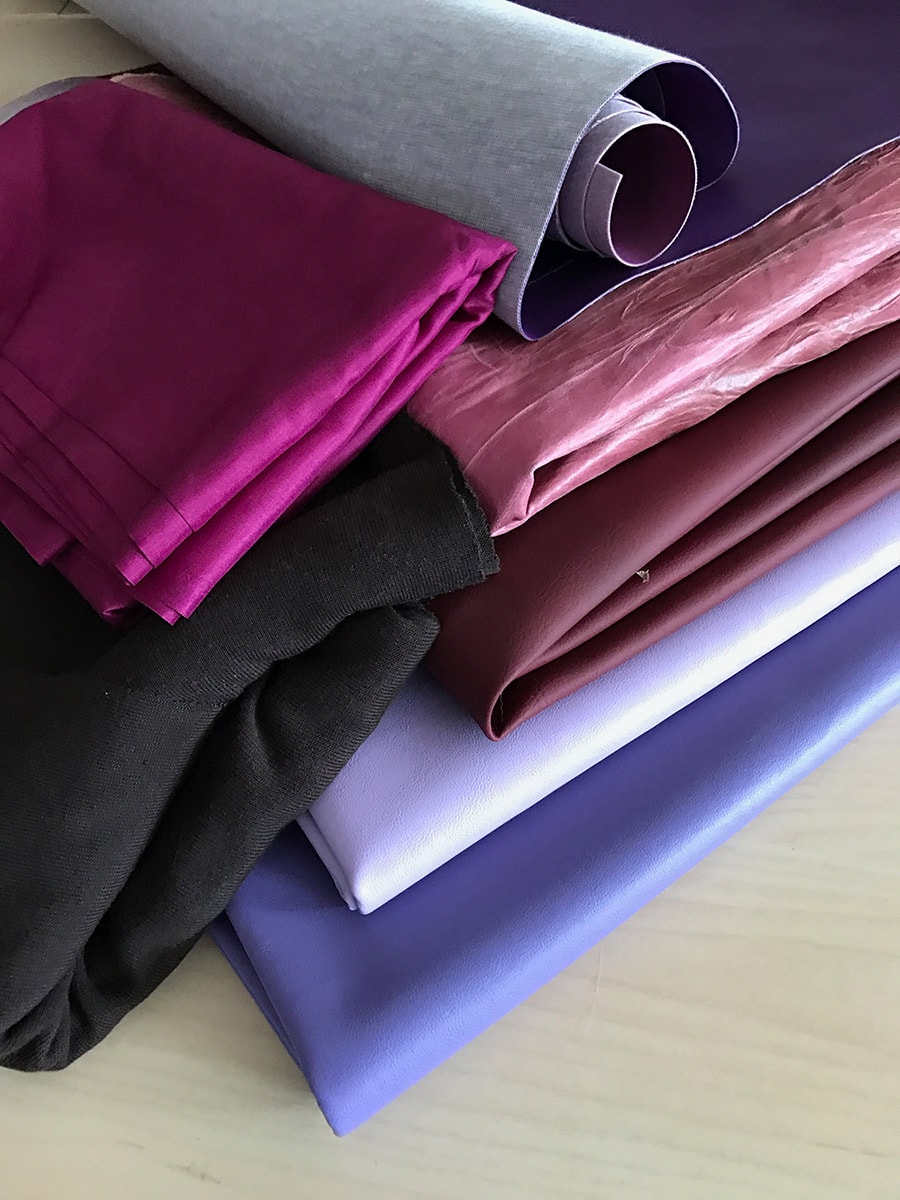
I started by collecting my fabrics. I prefer to work with faux leather instead of real animal products, so it was a bit tricky to find everything I needed. The fabrics of my reference weren’t that clear since I mainly worked with screenshots from the game instead of color neutral 3D renders and concept artwork. We found the reference images you see above too late and it turned out Aloy’s outfit is actually purple and not pink(ish)! Luckily I still insisted to keep everything as purple as possible!
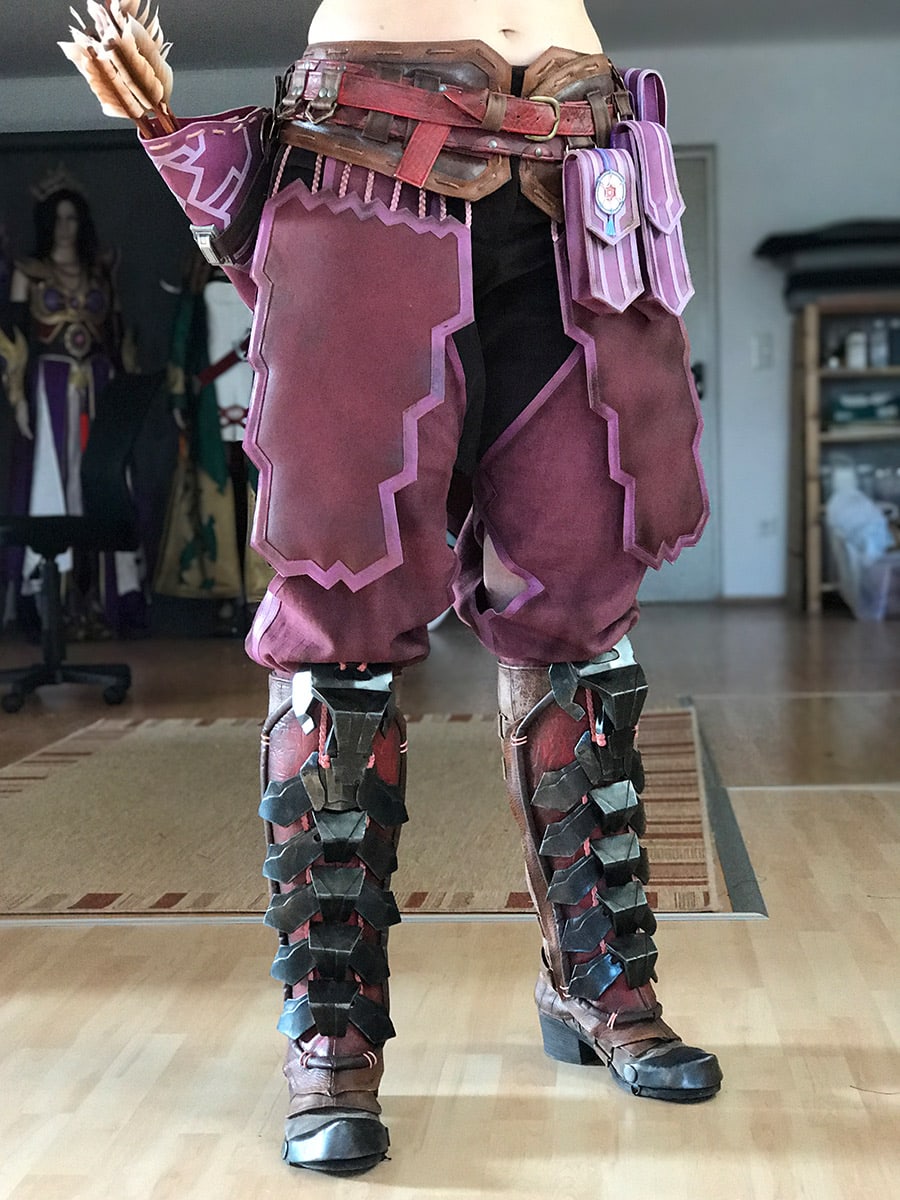
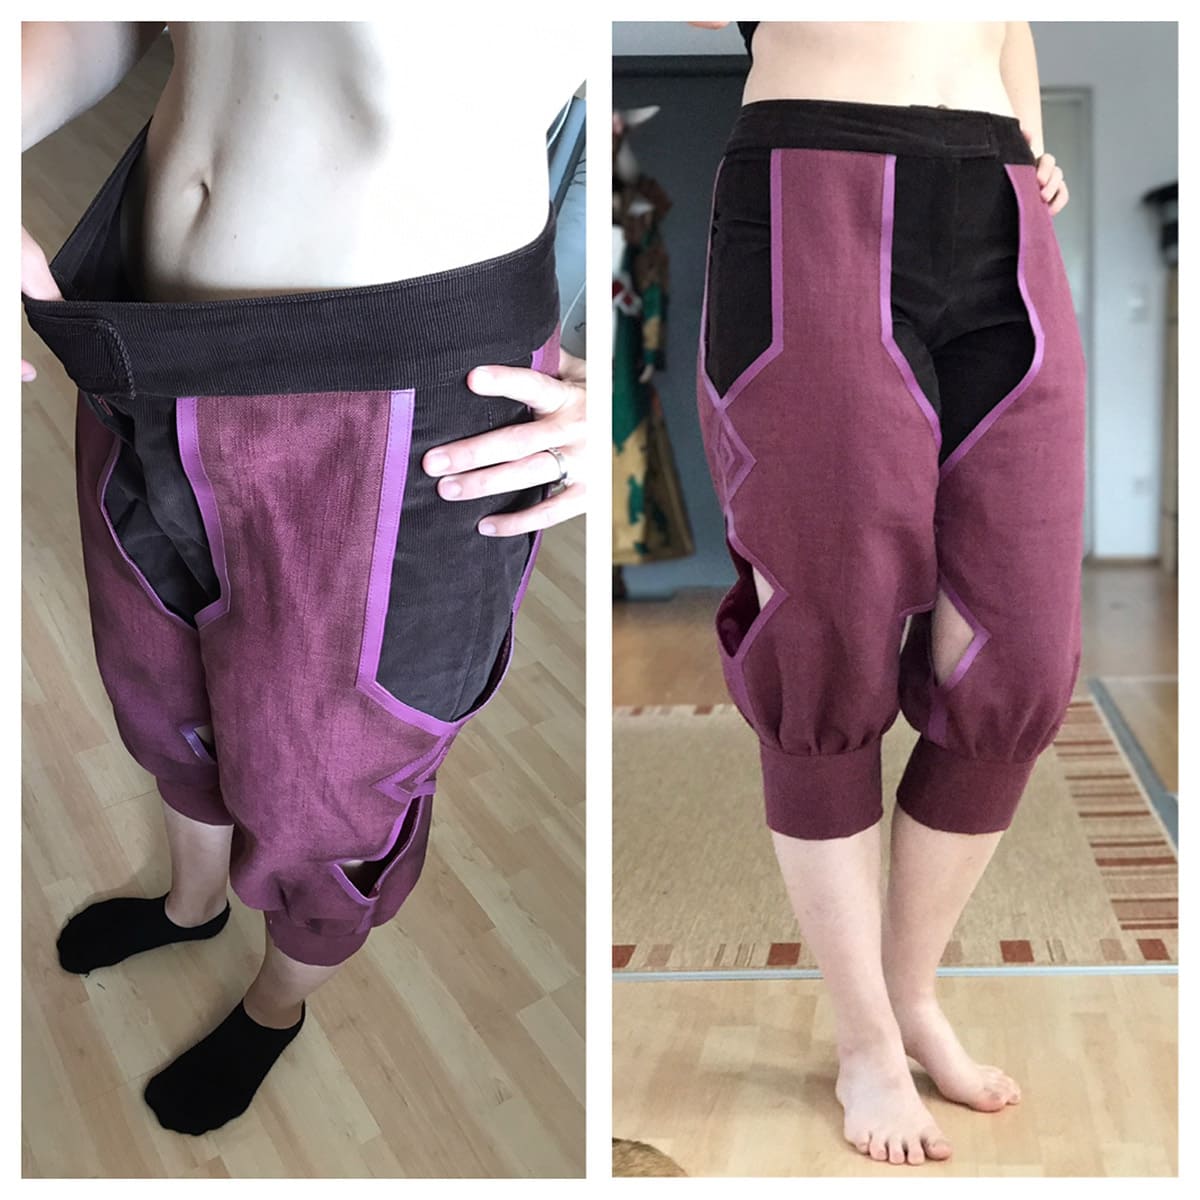
The pants
I began planning the leg armor area and wanted to work from the bottom to the top of the costume. I wasn’t sure which colors I would need, how to attach the armor, if Benni would manage to build all pieces and if it’s even possible to finish this project at all. So I started with a part, which let me and Benni mess up a bit without wasting too much time. The main question was how to attach all those separate plastic pieces to the fabric. We also had to figure out how to paint them so the color doesn’t chip of while they are rubbing against each other.
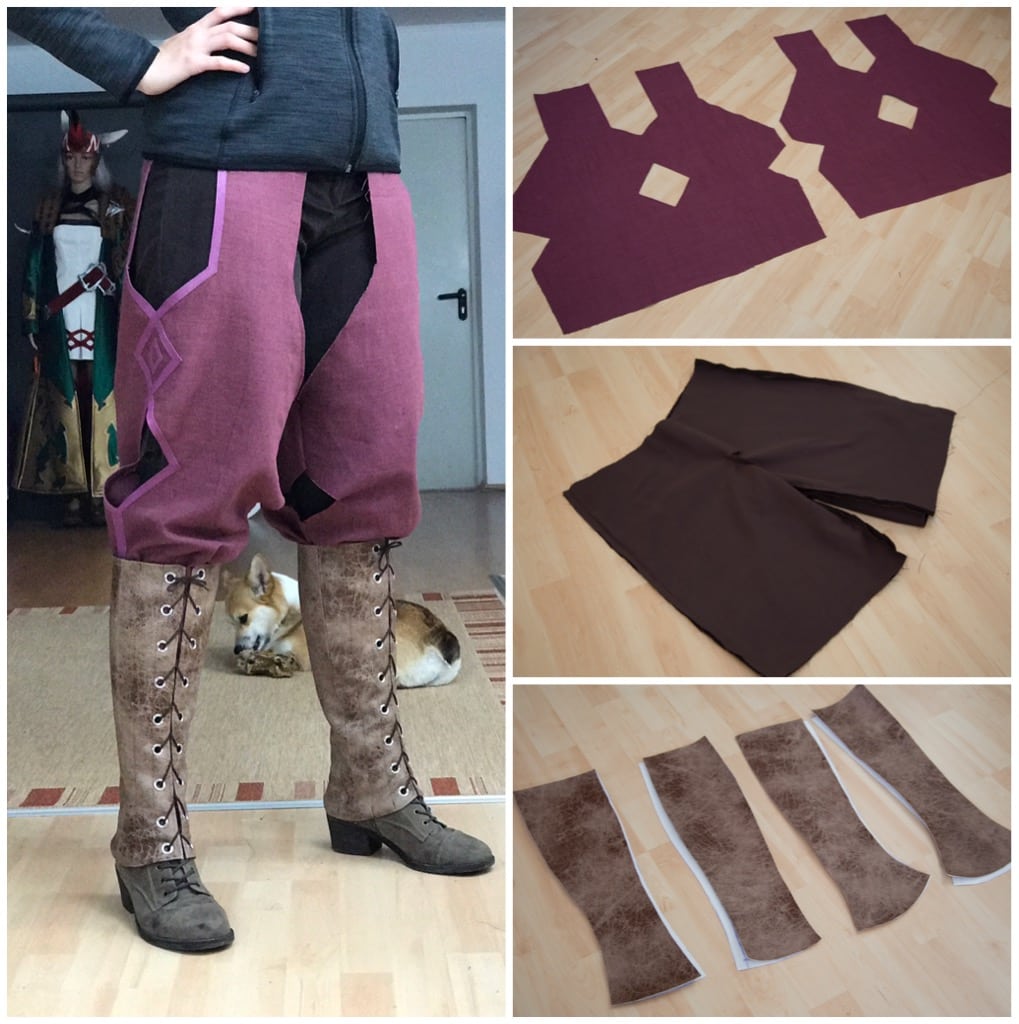
Despite of having written a beginners Sewing Book, I still have some trouble working with fabrics. It took me 3 tries to get the patterns for the pants and find the right material for them. After struggling mainly with how the fabric falls and creates wrinkles, the rest of the sewing process was pretty much straight forward. I used basic belly dance patterns, made a mock up to change the get the right shape and finally finished the first costume part for Aloy. In addition I made some pretty cool looking leather shin guards!
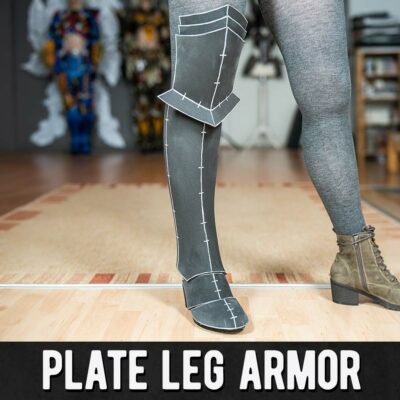
The leg armor
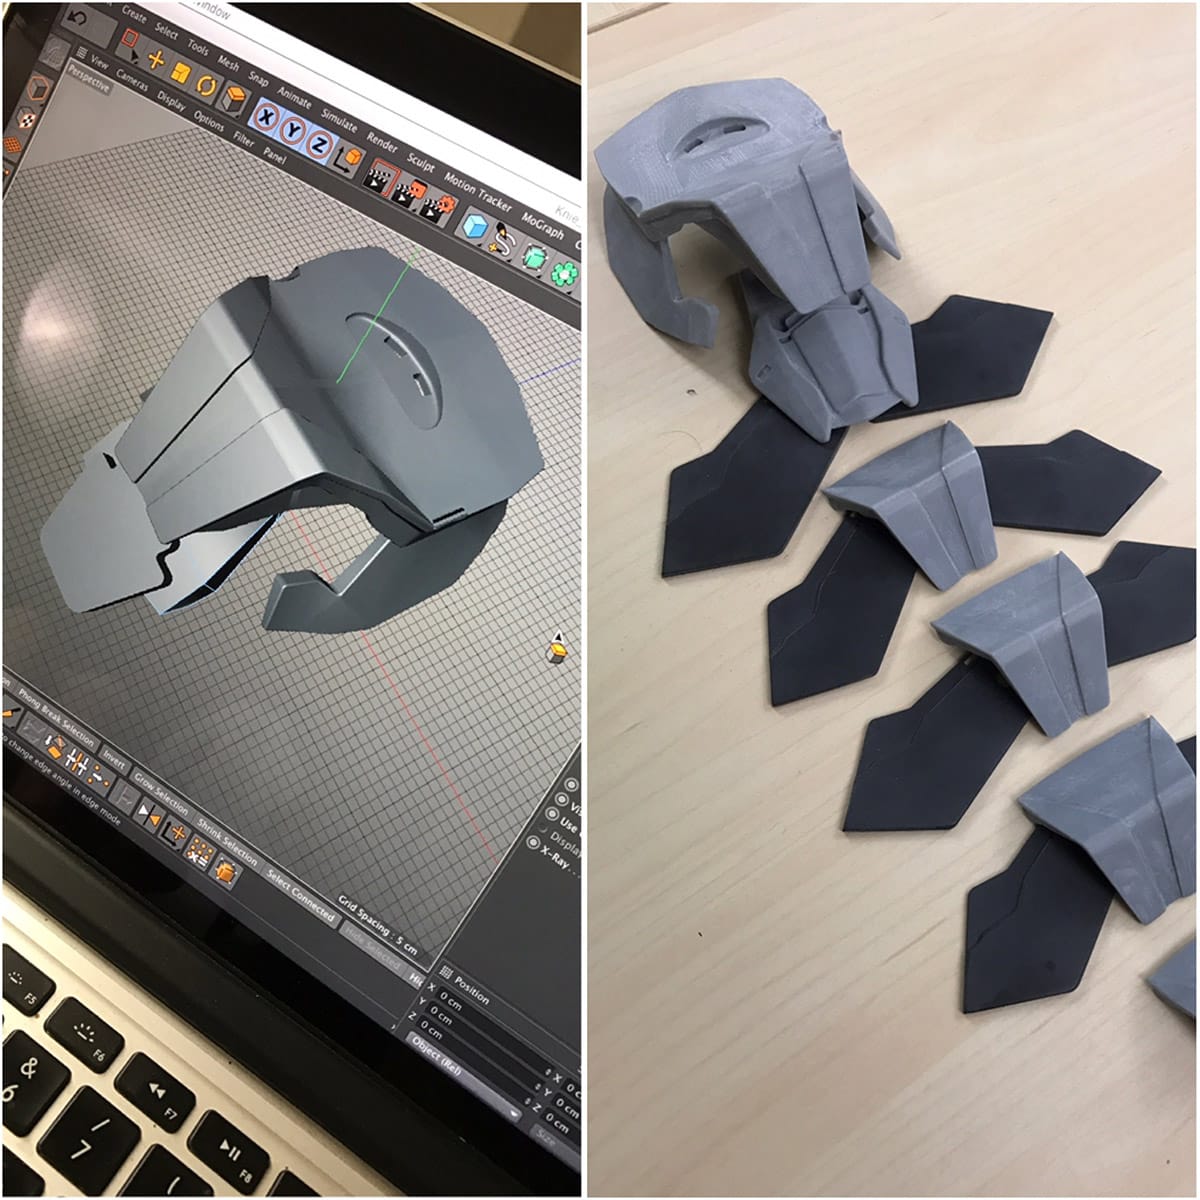
Benni meanwhile started working on the 3D models and the vector files for the armor. Just as much as I fought with my sewing machine, he struggled with Fusion 360 and Cinema 4D and was mainly busy watching online tutorials for the first days. His brother Jakob is a great 3D artist and so he got at least some help if he had questions. Still, he built everything from scratch all by himself and I was really proud of him!
Once the 3D files of the leg armor were done, our Zortrax M200 3D printer brought piece after piece to life. The flat elements were actually laser cut based on a drawing in a Adobe Illustrator. Afterwards Benni sanded and primed everything by hand.
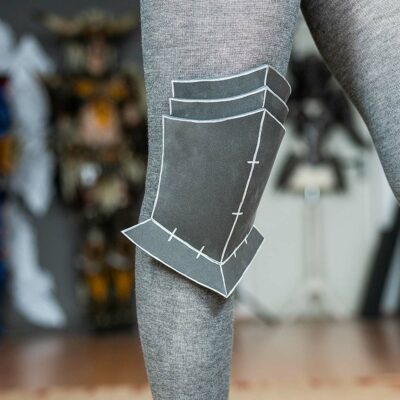
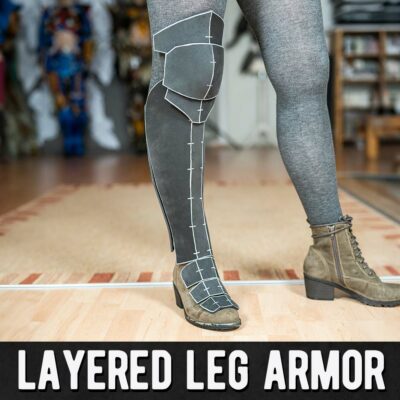
The shin guards
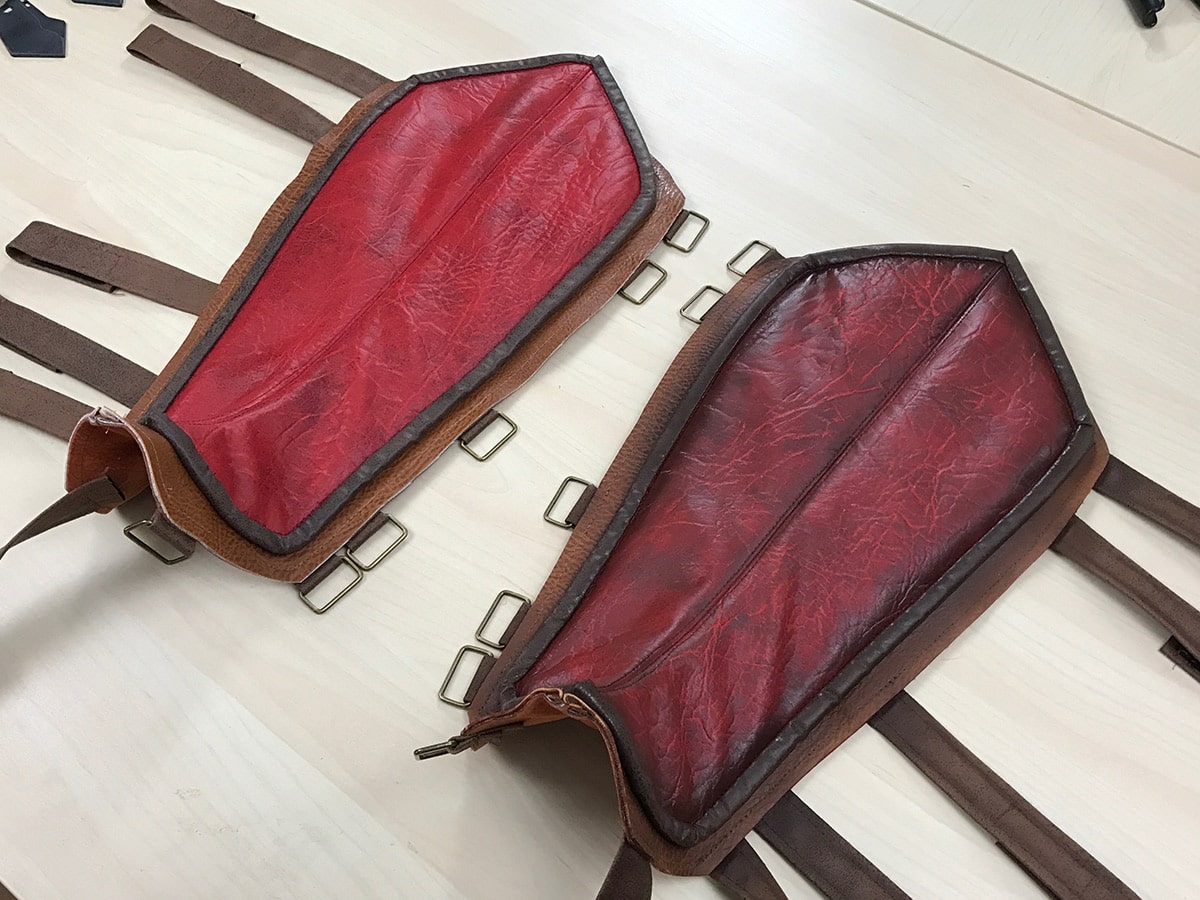
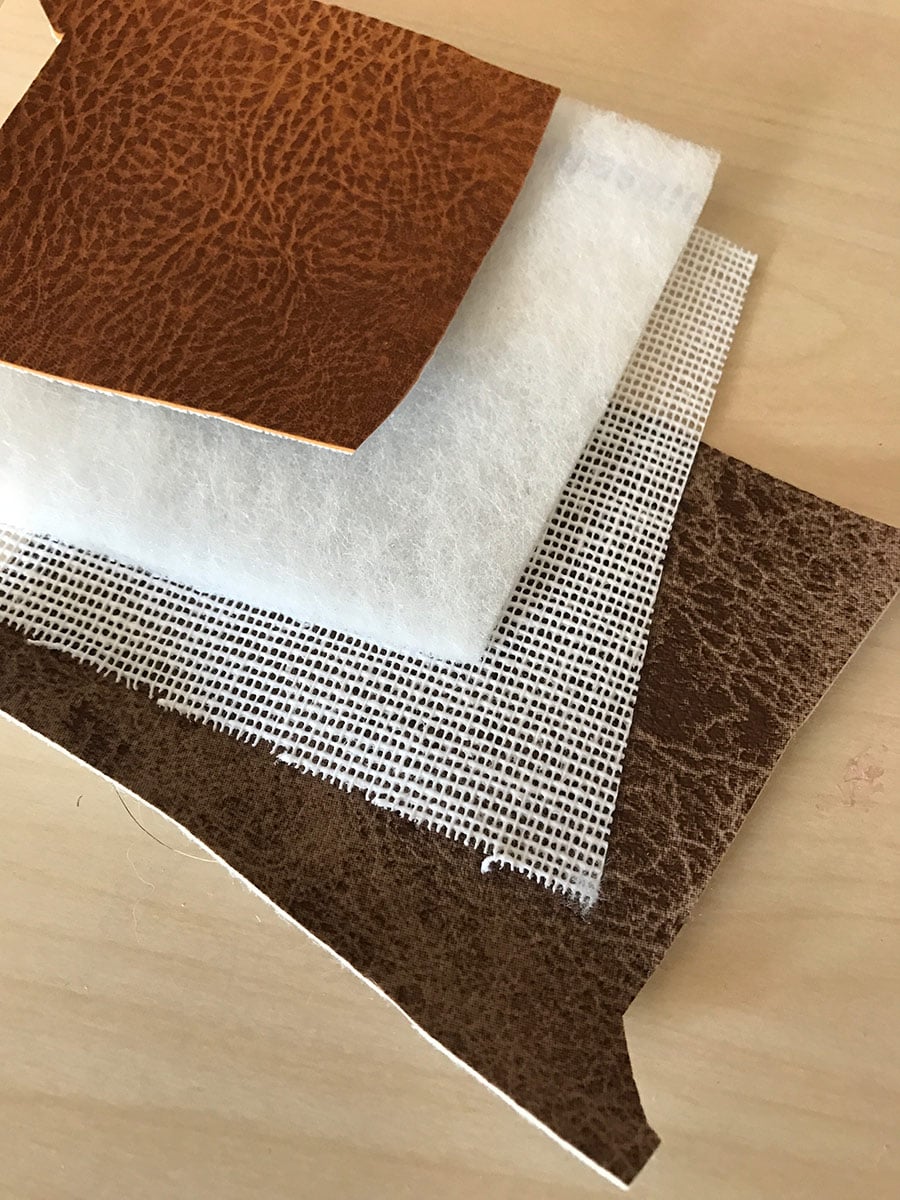
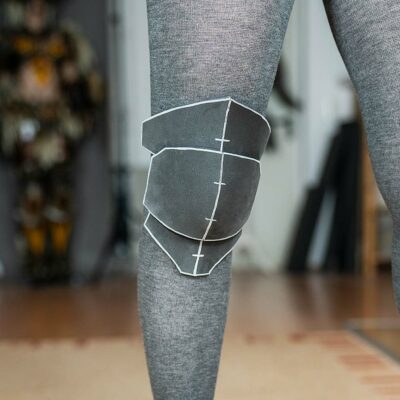
And myself? I worked on the shin armor. Using only faux leather made it a little bit hard to get a realistic look. I added a lot of volume vlies and doubled the material to give it a ticker and more massive look. In addition Benni weathered it afterwards with acrylics and his airbrush. The final piece turned out much more believable than the bright and plain original faux leather did before.
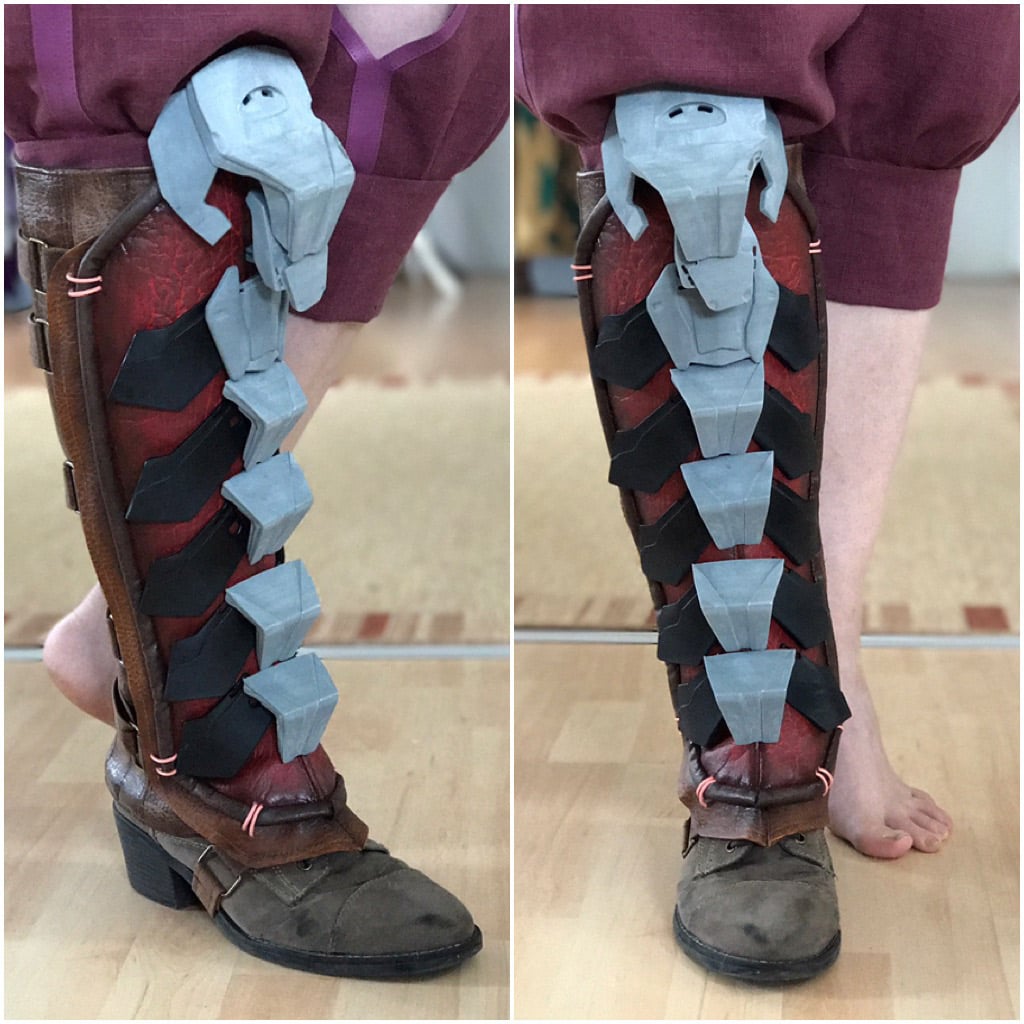
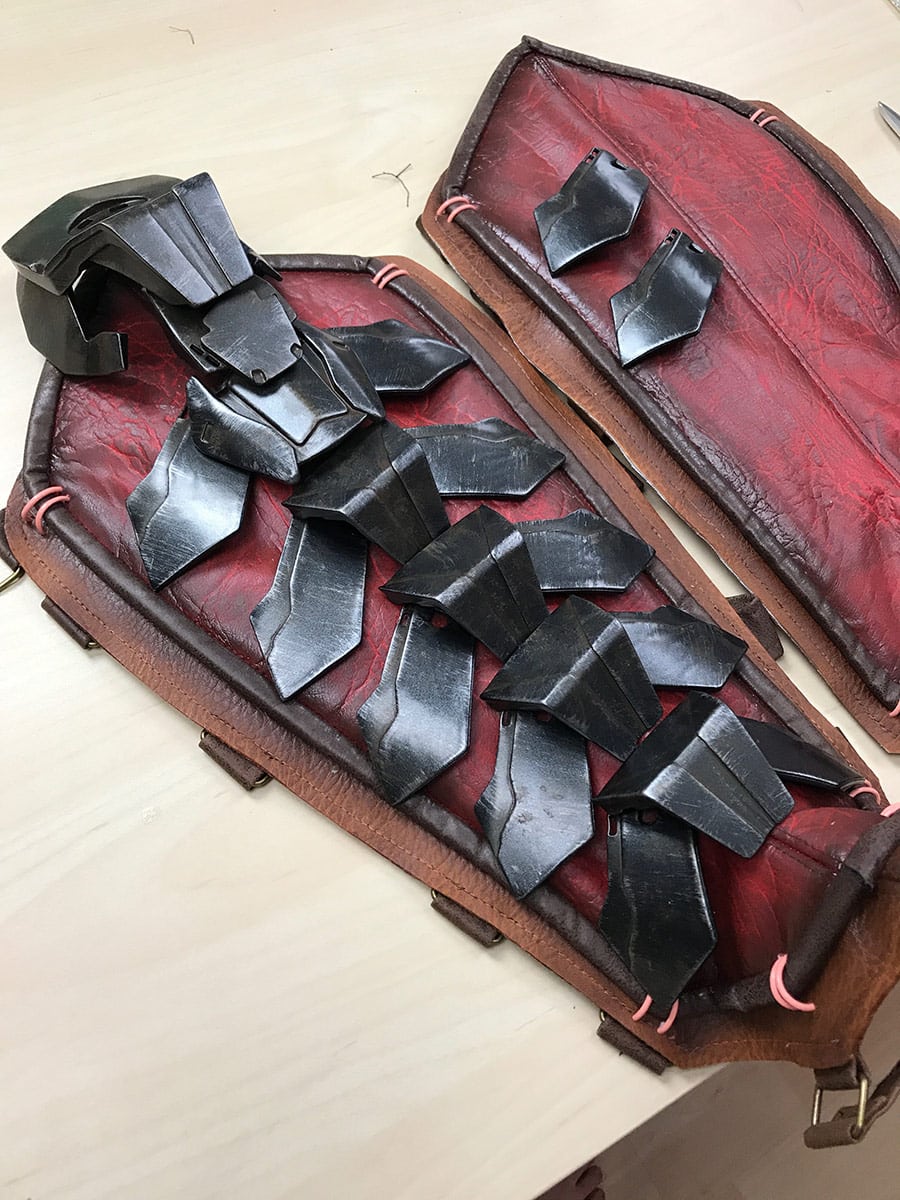
The first fitting test with one of the leg pieces was probably the biggest challenge of the costume and the reason, why I picked especially this part of the costume to start with. I thought about glueing the plastic on, using velcro tape, maybe even magnets. I considered belts, rubber bands and pretty much everything which came into my mind. Additionally I tried some of the better ideas and since the leg wasn’t thaaaaaat much the focus of the costume, it was fine to mess it up a bit. My final solution was to drill two tiny holes into the black laser cut parts and glue one some additional hooks to the 3D printed elements. Then I grabbed needle and thread and sewed on everything by hand by pulling the thread through the top layer of the fabric.
Aside of the attachment, Benni and I had to find the right paint job as well. We experimented with different colors and paints and finally stayed with an almost black, metallic automotive spray paint, brushed on silver scratches and added a dirty weathering with brown oil paint. This result was pretty close to the reference of Aloy’s original armor and it should be durable enough, that it would be fine if the armor elements would rub against each other.
If you are curious and like to see every single step, you can also find a full making of video of the legs here:

By loading the video, you agree to YouTube's privacy policy.
Learn more
The belt
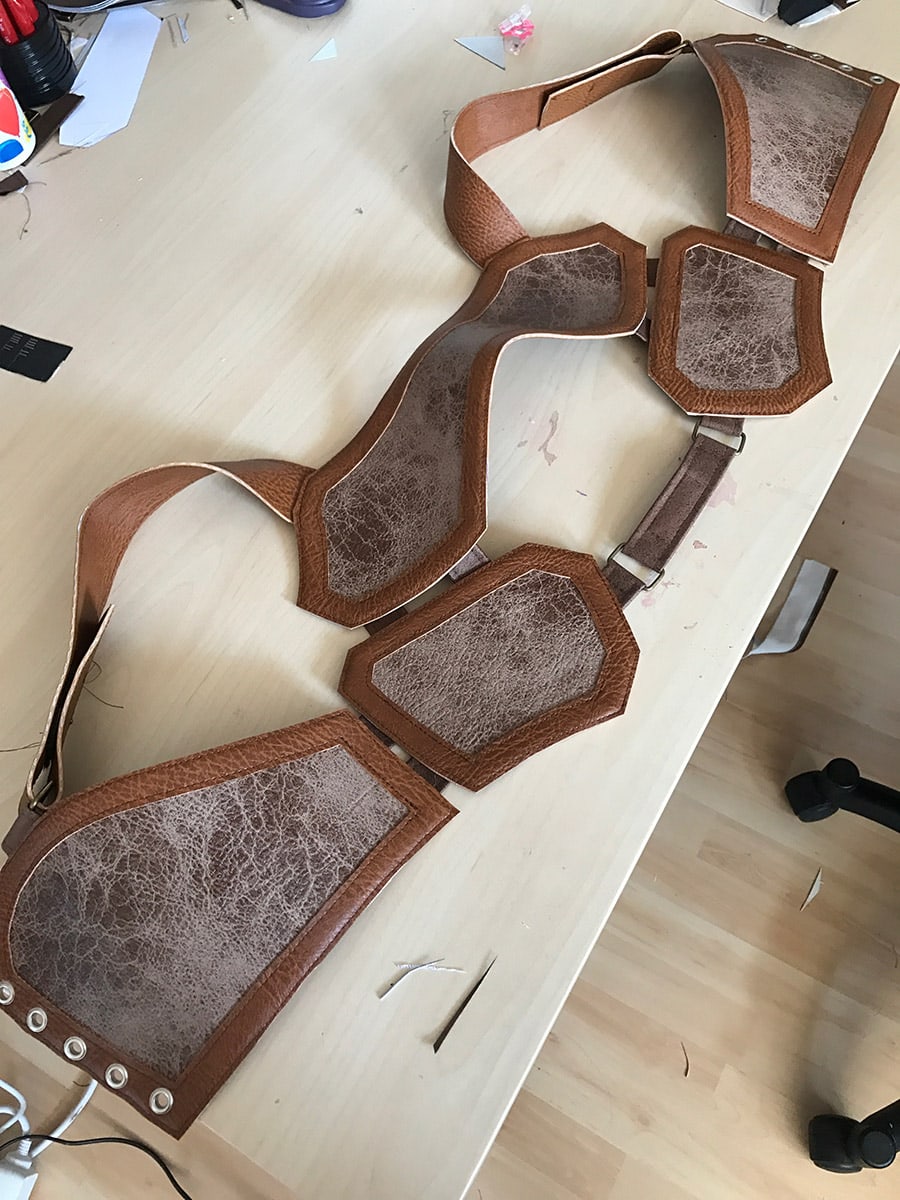
Next, it was time for the belt. I already knew that the costume will turn out quite heavy and the belt alone would have to carry around 6 kilos (12 pounds) around my hips. I still kept on working with thin and elastic faux leather, so I had to find ways to give the material more strength. What I came up with was a layer of buckram, a strong, but thin mesh material for making hats, and volume flies for additional thickness. I also found some amazing looking faux leather, which was just perfect for the costume.
Now, the belt was not just a belt! Aloy’s Shadow Stalwart version consisted actually out of three separate belts, four pouches, one quiver with eight arrows, one rope, four hip armor flappies and a crazy amount of rivets and buckles. So, it took quite some work. For the pouches I did a pretty simple pattern and changed its size once necessary. Additionally I made them all functional, which means I finally had some space for my phone, cosplay repair stuff and snacks!
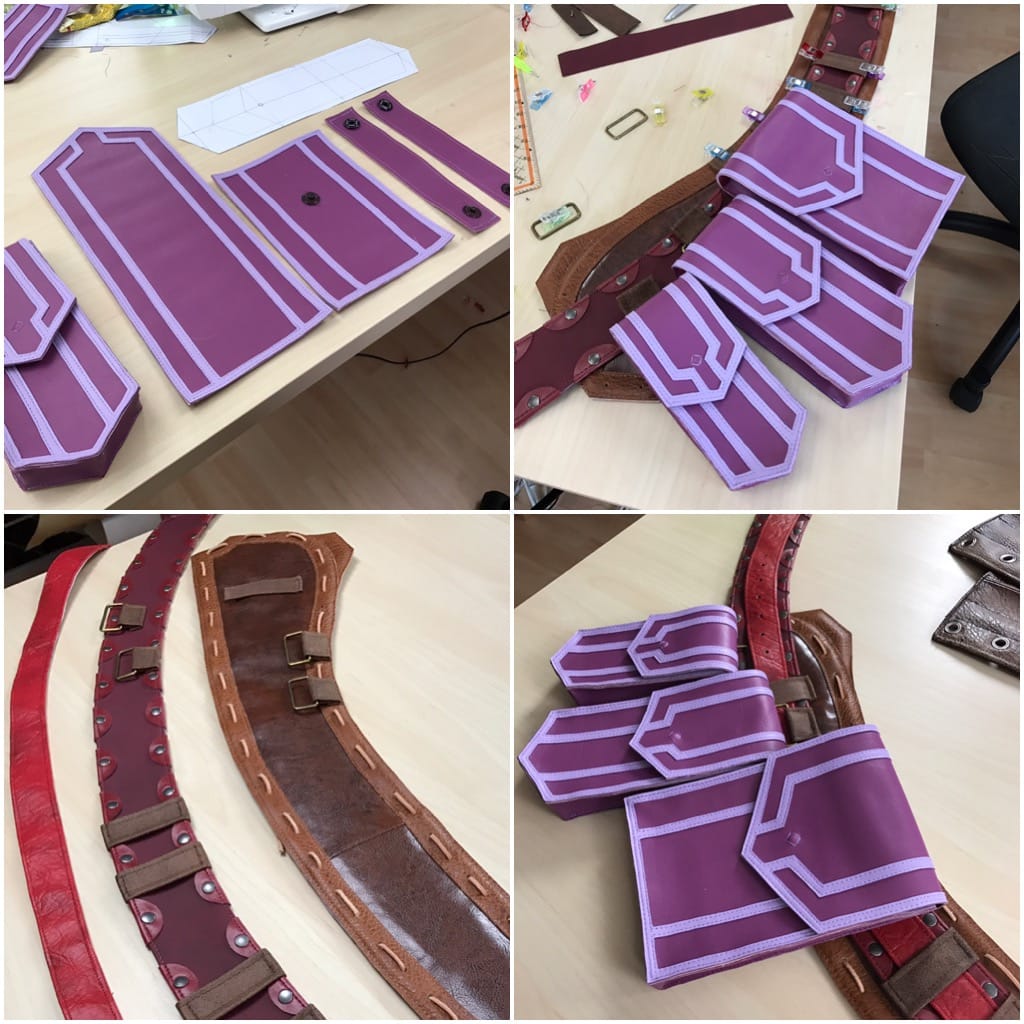
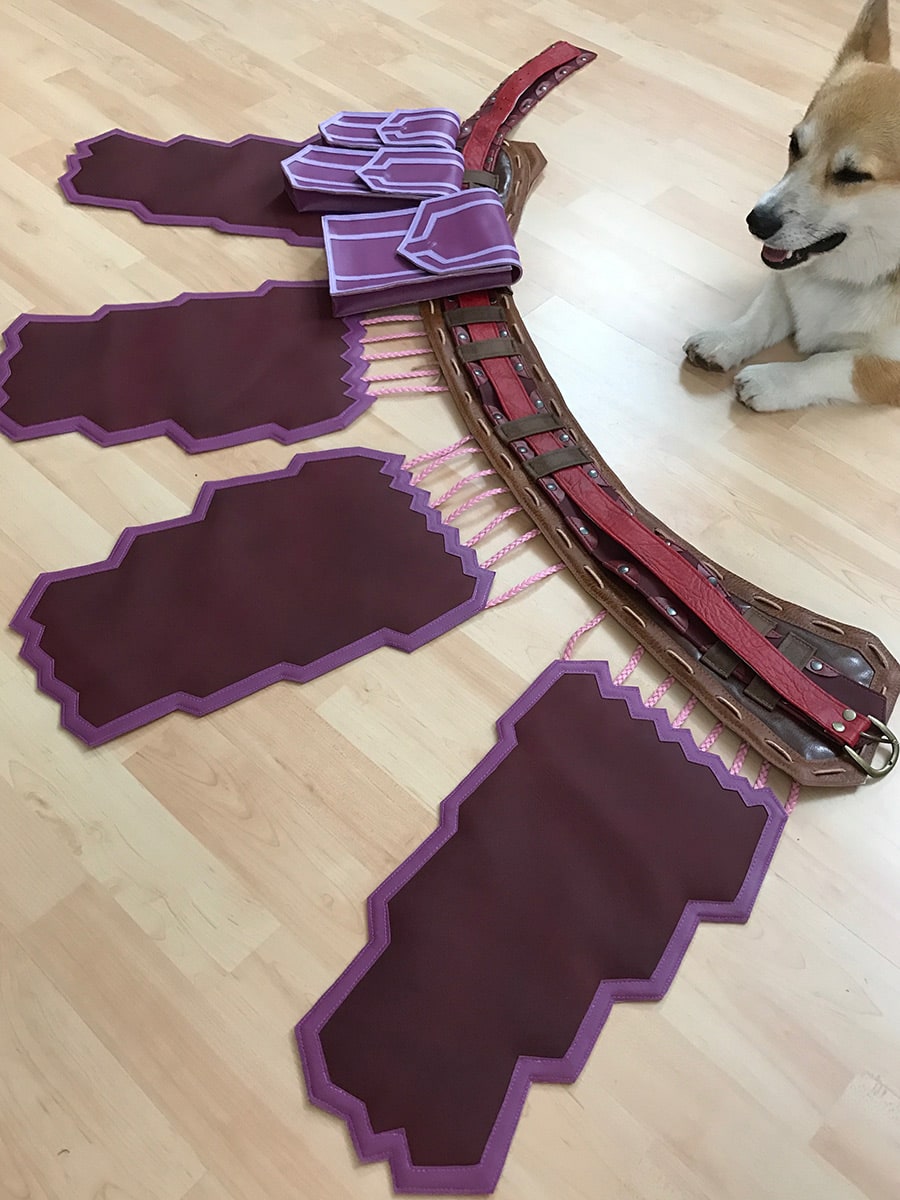
The hip area
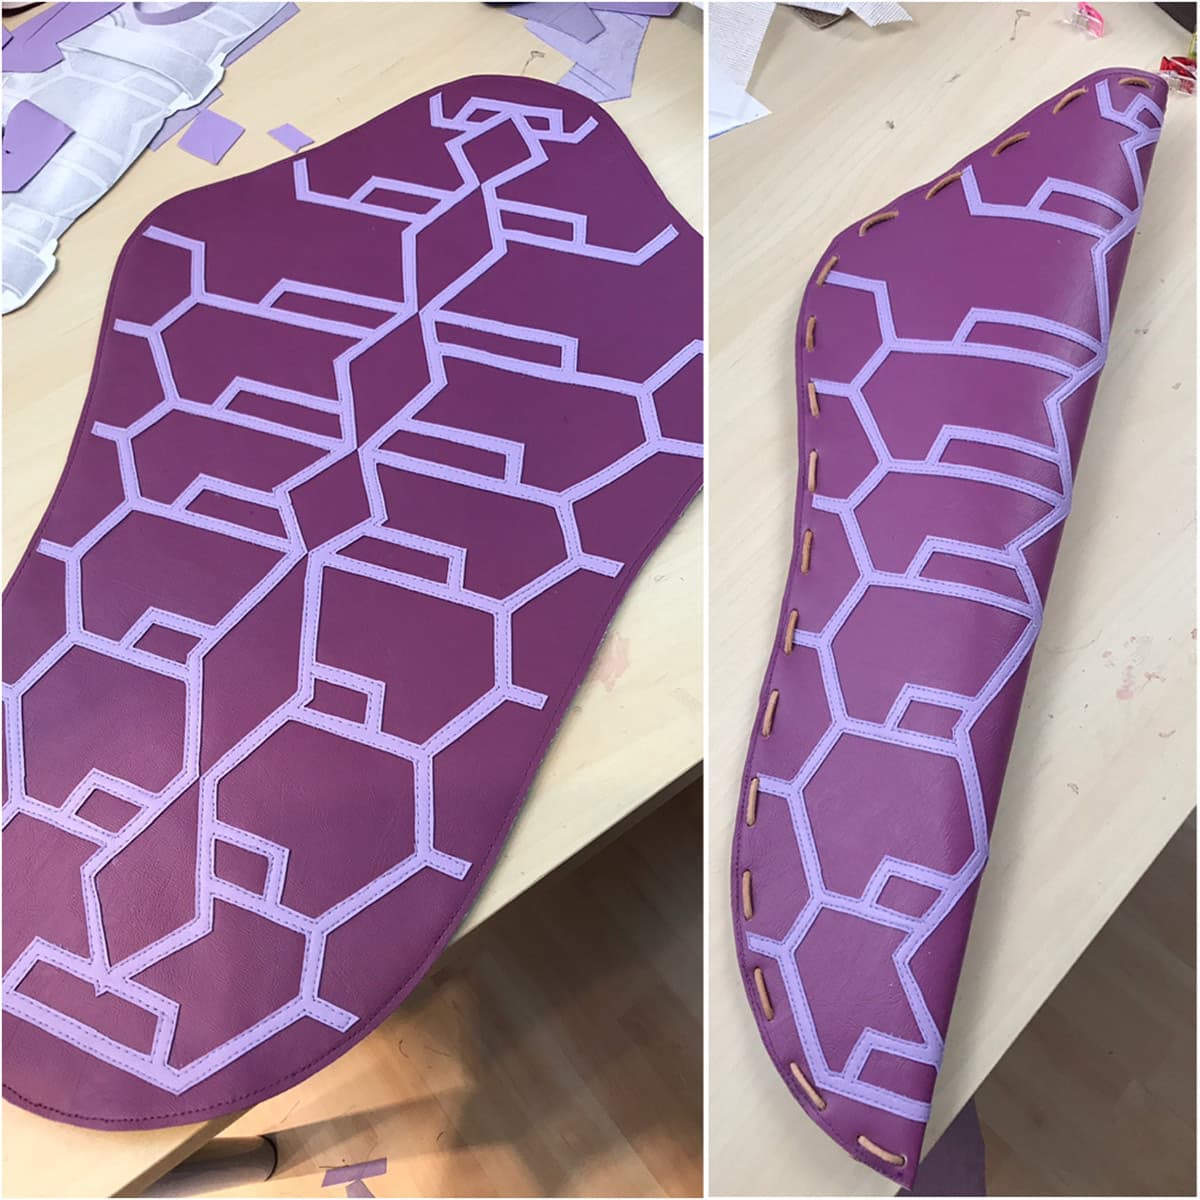
The hip armor flappies (and I seriously have no idea how to call them) were two layers of vinyl filled with volume flies and buckram. For an easy transportation and storage I also attached them only with velcro tape to the inside of the belt. This means I could take the whole belt apart, including the pouches, quiver and rope, which turned out really handy later.
The quiver began with a screenshot, which I printed out in different sizes to find the right measurements. Mirroring the shape, I cut out two layers of vinyl, glued and sewed it together and started tracing the ornaments the same way. As you might have guessed, especially this part was a lot of work, but I was really proud of how it turned out.

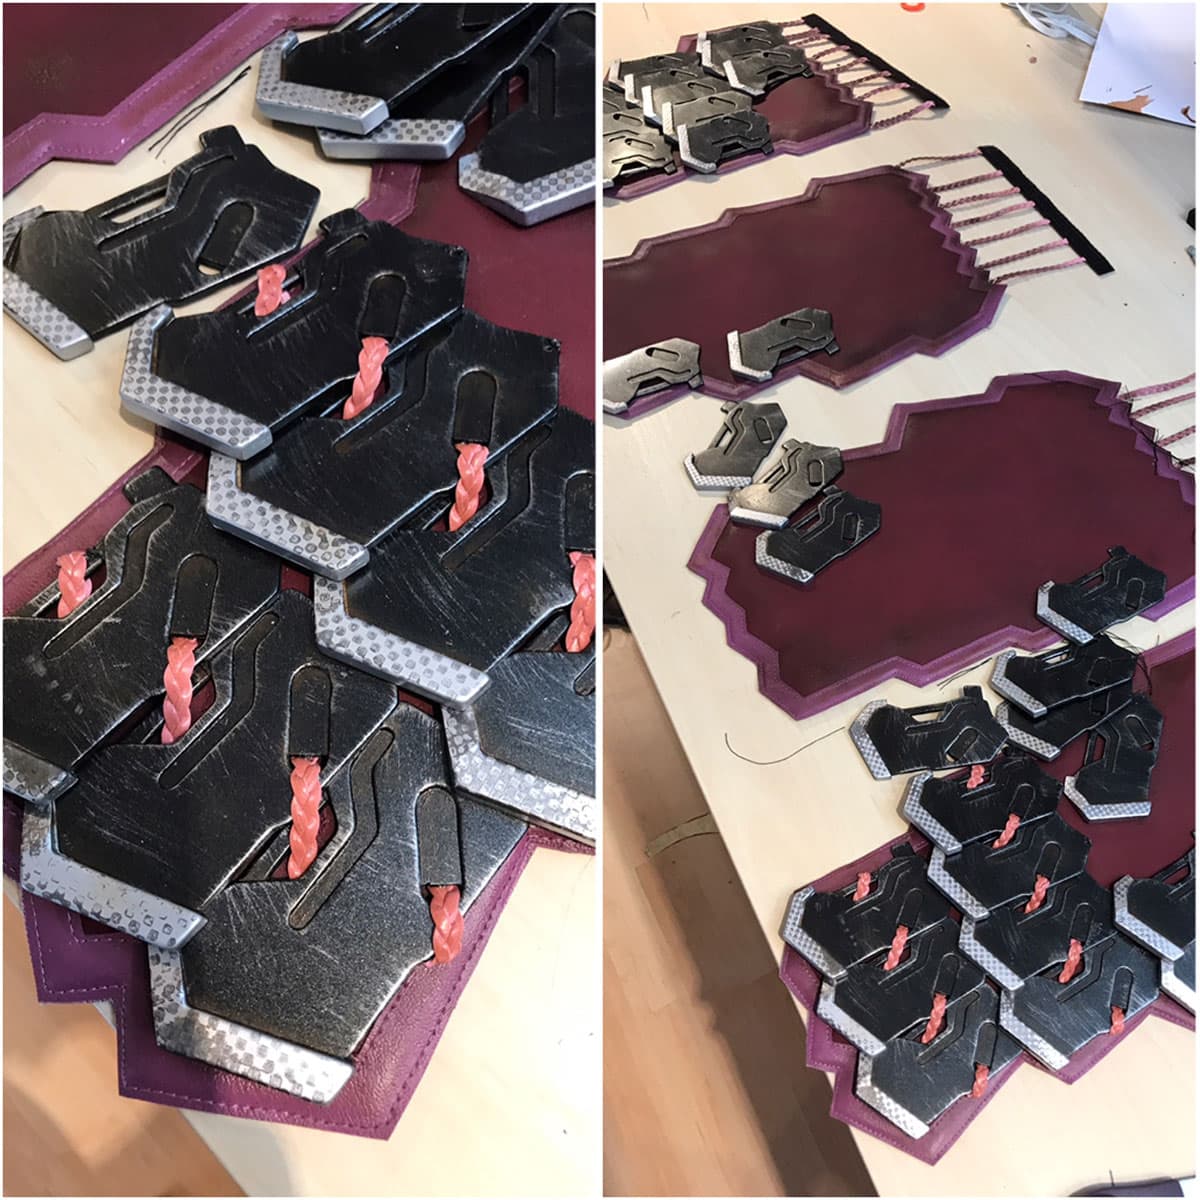
Finally I added some details, weathered the whole belt with airbrush and acrylics and combined all elements. This was the result so far:
The plate armor
I actually was a little bit worried about the massive amount of work and weight which went into creating all the scales on the hip flappies. Benni made a left and right piece out of laser cut styrene, created a mold and cast them 80 times in total. Their weight was around 2kg (4,5 pounds). Afterwards every single piece had to be painted and hand sewed on thin vinyl fabric.
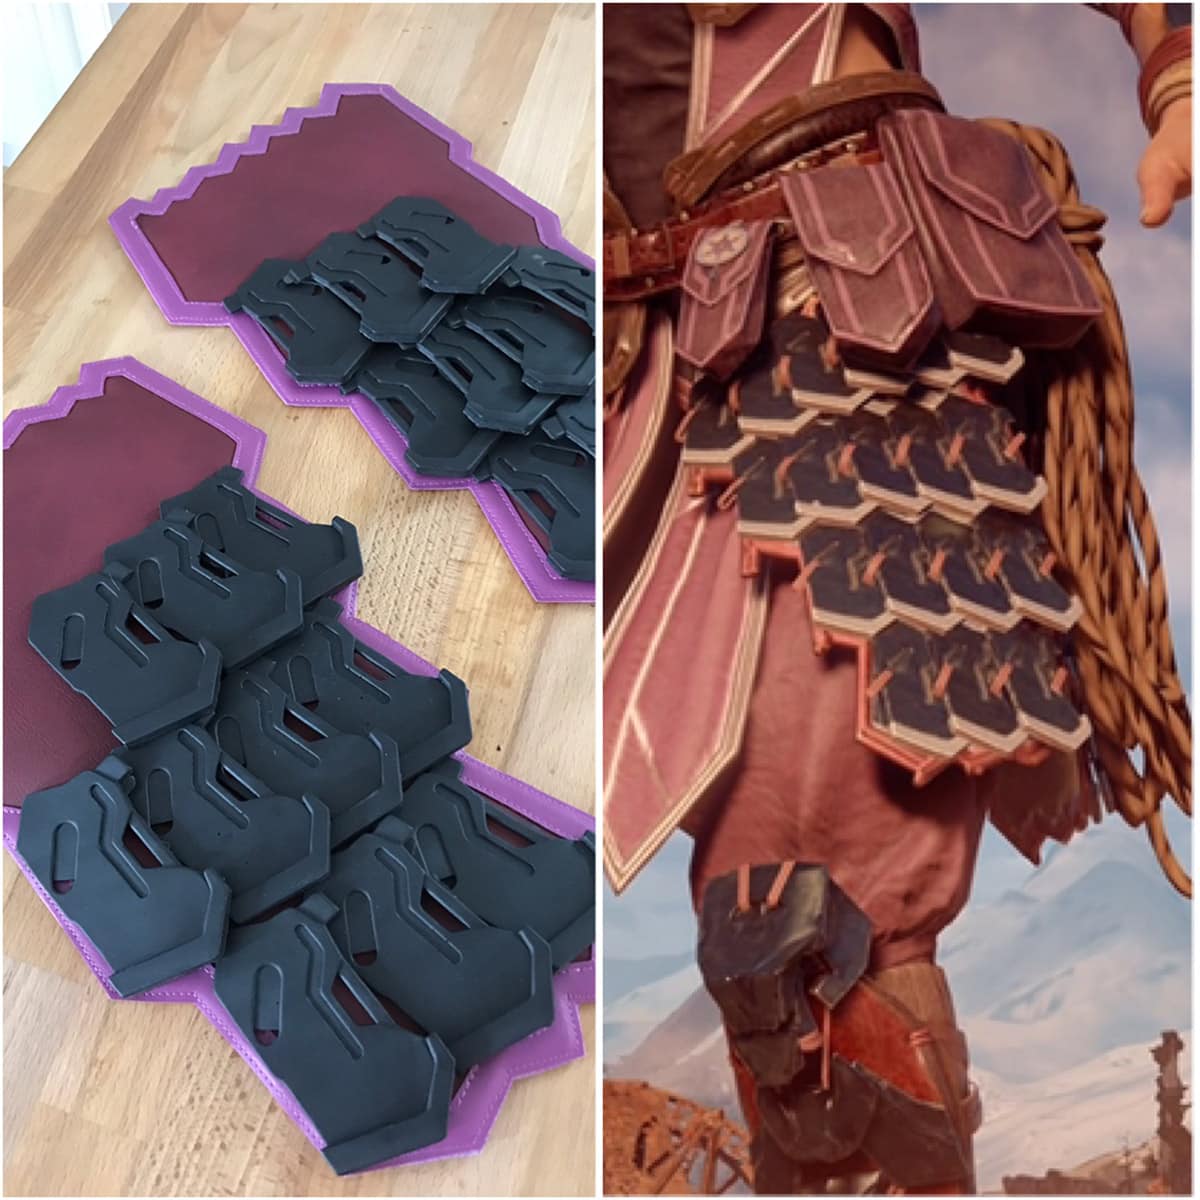
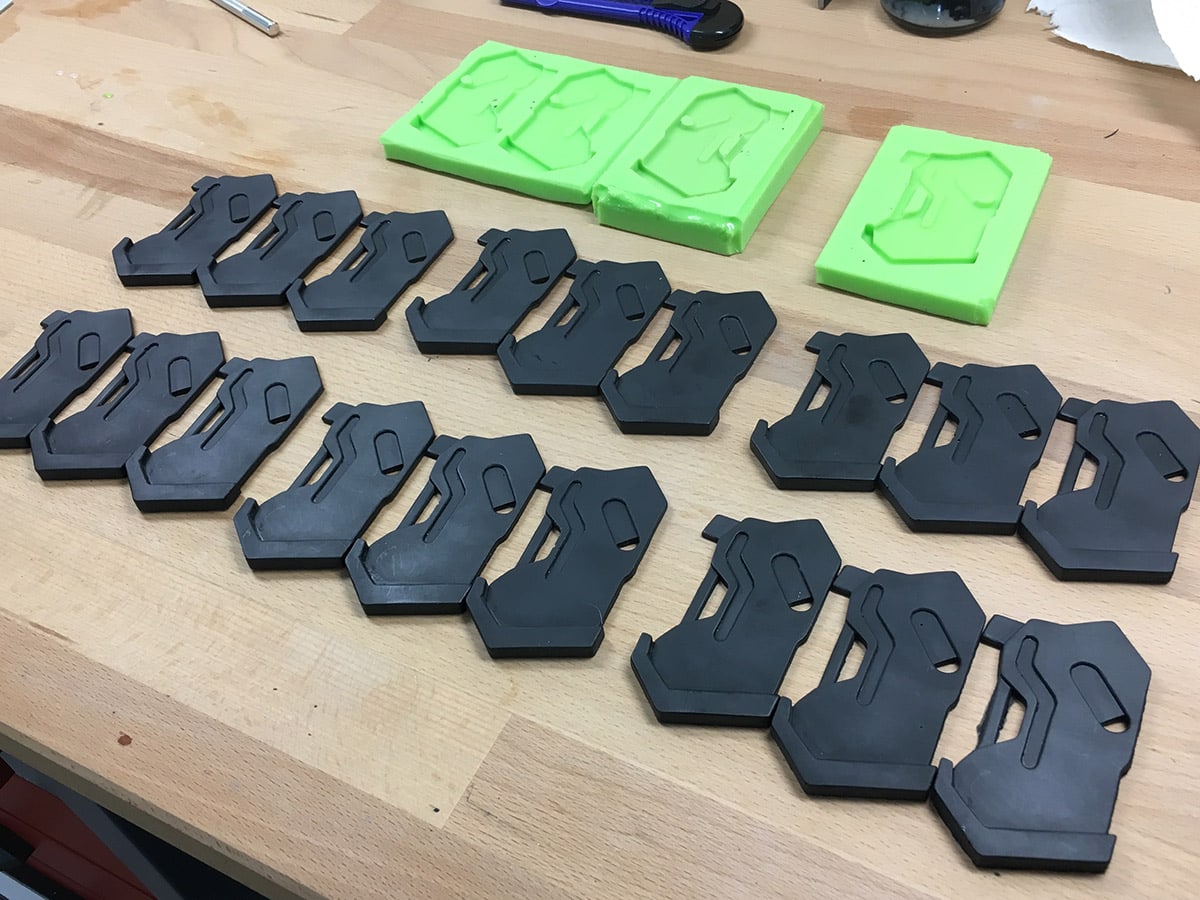
For the paint job, Benni and I made a little conveyer belt. I spray painted everything dark metal, Benni masked and airbrushed the silver bottom and added scratches. Following this I added a carbon fiber stencil, some brown oil paint for the weathering and a final protective coat of satin spray varnish. Finally I hand sewed everything on piece by piece.
Then we uploaded the next making of video for the belt:
By loading the video, you agree to YouTube's privacy policy.
Learn more
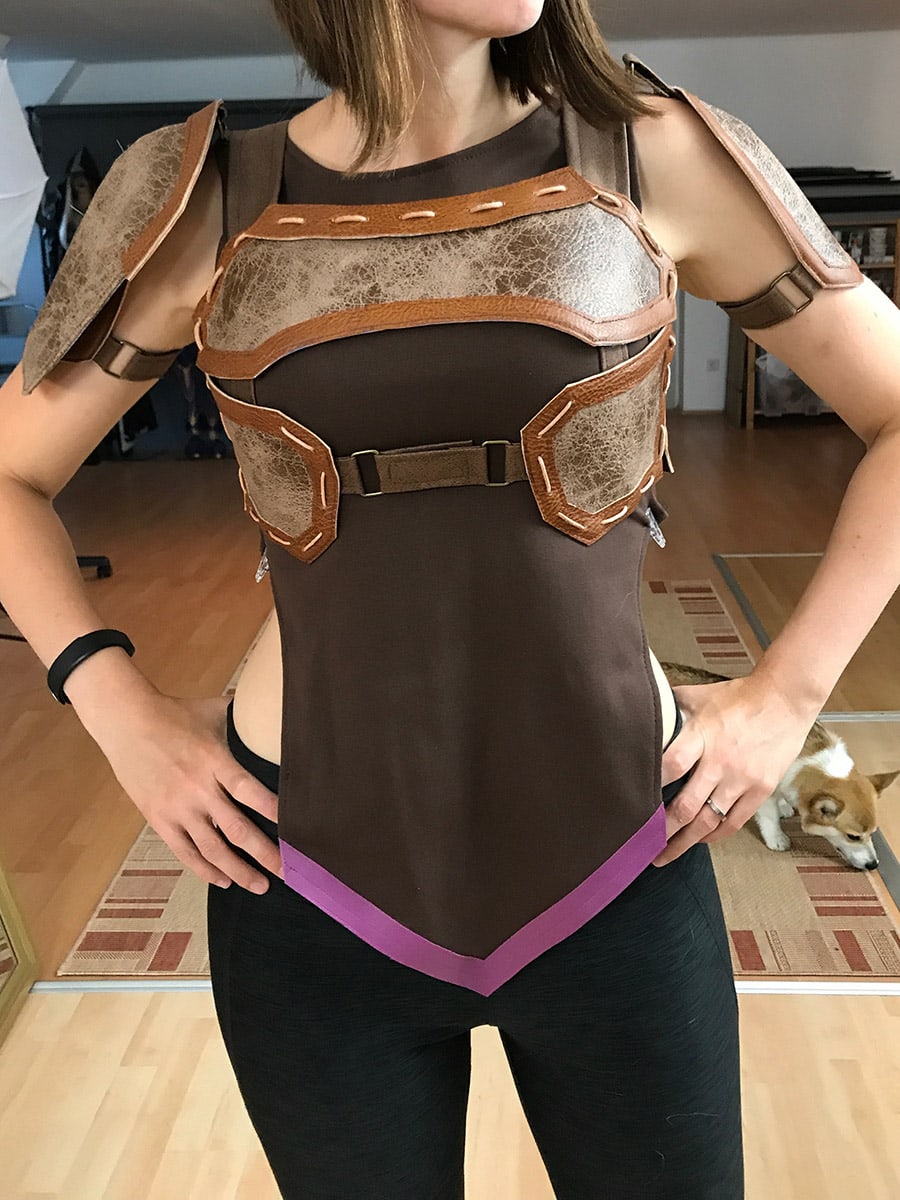
The leather breastplate
Next part was the breastplate. I made a base out of faux leather and tried to keep it as close to the original as possible. Half of the armor pieces were actually floating over Aloy’s chest, so some adjustments were necessary. Still I’m really happy that Guerilla Games provided Horizon Zero Dawn with a pretty useful photo mode, which allows us to move the camera around Aloy and even change the light. Additionally I had the feeling, they really thought about how this design might actually work and added plenty of belts, buckles and strings. It seams they wanted to create something that would work in reality as well – and not many concept artists are doing this!
So this result was pretty much based on 20 screenshots.
After adding some details, I also sewed the base of the shoulders as well as a shirt for the costume. I made the patterns for the breastplate by wrapping myself in duct tape and drawing them on afterwards. That’s the reason why the fit turned out pretty perfect.
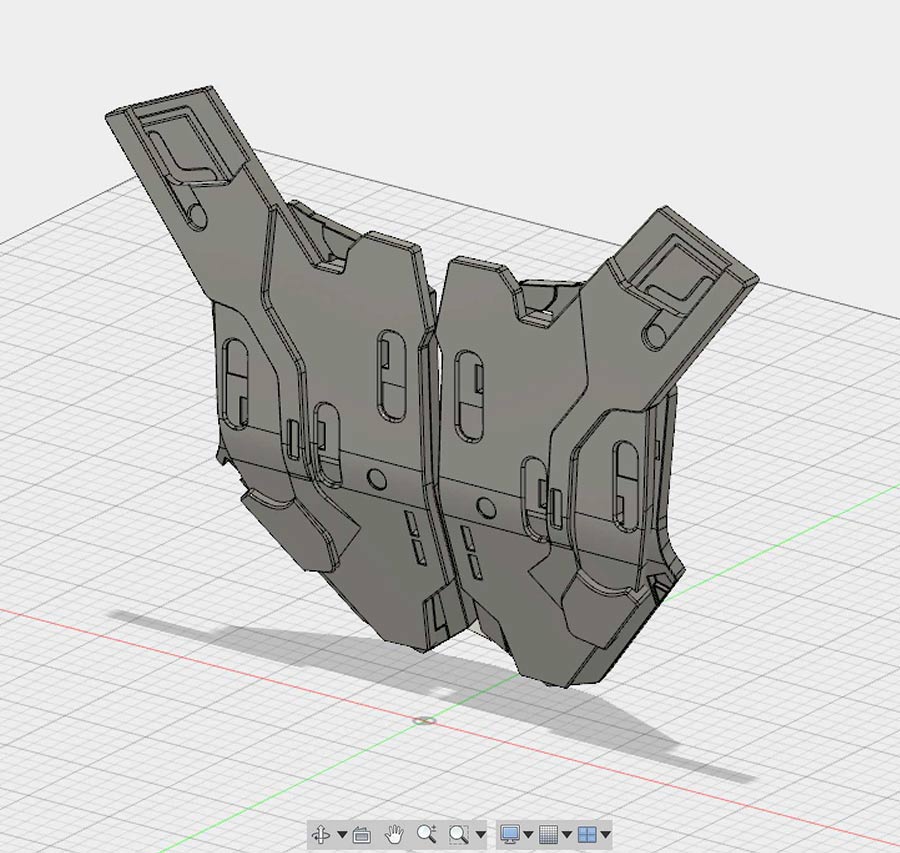
The 3D printed armor
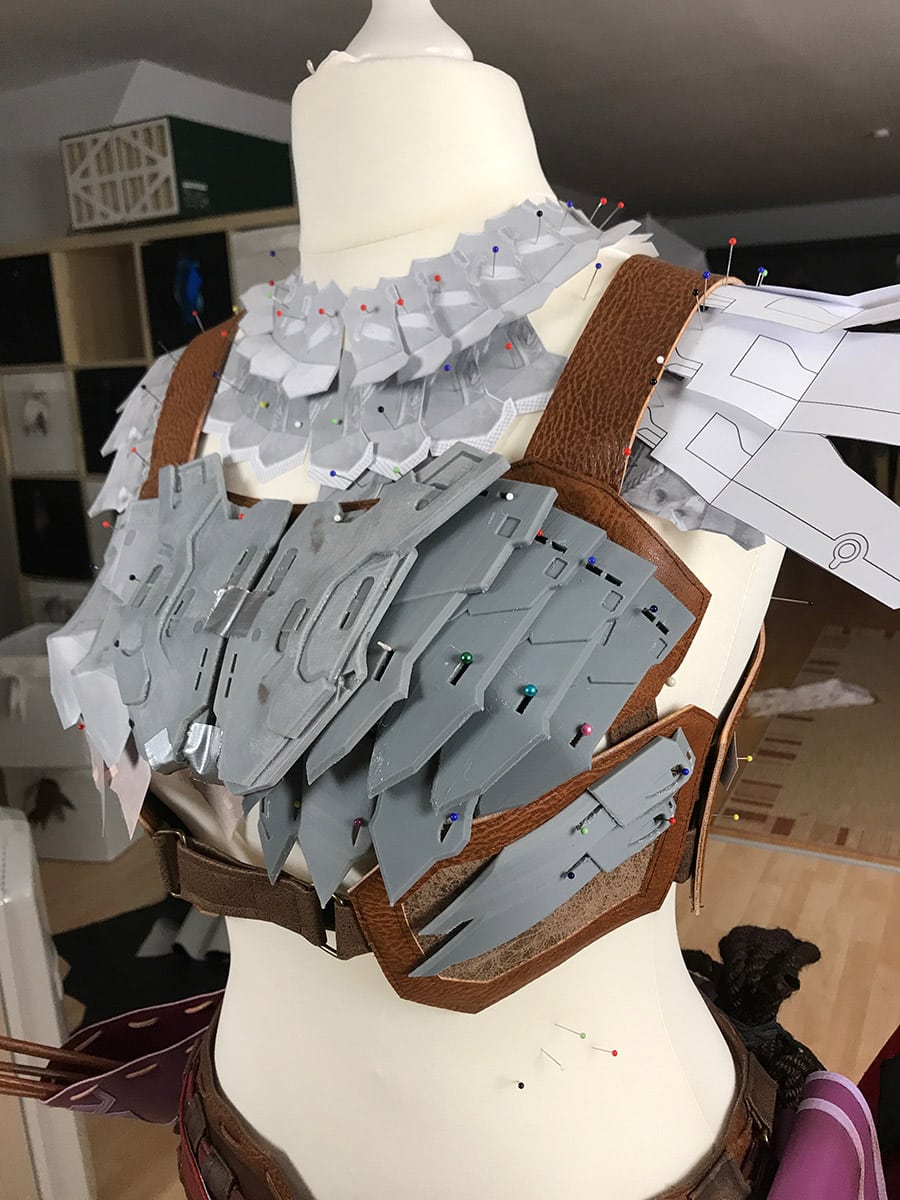
Afterwards Benni made one million more in game screenshots, cut every single armor piece out in Photoshop, printed out in life size and pinned it as a paper dummy on my mannequin. Even this simple step took him already several hours of work.
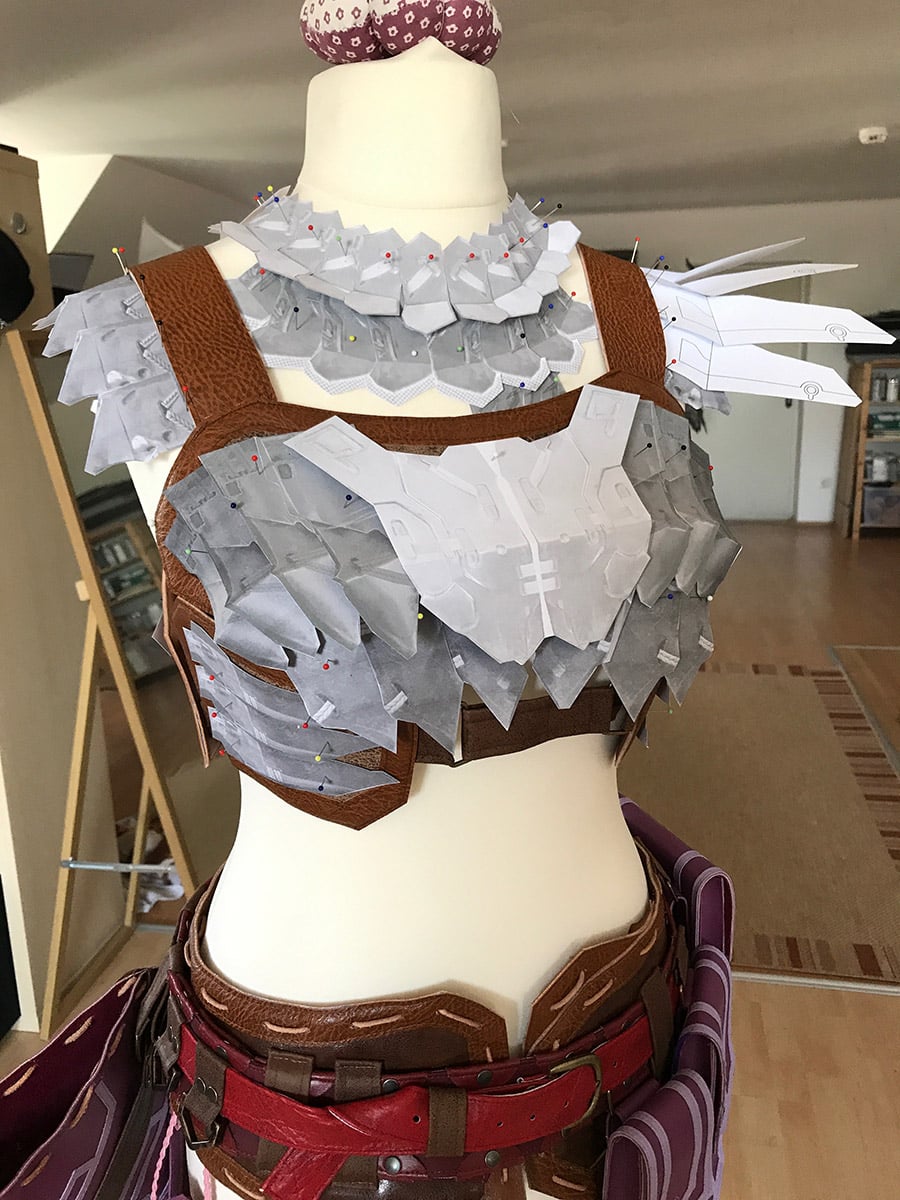
Once he got the shapes and sizes for every single part right, he used those as a reference to 3D model them in Fusion 360. Despite of looking quite similar, each piece had to be built up completely from scratch and especially the front middle element was a huge challenge for him. Afterwards, several days of printing had begun and Benni slowly replaced paper dummy by paper dummy with a 3D printed plastic piece. At this time I didn’t thought about the attachments, so he simply pinned all pieces onto the breast plate.
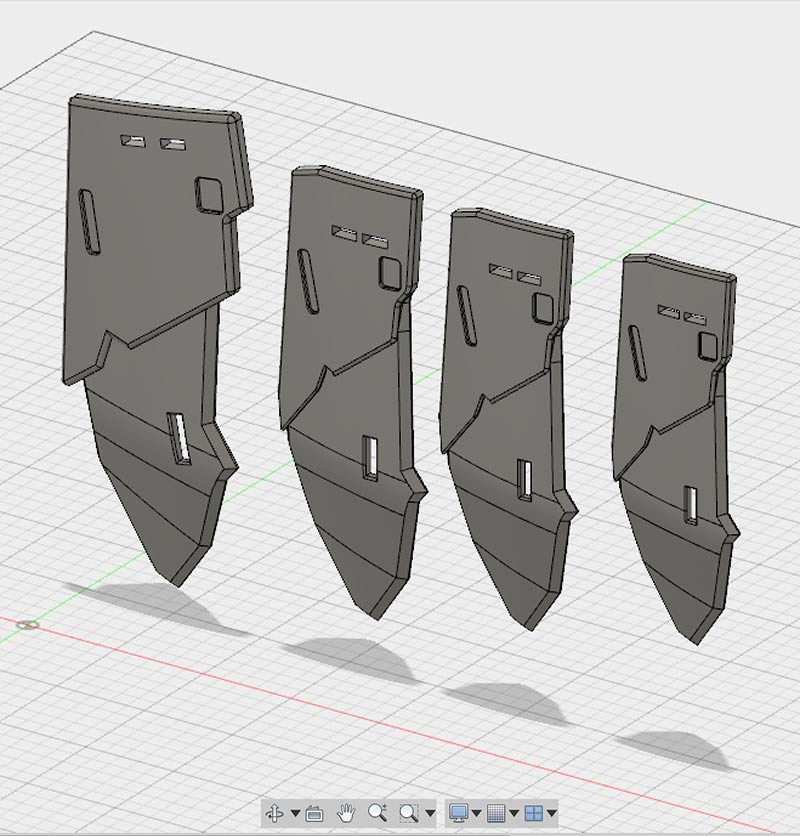
While the 3D printer was still busy printing, Benni begun sanding all elements and creating other ones with the laser cutter. Once everything was done, a crazy painting marathon begun and we spray painted, airbrushed and weathered over 100 parts.
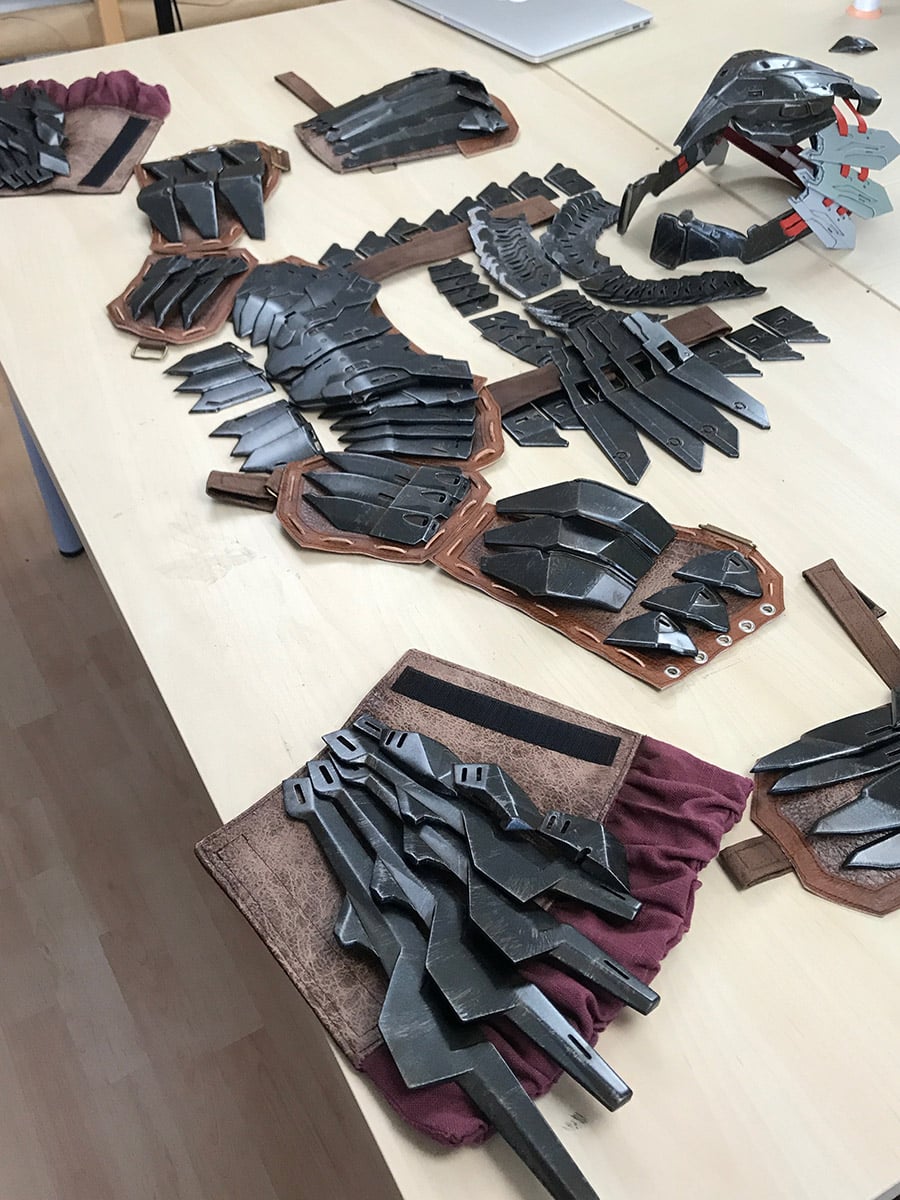
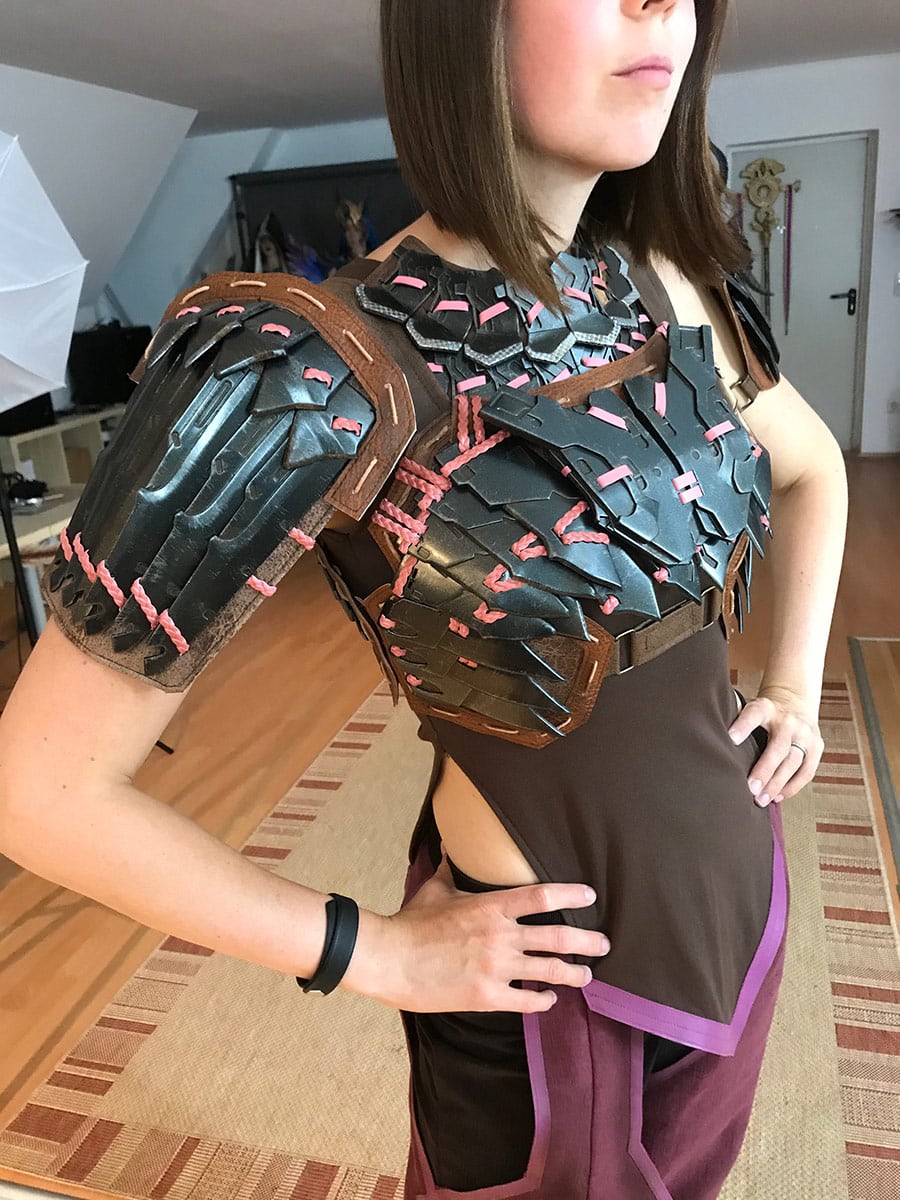
Afterwards we both also hand sewed all parts one by one onto the leather of the breastplate and shoulder armor. I absolutely felt in love with the result!
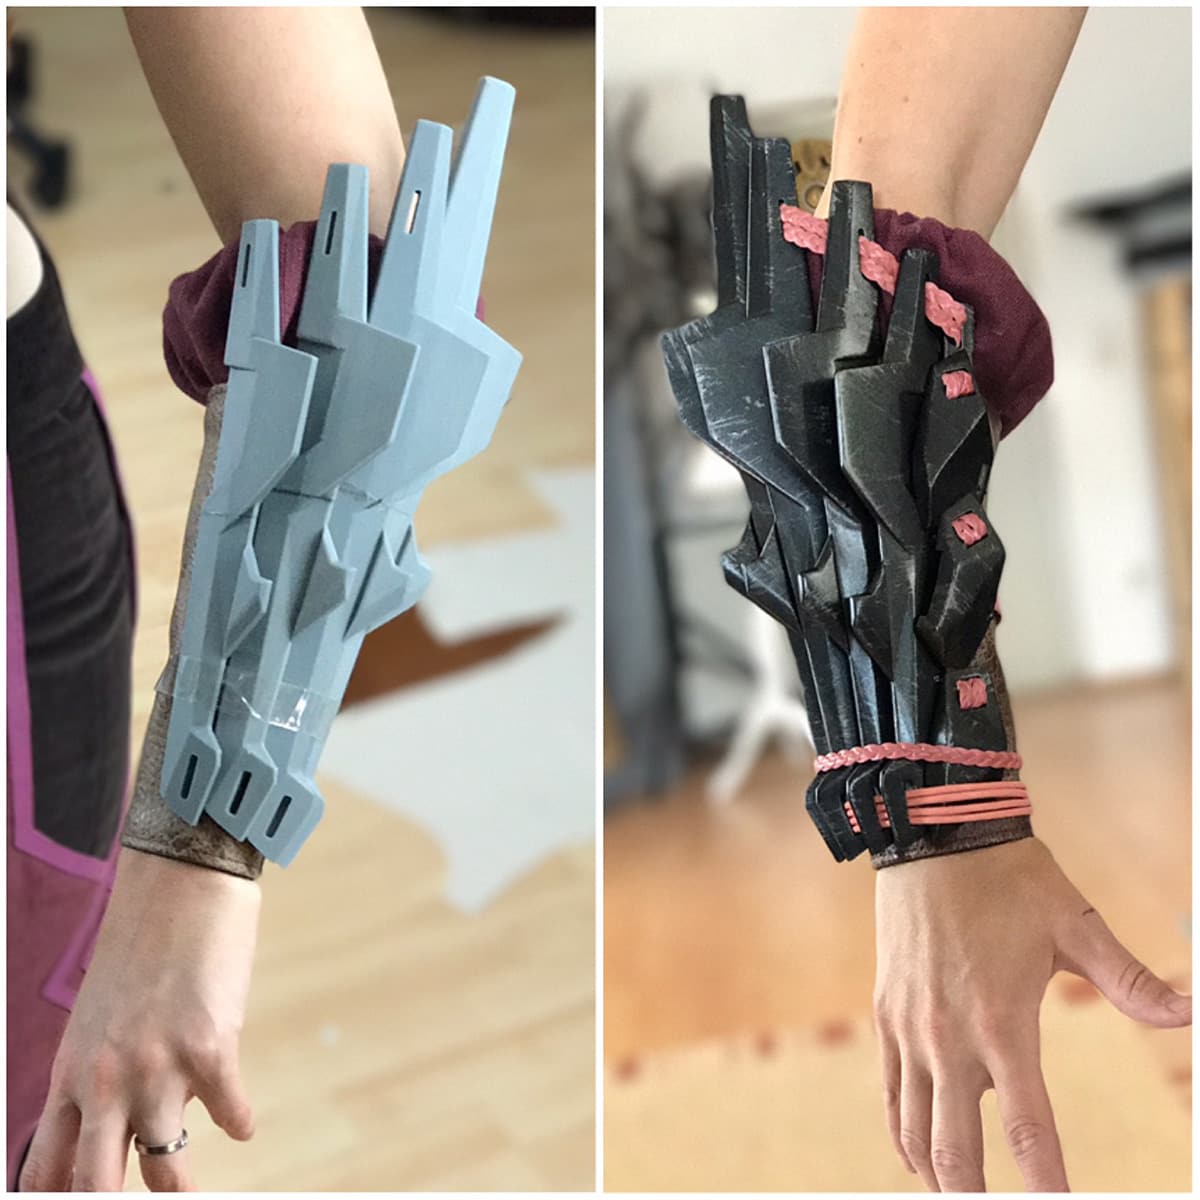
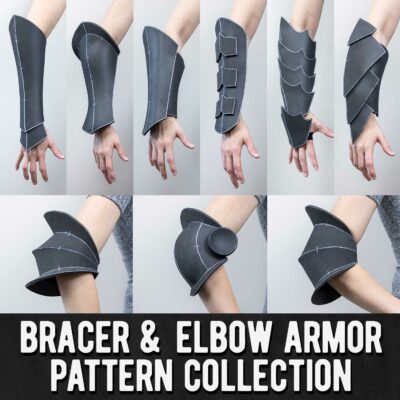
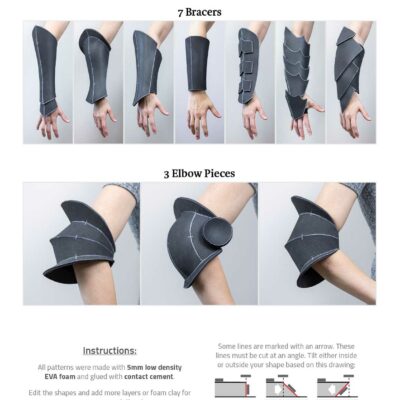
The bracers
Oh, and we also finished the bracers. They were also 3D modeled by Benni and printed with our Zortrax M200 machine(s). All the pink belts were supposed to be the actual attachments in the game, but I noticed pretty early that this doesn’t work. So I hand sewed them on as before and the belts were just decorative elements.
And here is the next making of video! Just in case you want to see even more progress details of the breastplate!
By loading the video, you agree to YouTube's privacy policy.
Learn more
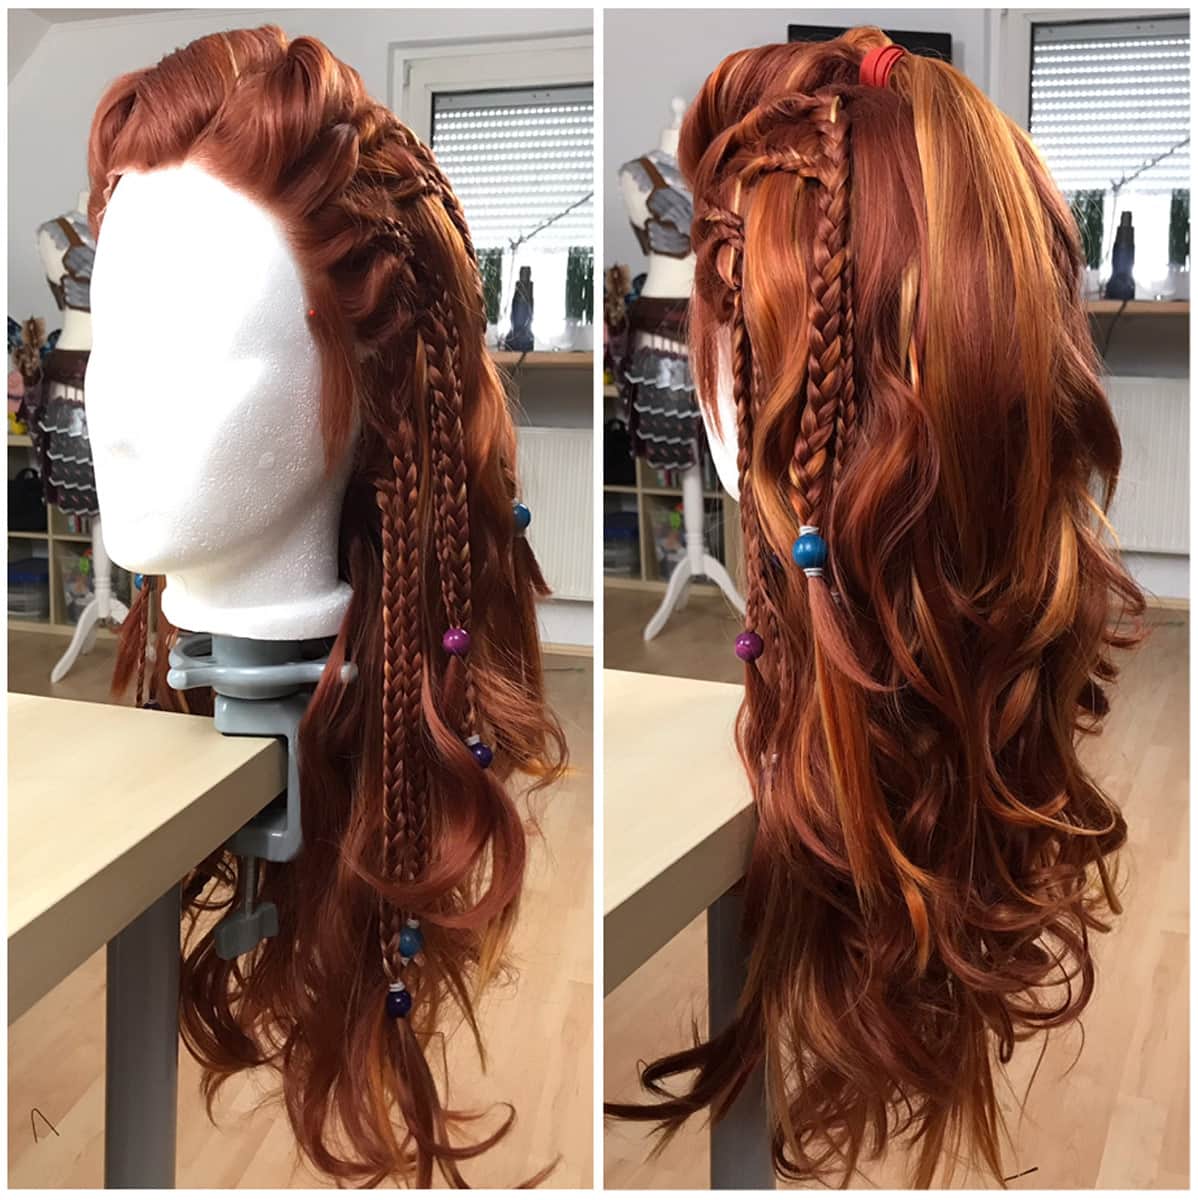
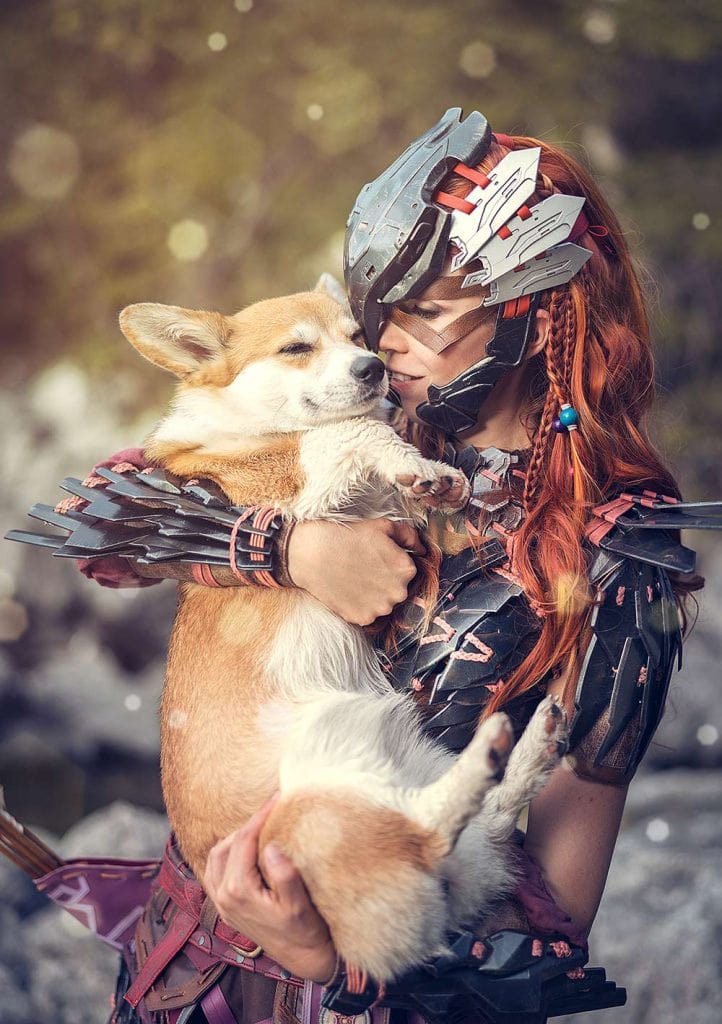
The wig
Now it was finally time for Aloy’s wig. The base was a Matilda dark copper red from Ardawigs plus pumpkin and light blonde wefts I attached with fabric glue. The wefts actually gave the wig a lot of extra volume and nice, interesting highlights. Since it was really hard to find the right color, I actually thought about dying a wig, but at the end I was quite happy with this result. Afterwards I cut the wig into the right length, added tons of braids, curled it and fixed everything with super strong hairspray.
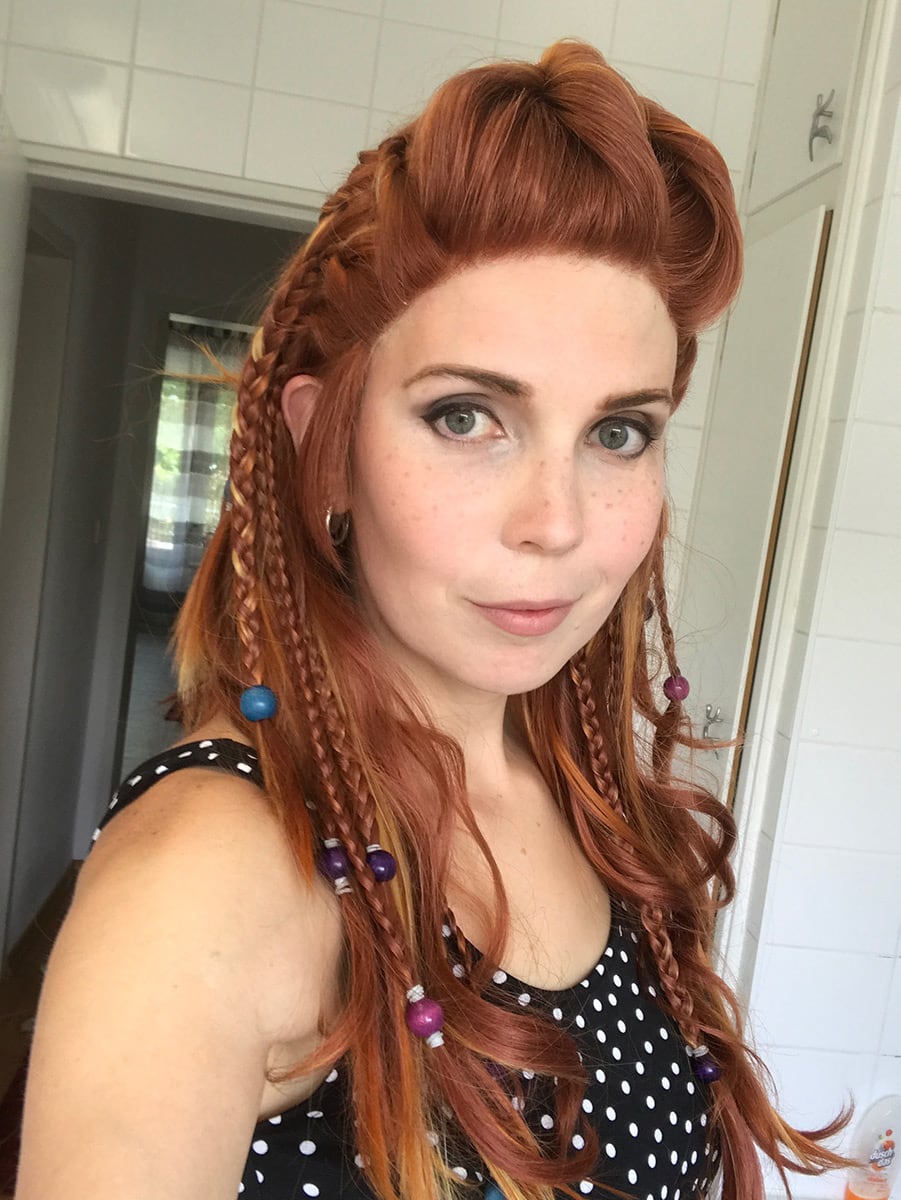
I actually finished this part already pretty early, but didn’t dared to try it on and do a make up test. To be honest, I was just not comfortable with my body shape to portrait Aloy. I avoided my scale for 3 years and Aloy finally pushed me to check my weight – noticing that I gained 22 pounds! Man! And Aloy… well, she is athletic and I was not. So she became one of the reasons to get back in shape again. I’m simply a perfectionist and just as much I wanted to recreate the costume as perfect as possible, I also wanted to look like Aloy as much as I could. So I changed my nutrition and working out became just as much costume progress as working on the costume itself. I worked out daily for three months and finally tried the wig on. Luckily my plan actually worked and I am a lot fitter now! I put some simple make up con, added some freckles on top of my own freckles and put the wig on. Benni said, I looked like Aloy and I was soooo happy!
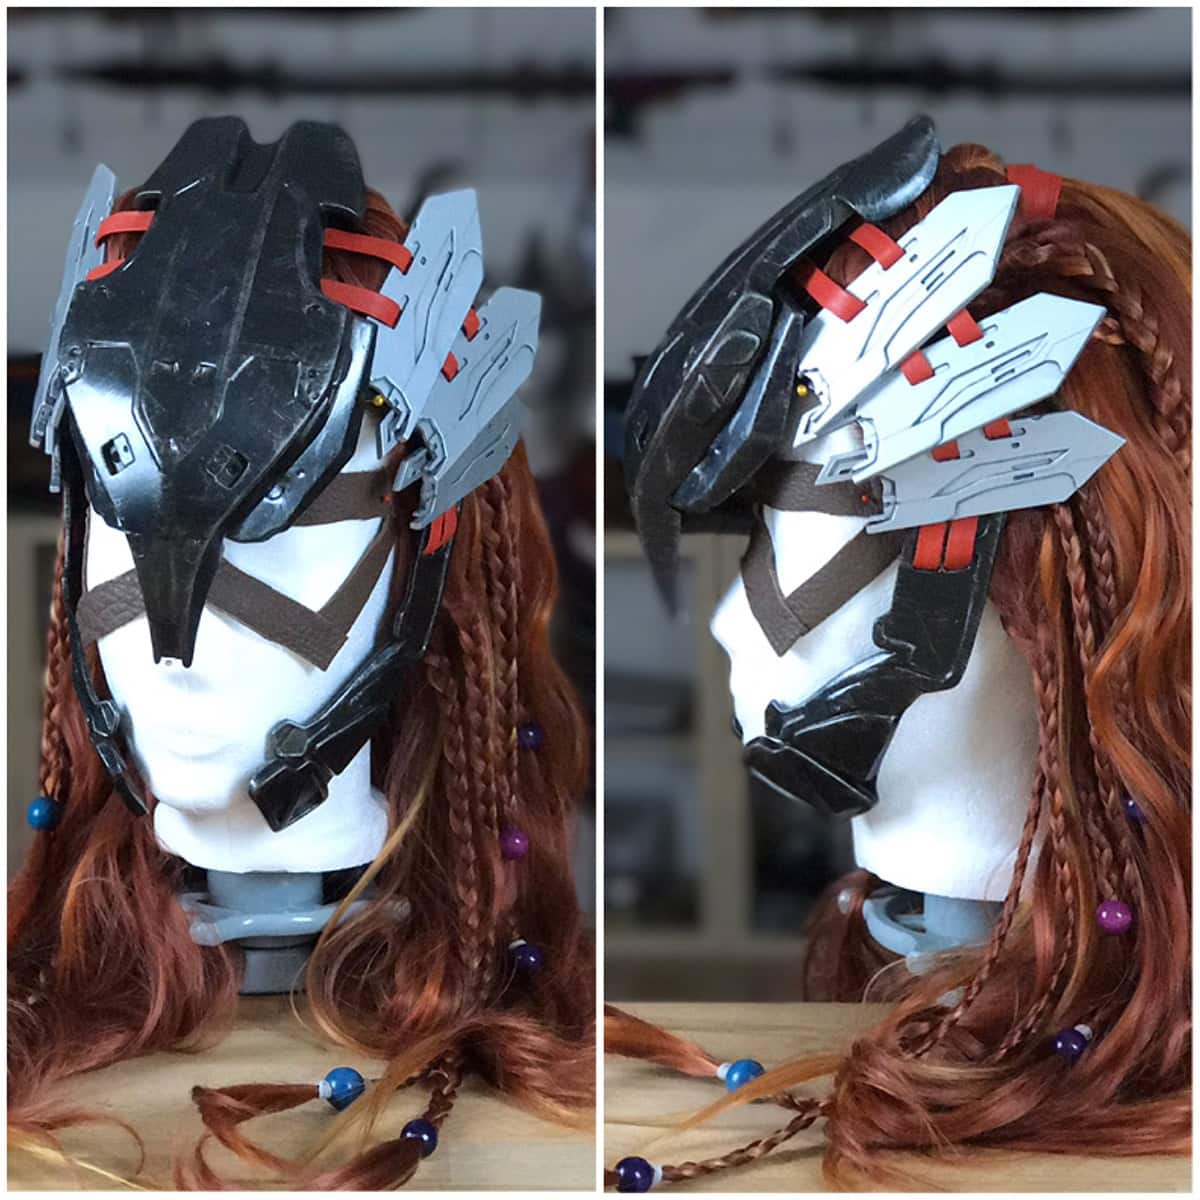
The headpiece
The next part was Aloy’s massive mask. During the project, Benni got already much better in 3D modeling, but this costume piece was still too challenging for him. So he asked his brother Jakob (@blackmaskedfox), who is a professional 3D artist, for help. Two years ago I actually did a full body 3D scan of myself in Los Angeles, so he was able to 3D sculpt the mask directly on my head. Afterwards Benni laser cut the white pieces on the sides separately.
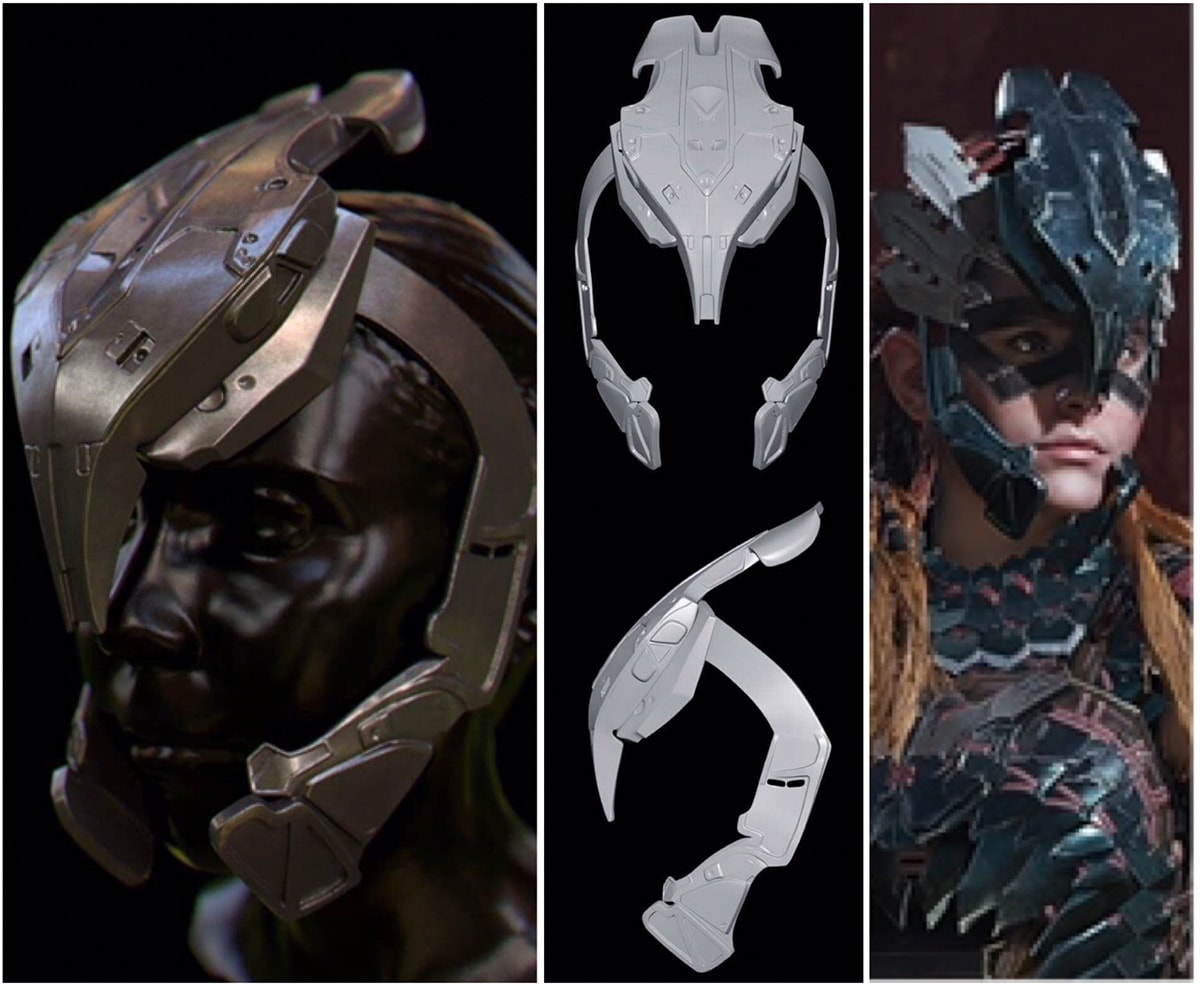
Once everything was printed and laser cut, this was the result.
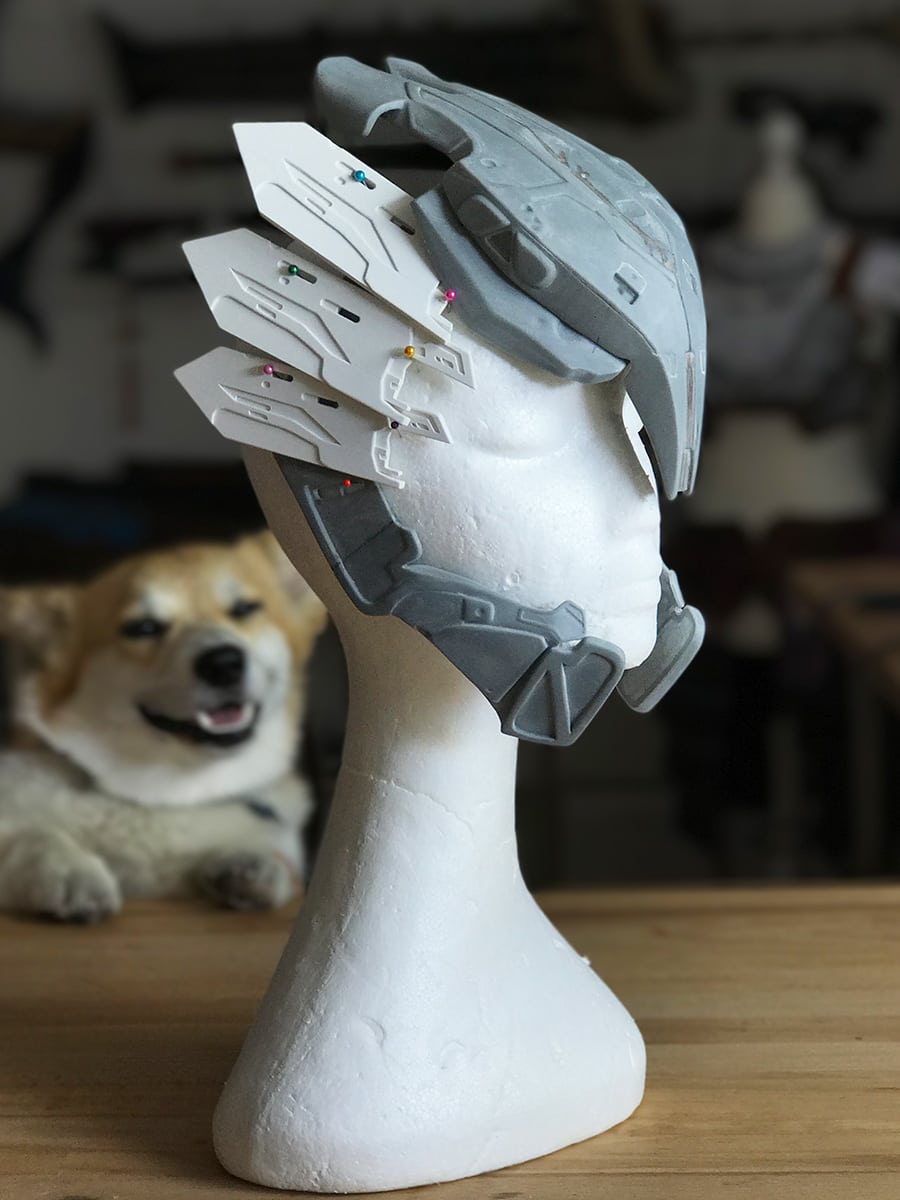
To assemble all parts, Benni first painted everything and we carefully glued them together with a mix of ABS and acetone afterwards. Looked pretty good so far!
So finally, we made the next making of video, this time about the wig including a make up test as well as creating the mask.
By loading the video, you agree to YouTube's privacy policy.
Learn more
The first test
Well, and just when I wanted to try the full costume on I noticed I lost 10 kilos (22 pounds) in total. Now my breastplate didn’t fit anymore, the belts around my legs need to be adjusted and my pants were far too wide. I was fit and in shape like Aloy. However, at the same time my weight loss gave me some extra trouble and forced me to change several costume pieces.
So I spent more time to make some major adjustments here and there.. and FINALLY I tried the whole costume on the very first time!
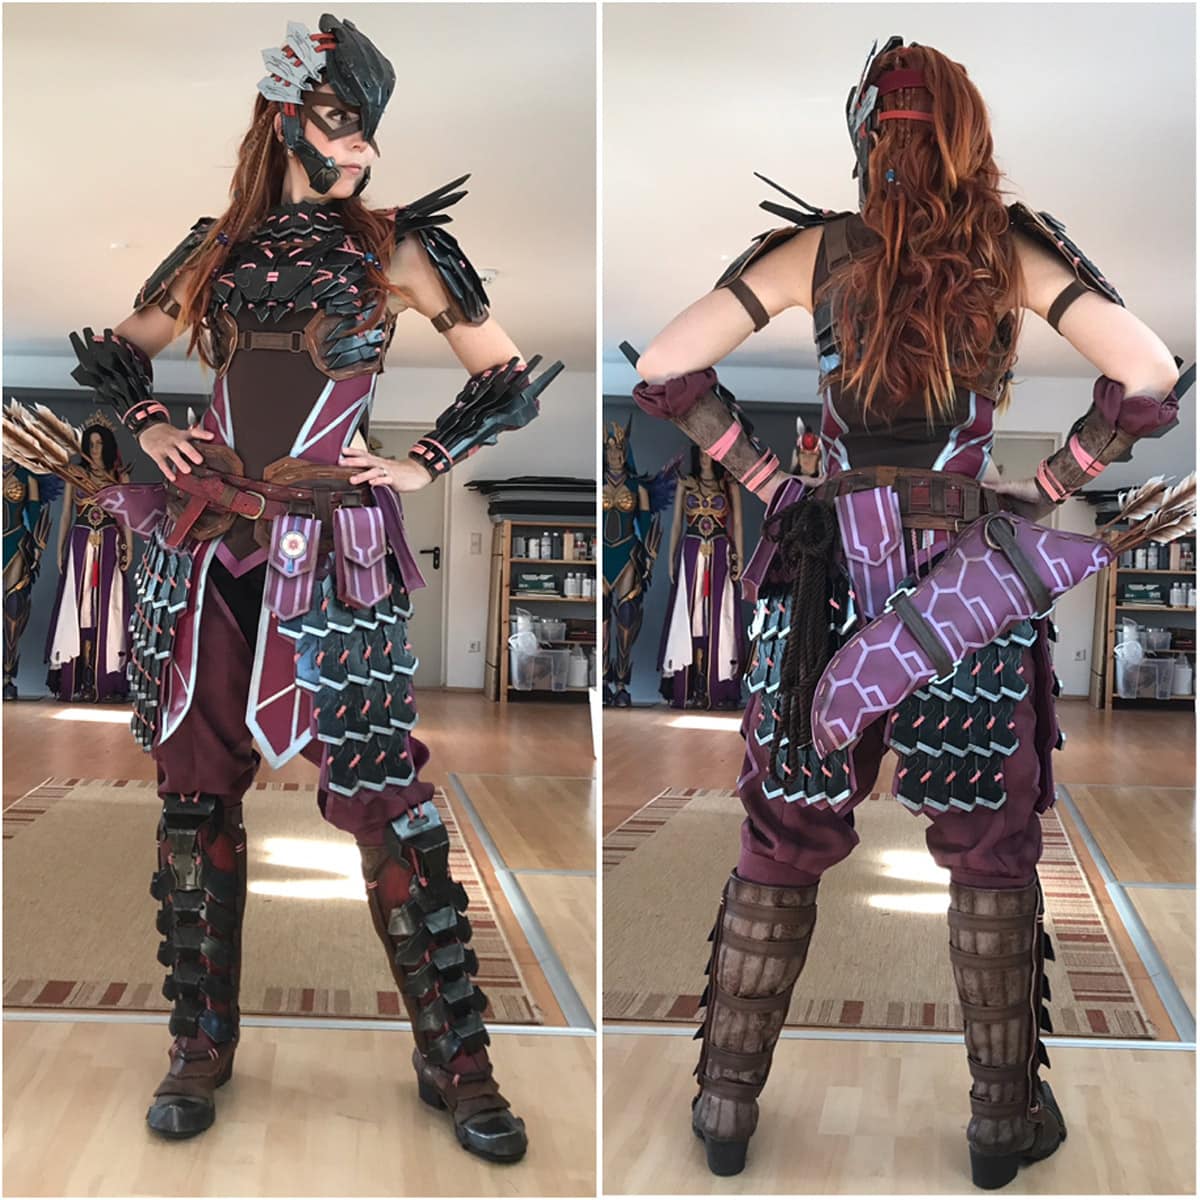
As you can see in the dressing up video, Aloy’s Shadow Stalwart armor turned out very functional and comfortable! Everything was nicely attached, the costume moved naturally and was well balanced. In addition, was very easy to get in and out. After 14 years of cosplay, Aloy is the one costume which included all the knowledge and experience Benni and I gained in the past. Being our biggest challenge, the costume turned out just as I wanted and we were really proud. Well… there was just one little problem.
Wearing 240 3D printed, laser cut and molded armor pieces in addition with plenty of layers of vinyl and faux leather made the Shadow Stalwart armor quite heavy. Around 10 kilos or 22 pounds to be precise – exact the same amount I actually lost during my work out! OH THE IRONY! While the costume was very comfortable and sat perfectly, it was pretty exhausting to wear it. No wonder that Aloy is so fit! She climbs and swims in this gear!
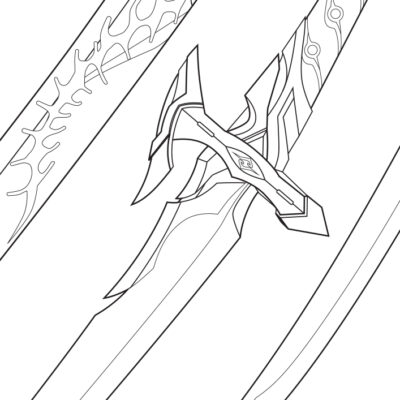
The weapon
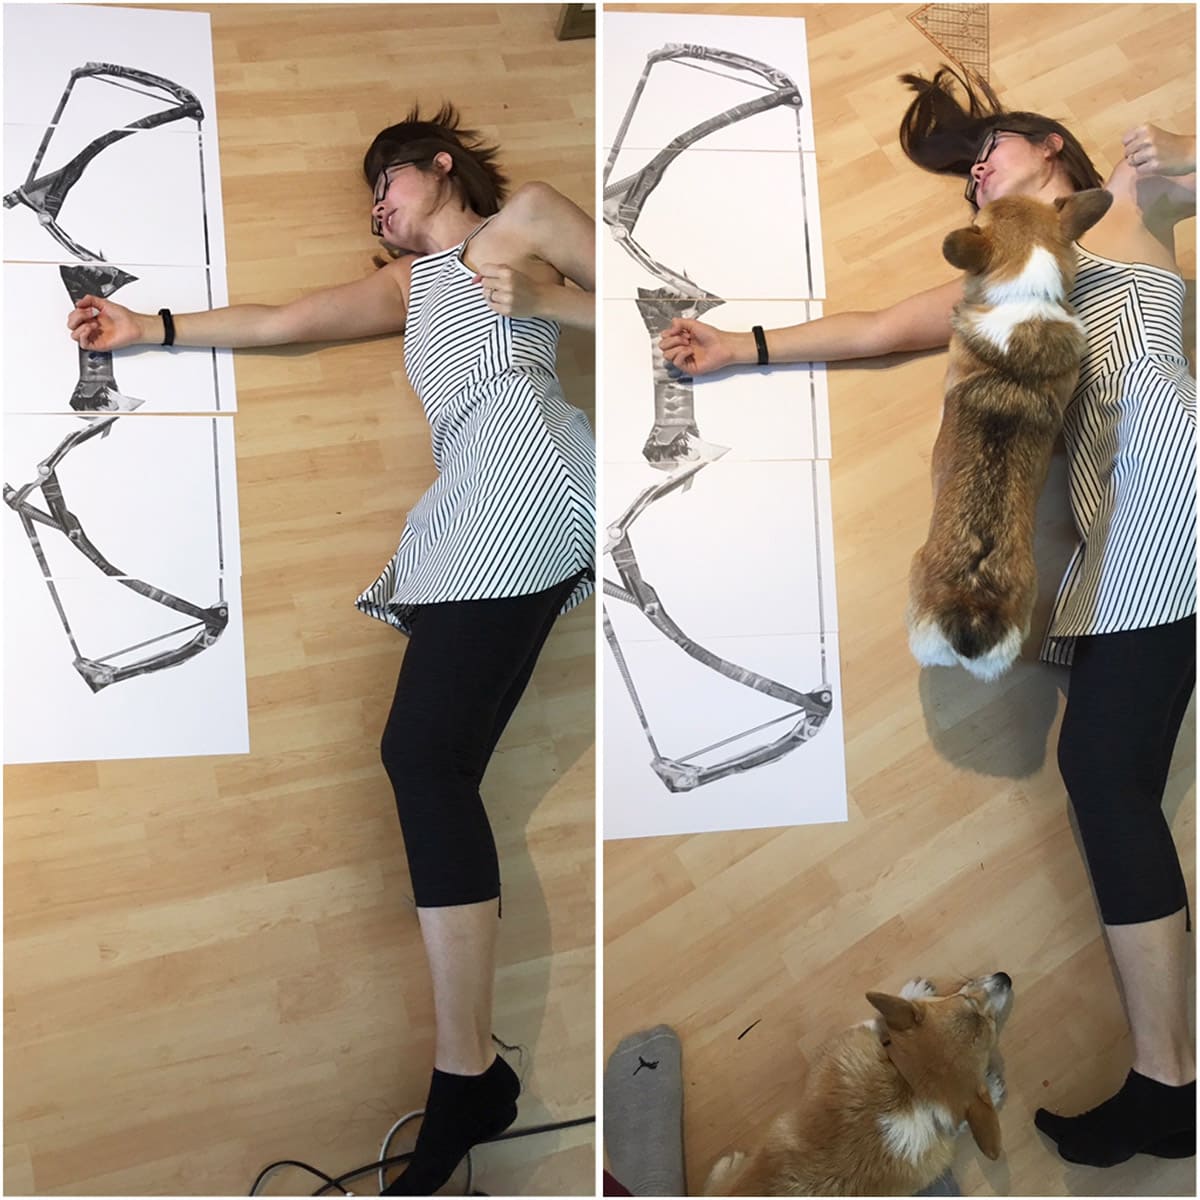
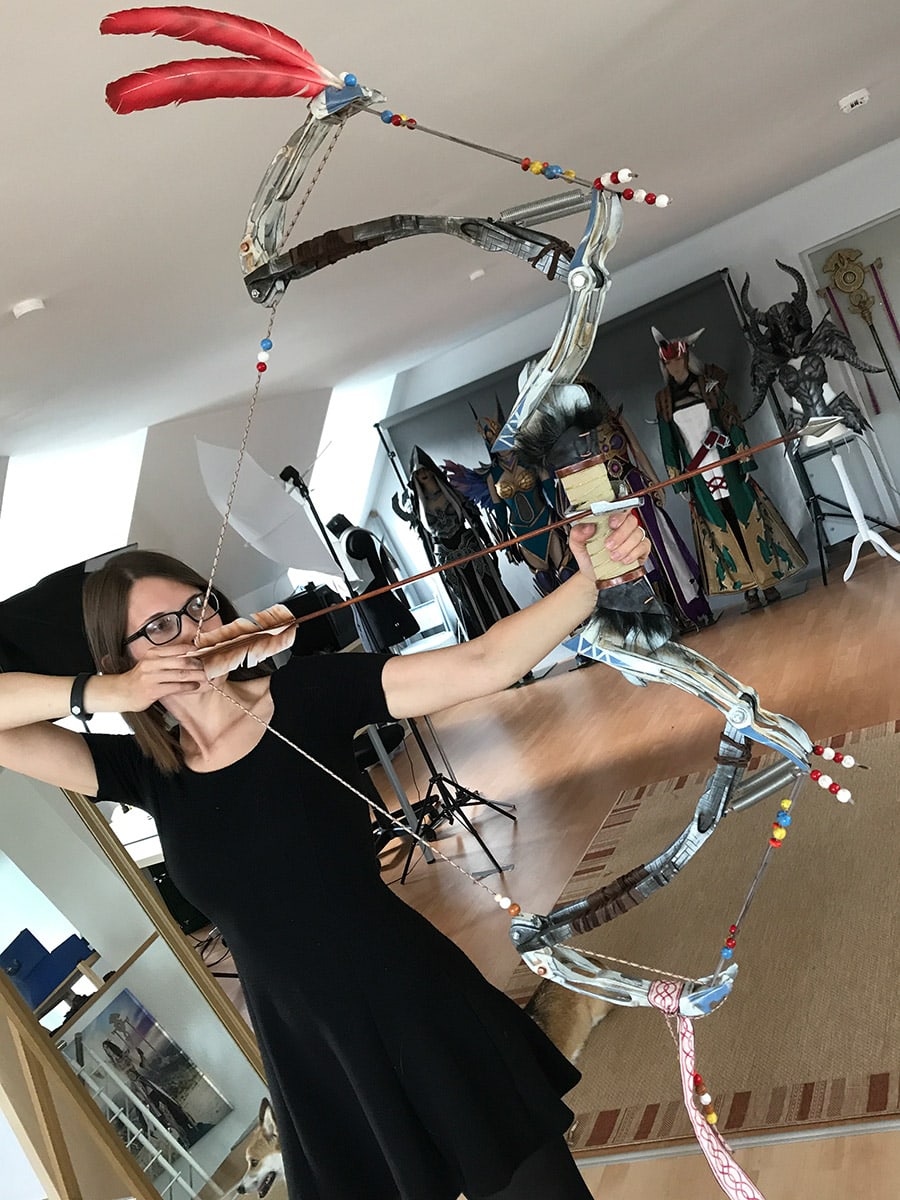
While having the costume done was pretty exciting, one important part was still missing. A weapon! Benni and I didn’t want to build the standard War Bow most other Aloy cosplayers already did before. Instead we searched for something more unique and also more challenging. We decided to pick the Shadow Sharpshot Bow, which was quite fragile and had moving elements when Aloy pulled the string.
Since I was already busy with the next project, the Erazer Girl, Benni was left alone to build the bow for me. First he printed two screenshots in life size and I laid down to take a few photos. It was up to me to decide which bow I prefer and I surely chose the bigger version.
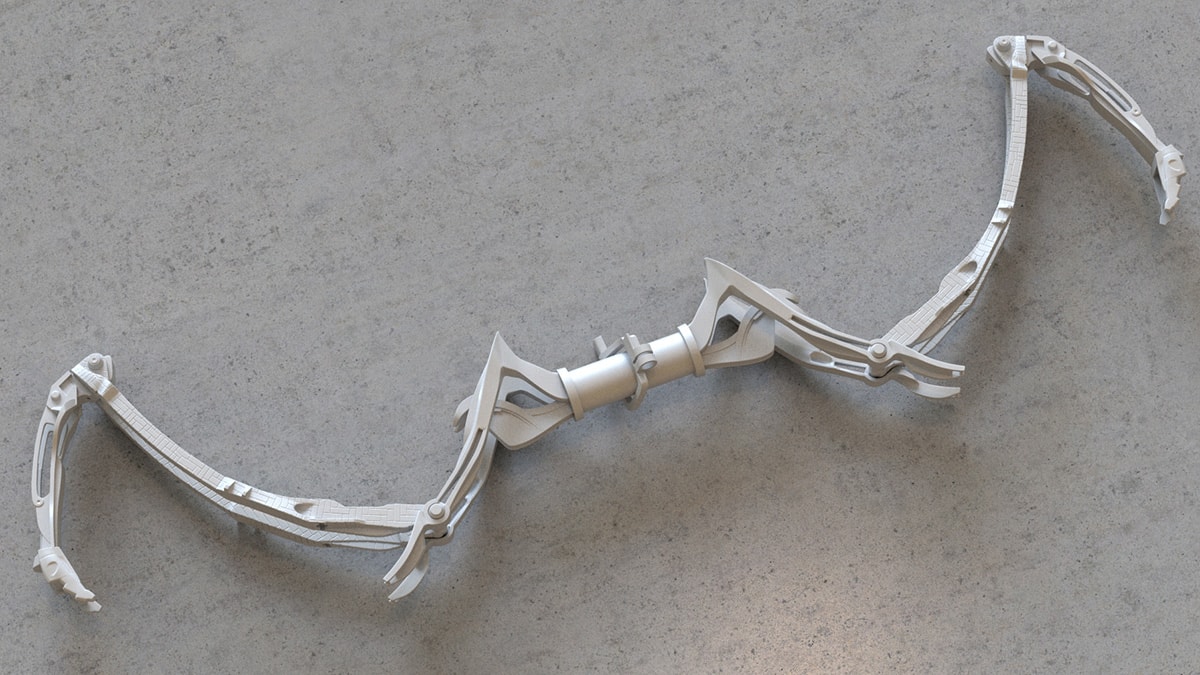
The bow 3D model
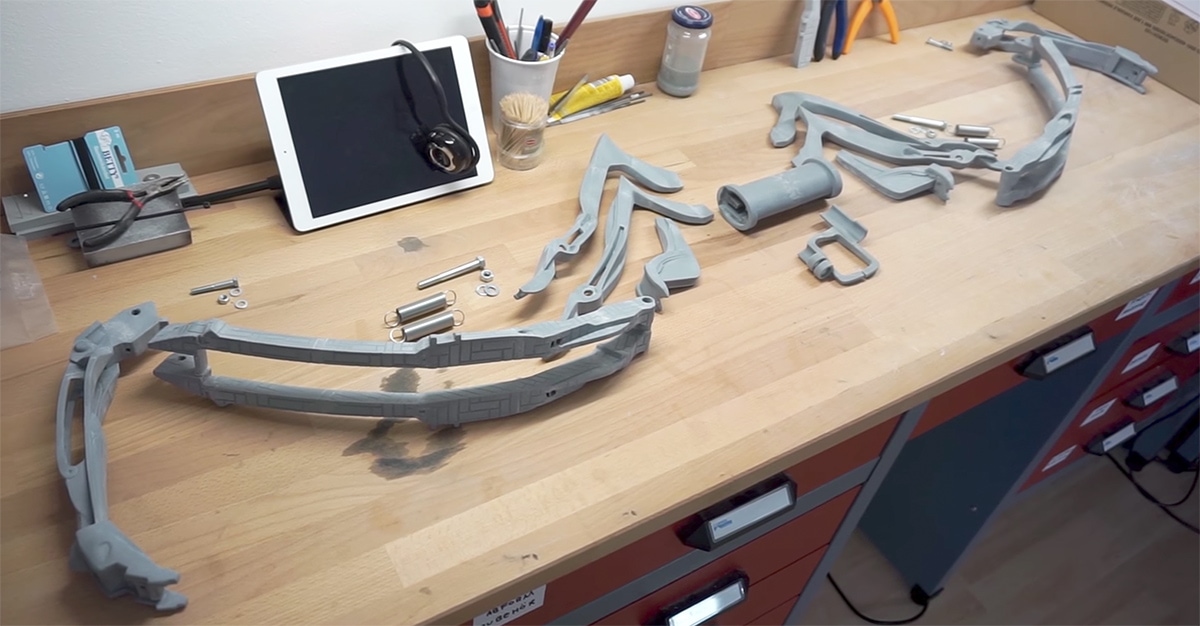
So, next Jakob used the screenshots Benni made in the game and was busy sculpting the bow from scratch. He mainly sculpted it in Maya and it took him 40 hours to create over 40 separate pieces, so they would fit into our machines. Afterwards our Zortrax M200 spent a full week printing all pieces out. Since we were running out of time, Benni even set his alarm in the middle of the night to start the next print.
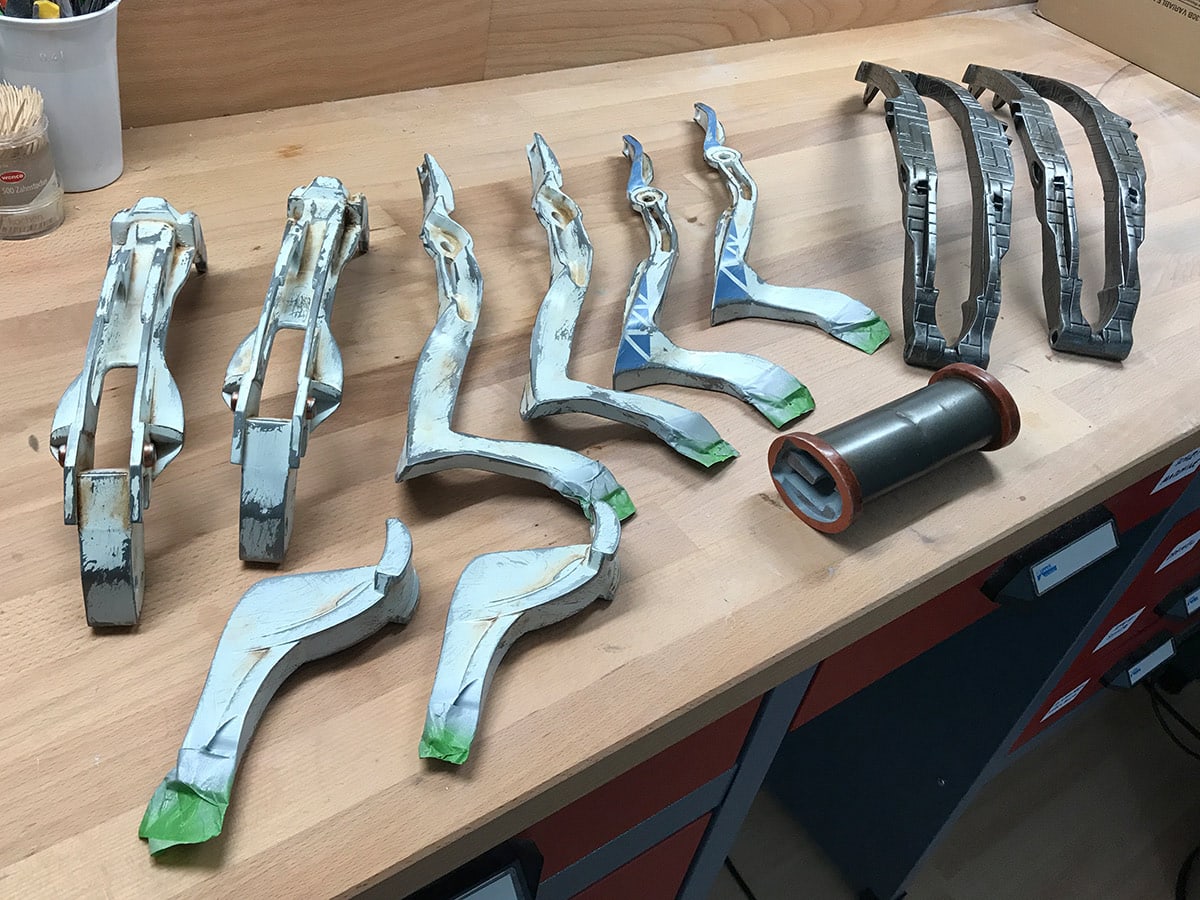
After getting rid of the support material, sanding everything and assembling all pieces for 3 further days, this was the printed result. You might discover some springs and screws on the picture as well. These were added to provide the rotating mechanism of the bow.
Once all pieces were assembled, this was the first test. The bow moved naturally and bent once I pulled the string. So it looked actually like it would be possible to shoot an arrow with it. In reality however the 3D printed plastic was too fragile and weak to create enough power for an actual shot. Still, it looked pretty convincing!
The paint job
As mentioned a few times, we were pretty stressed to finish the bow. I wanted to bring the costume to Pixelmania. Sadly though only a single day was left for the painting, weathering, details and add the final bow spring. Being a pretty effective team, we shared all steps and worked nonstop to finish the bow in time. Priming, airbrush, masking, more airbrush and weathering! All in one day!
And well… we managed it! :)
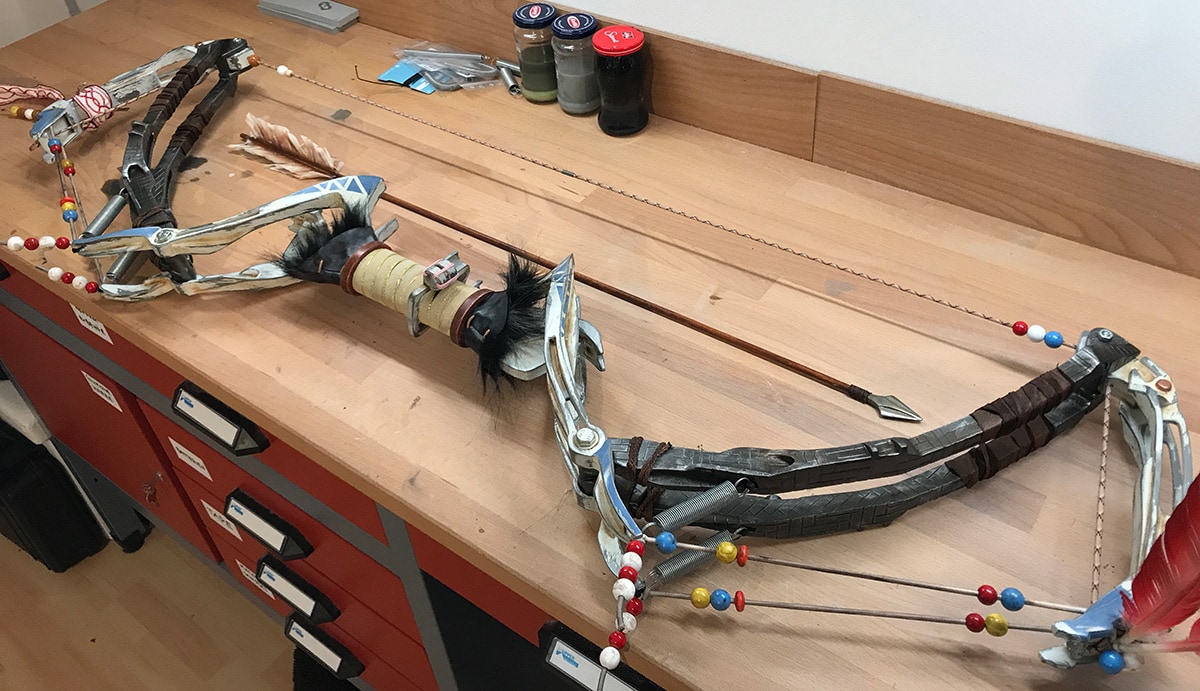
The Shadow Sharpshot Bow is truly one of my coolest props now. I was so proud and thankful to Benni and Jakob for building this amazing piece of art for me!
If you’re interested in building this bow yourself, you can find the Sharpshot 3D model in our shop.
So, and here is the final making of video of the bow!
By loading the video, you agree to YouTube's privacy policy.
Learn more
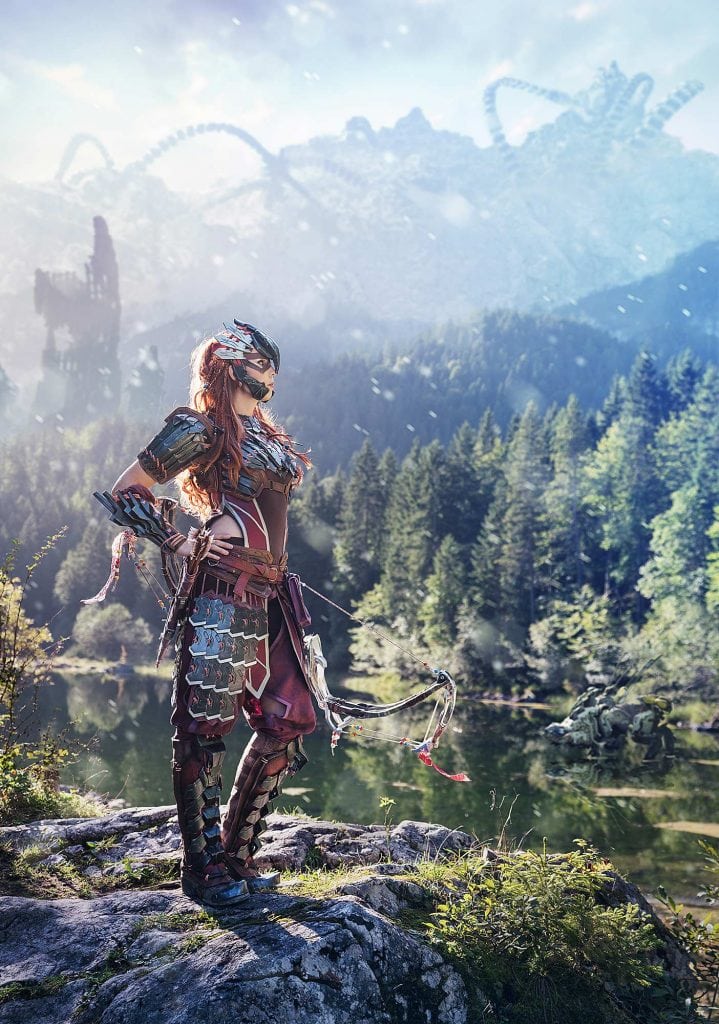
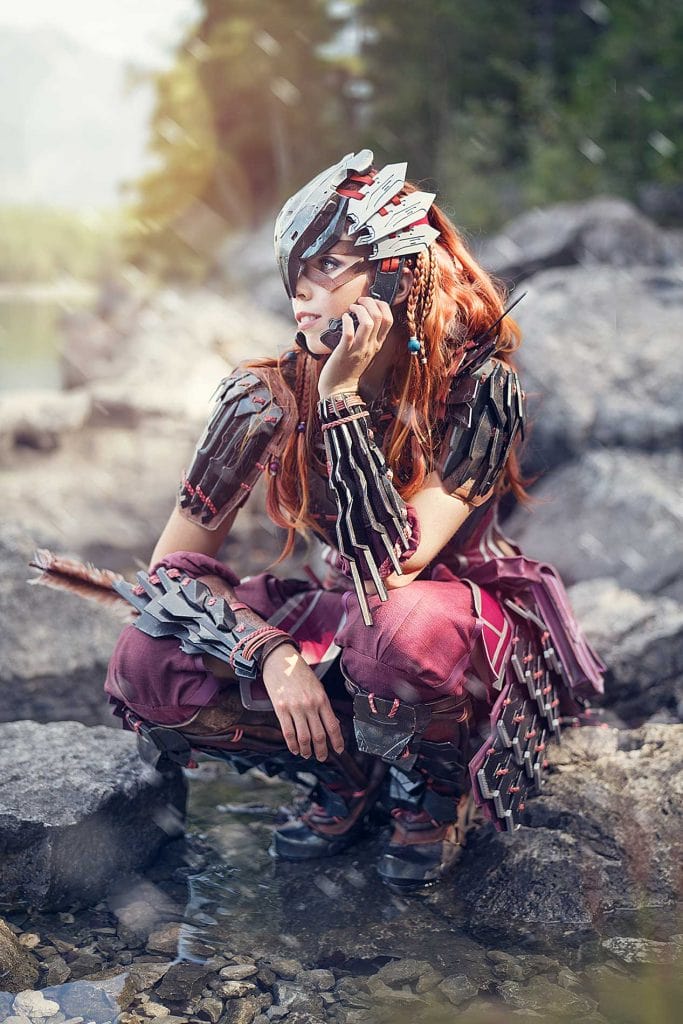
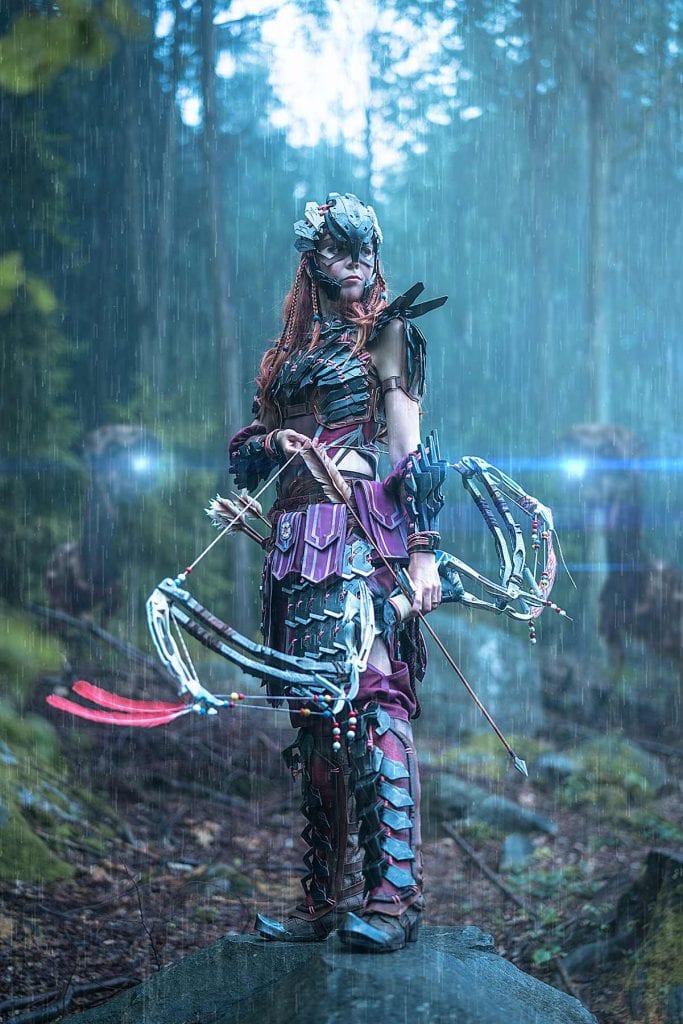
The final photoshoot
Creating the Shadow Stalwart armor took Benni, Jakob and me 3 months. It was a team effort and I know it wouldn’t have been possible without them. We all learned a lot, refined our skills and discovered new techniques and materials for upcoming projects. Aloy was one of our most challenging projects, but we still had a lot of fun creating this costume! Additionally I’m just a huge fan of Horizon Zero Dawn. It just felt amazing to walk in Aloy’s shoes through the woods. Finally, I only had to pull the bow string could bring her to life through Benni’s amazing photos. Here are a few of them:
We use Amazon Affiliate links. If you buy something we might get a small commission. Thanks for your support! Learn more.


Your work is amazinggggggggggg!
Many thanks for such a important . Excellent information
That look so cool, excellent information!!! Thank you so much
Such a wonderful piece of art! much appreciated. must took tons of hard work and passion.
Oh. My. Gosh. This is one of the best things I’ve ever seen I am so in love with this cosplay 😍😍😍
Impressiiiiiiiiiive. A huge congratulations.
I think you should make a costume from Naruto
You would be great at the Headband Kunai and shurikens
Wish I could just apprentice under you for a year!!!!
Your work is amazing and you are inspiring.
Thank you.
Wooooow!!! Great job! I just love this game, and Aloy is such a rewarding character to play. You, Benni, and Jakob have done her justice.
That is inspirational and amazing work! Way to be!
So cool. Just. Amazing. A++
Holy crap!! That look so cool!! I wish I had skills… to cosplay as Aloy…